Connection Troubleshooting
Can't Connect Laser to Computer
First steps:
- Make sure your laser is turned on
- If your laser has an Emergency Stop button, make sure it's released, typically accomplished by twisting the button
- If you're connecting with a cable, make sure it is plugged in securely on both ends
- Close any other control software that might be communicating with your laser
- Make sure you've selected the correct device in LightBurn, and that the controller type and connection method are correct
If you still can't connect to the laser:
Laser Doesn't Stay Connected To Computer
If your laser connects to the computer but doesn't stay connected, please try the following:
Laser Behaves Unexpectedly
If your device is restarting when you try to use it, you are most likely experiencing either communication problems or brief losses of power. This is often visible when a device set to home on startup homes unexpectedly. Please try the following:
If you're experiencing unexpected behavior from a device not originally intended as a laser, such as a diode module mounted to a 3018 CNC router, you may need to adjust the settings:
Laser Is Connected, But Not Responding
If your laser appears to be connected to the computer but is not responding, try the following:
- If your device has a screen, check for error messages or alarms
- Some enclosed lasers have sensors to detect if the lid is open, and will not run until the door is closed and the error is cleared
- Some lasers with water cooling have sensors to detect the flow of water, and will not run if they don't detect water flow
- Check to see if the correct serial port is selected, if relevant
- For GRBL devices, check the Console Window for Errors and Alarms
Transfer Failed
If LightBurn is unable to transfer the file to your laser, you'll see the following error message:
There was a problem sending data to the laser. The machine may be busy or paused.
- If you're using a device that requires selecting a COM port in the Laser Window, make sure the correct COM port is selected. Other devices connected to your computer may also show up as COM ports, but LightBurn won't be able to connect to them. You can confirm that the COM port selected is the correct one by disconnecting or turning off your laser - if the COM port disappears when you do so, it's the right one.
For DSP (Ruida, Trocen, TopWisdom)
DSP lasers have some additional things to check.
- If you're connected over USB and have the ability to connect over Ethernet, try an Ethernet connection and see if it makes a difference. If it does, you're having USB connection issues and may need to replace your USB cable.
-
If you're using an ethernet connection, it's possible that the IP address you configured in LightBurn no longer points at the the laser. To test this, you can ping the laser. Click the blue box below for directions. If your computer can't communicate with the laser over the network, LightBurn won't be able to either.
Testing network connections
I'll use the IP address
192.168.2.201as a placeholder, but you should replace it with your own laser's IP address.- Go to Device Settings - Basic Settings and find the IP address you used for your laser.
- Open the command prompt. You can do this by opening Power Shell on Windows or Terminal on Mac.
-
With the laser on, run the following command:
ping <IP_ADDRESS>, so in my example it would beping 192.168.2.201.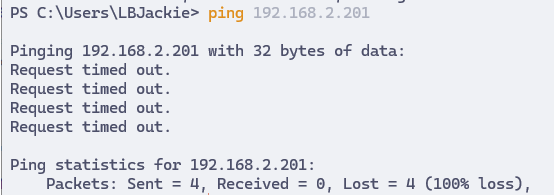
A ping that failed to connect. No devices are present at the specified address. 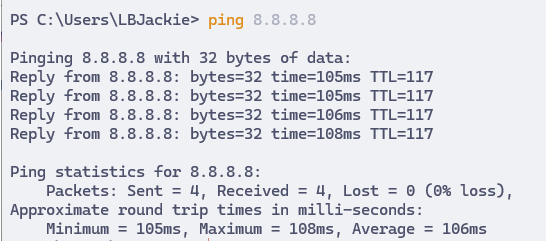
A successful ping. There is a device at this address. -
If you had an unsuccessful ping, your computer can't see your laser on the network. Make sure the IP address matches the one set on the controller.
- If you had a successful ping, it's possible that another device on your network is using the IP address and is interfering with communications. Turn off your laser and try again - if you still get a successful ping, it's coming from something other than the laser. Change your IP address on both the laser and in Device Settings.
-
It's possible that your laser is running out of storage space, preventing LightBurn from sending the file. Try clearing existing files off the controller. Controllers vary, but typically you'll want to find File → Delete All in the on-screen menu. You should be able to find the exact method in the user manual for your laser or controller.
- Extremely high resolution engravings are sometimes rejected by the controller. Resolutions above 254 DPI (equivalent to Line Intervals below .1mm) have diminishing returns in terms of image quality. Try reducing your resolution and see if the problem is resolved.