Graham Cracker Houses
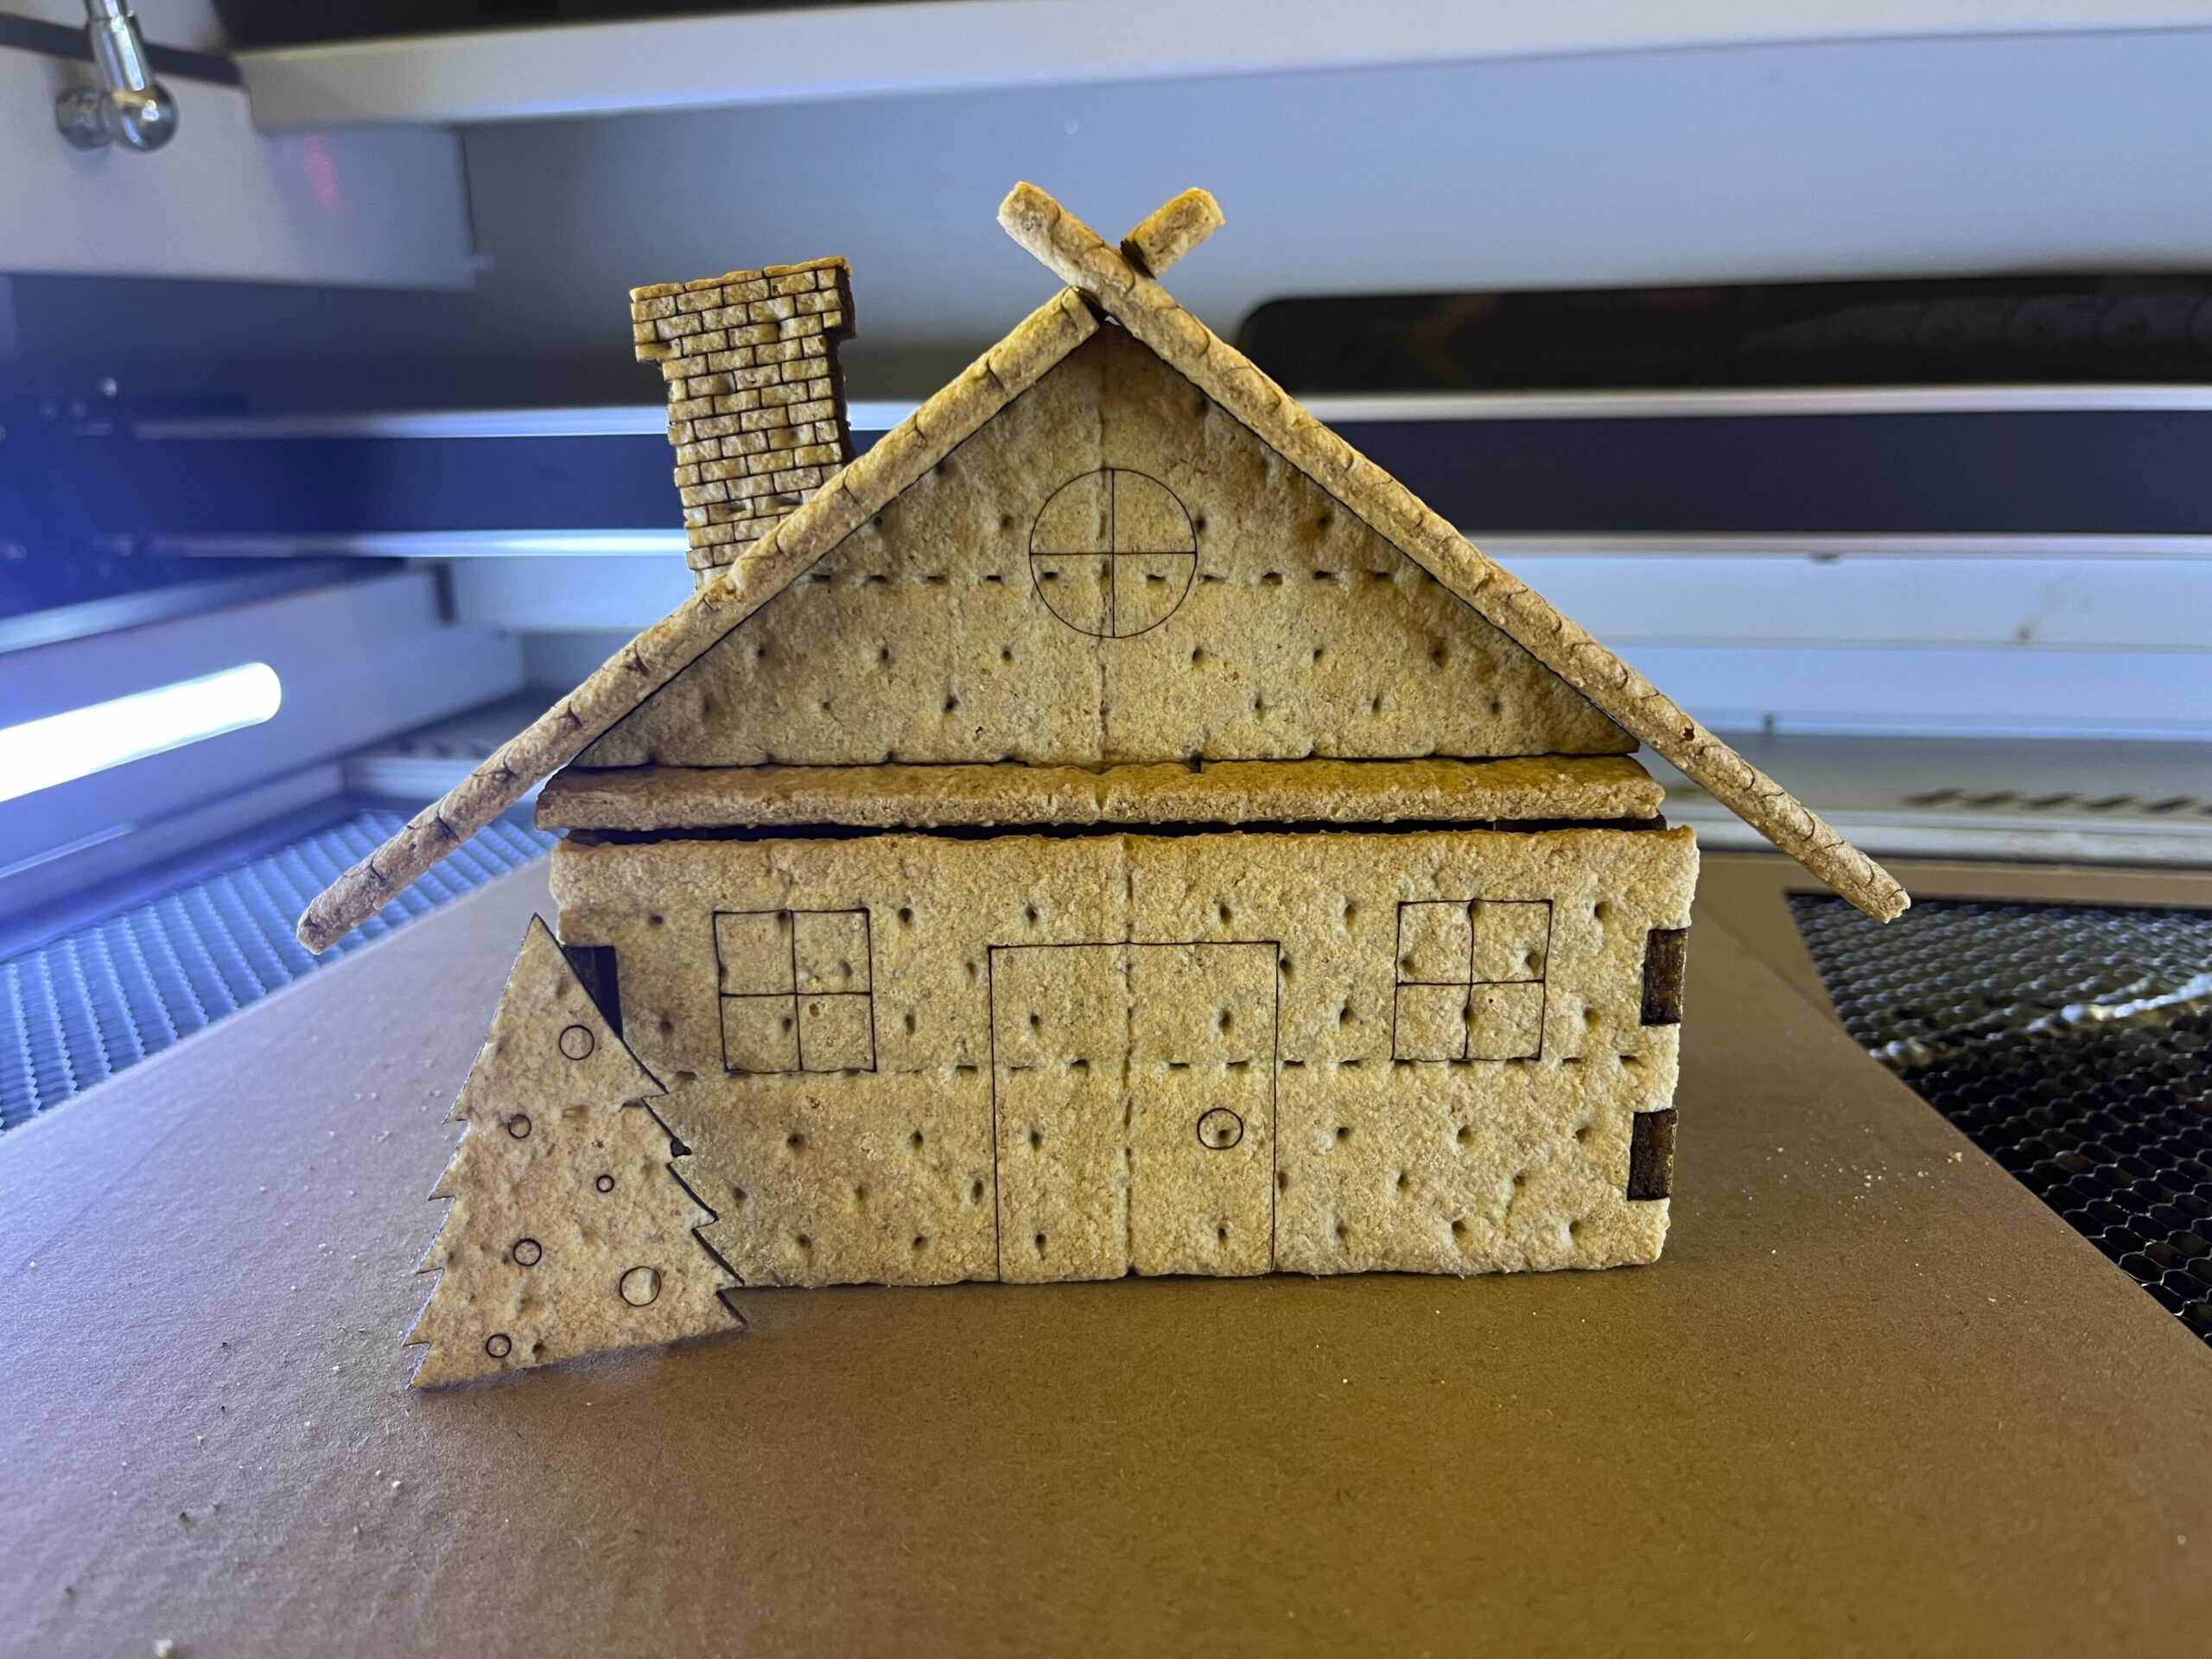
To celebrate the holiday season, we designed and made these small, simple, and, in our not-so-humbug opinion, utterly delightful graham cracker houses. We used graham crackers instead of gingerbread because they're relatively flat, uniform, and available in any grocery store. Making gingerbread just takes too much time we'd rather spend lasering. While this project might seem like pure holiday frivolity, stay frosty and you'll also learn a thing or two along the way.
What You'll Learn
In this guide, we'll cover several design and layout techniques, including:
- Using Tool Layers to represent material and serve as guidelines in your LightBurn workspace
- Using snapping behaviors for alignment and positioning
- Patterning with the Grid Array tool
- Modifying designs with Offset, Cut Shapes, Weld, and Edit Nodes
- Using the Offset tool and Cut Selected Graphics to create a jig for your project
- Aligning your output to the jig using User Origin or Current Position
Materials
- Graham crackers of any size
- Cardboard to create a jig (optional)
- A laser capable of cutting through your graham crackers
- LightBurn, of course!
TODO: A video goes here
Steps
1. Make a Graham Cracker Template
We'll start off by making a template to represent a single graham cracker in our LightBurn workspace.
-
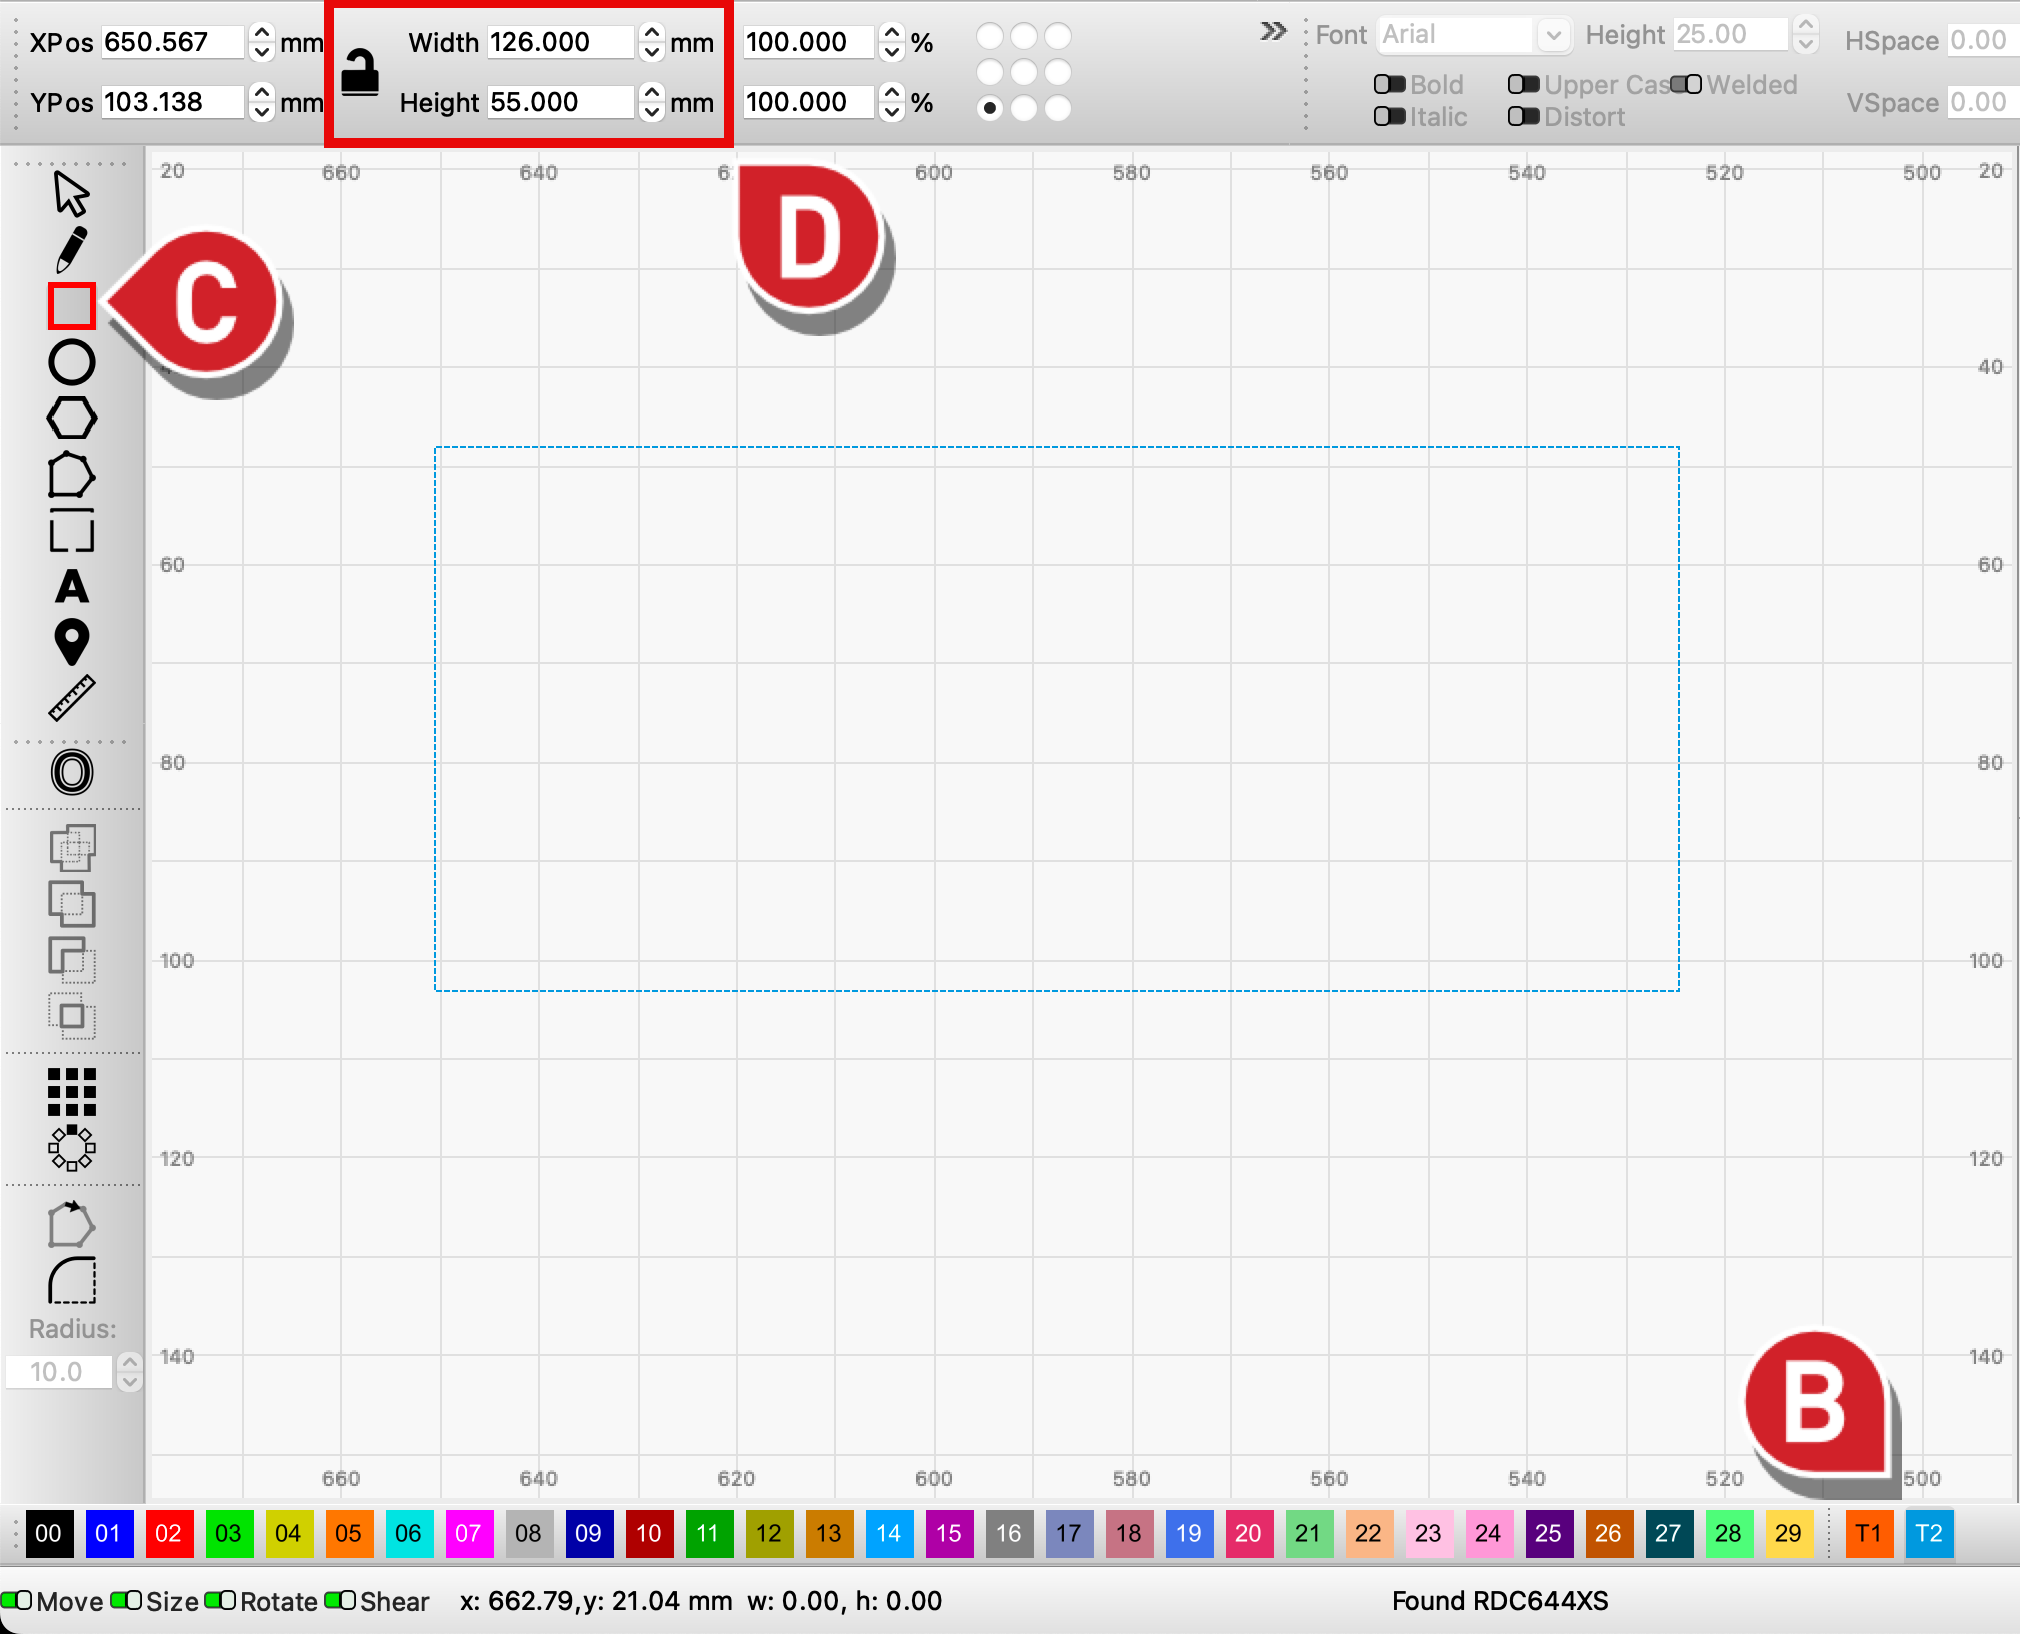
Measure one of the graham crackers you'll be using. You'll need to know its length, width, and thickness. We'll be using 126 x 55 x 5.5 mm crackers, but any size cracker will work with some modifications. A bit of rounding is ok for this project.
-
In LightBurn, select a Tool layer.
-
Create a rectangle using the Rectangle tool ( Ctrl+R / Cmd+R ).
-
Adjust its dimensions in the Numeric Edits Toolbar, matching the length and width to the measurements you took of the graham cracker. Make sure the lock icon is unlocked so you can adjust each dimension independently.
2. Add Guidelines for Tabs
Now we'll add some additional objects set to a Tool layer to serve as guidelines for snapping and alignment.
-
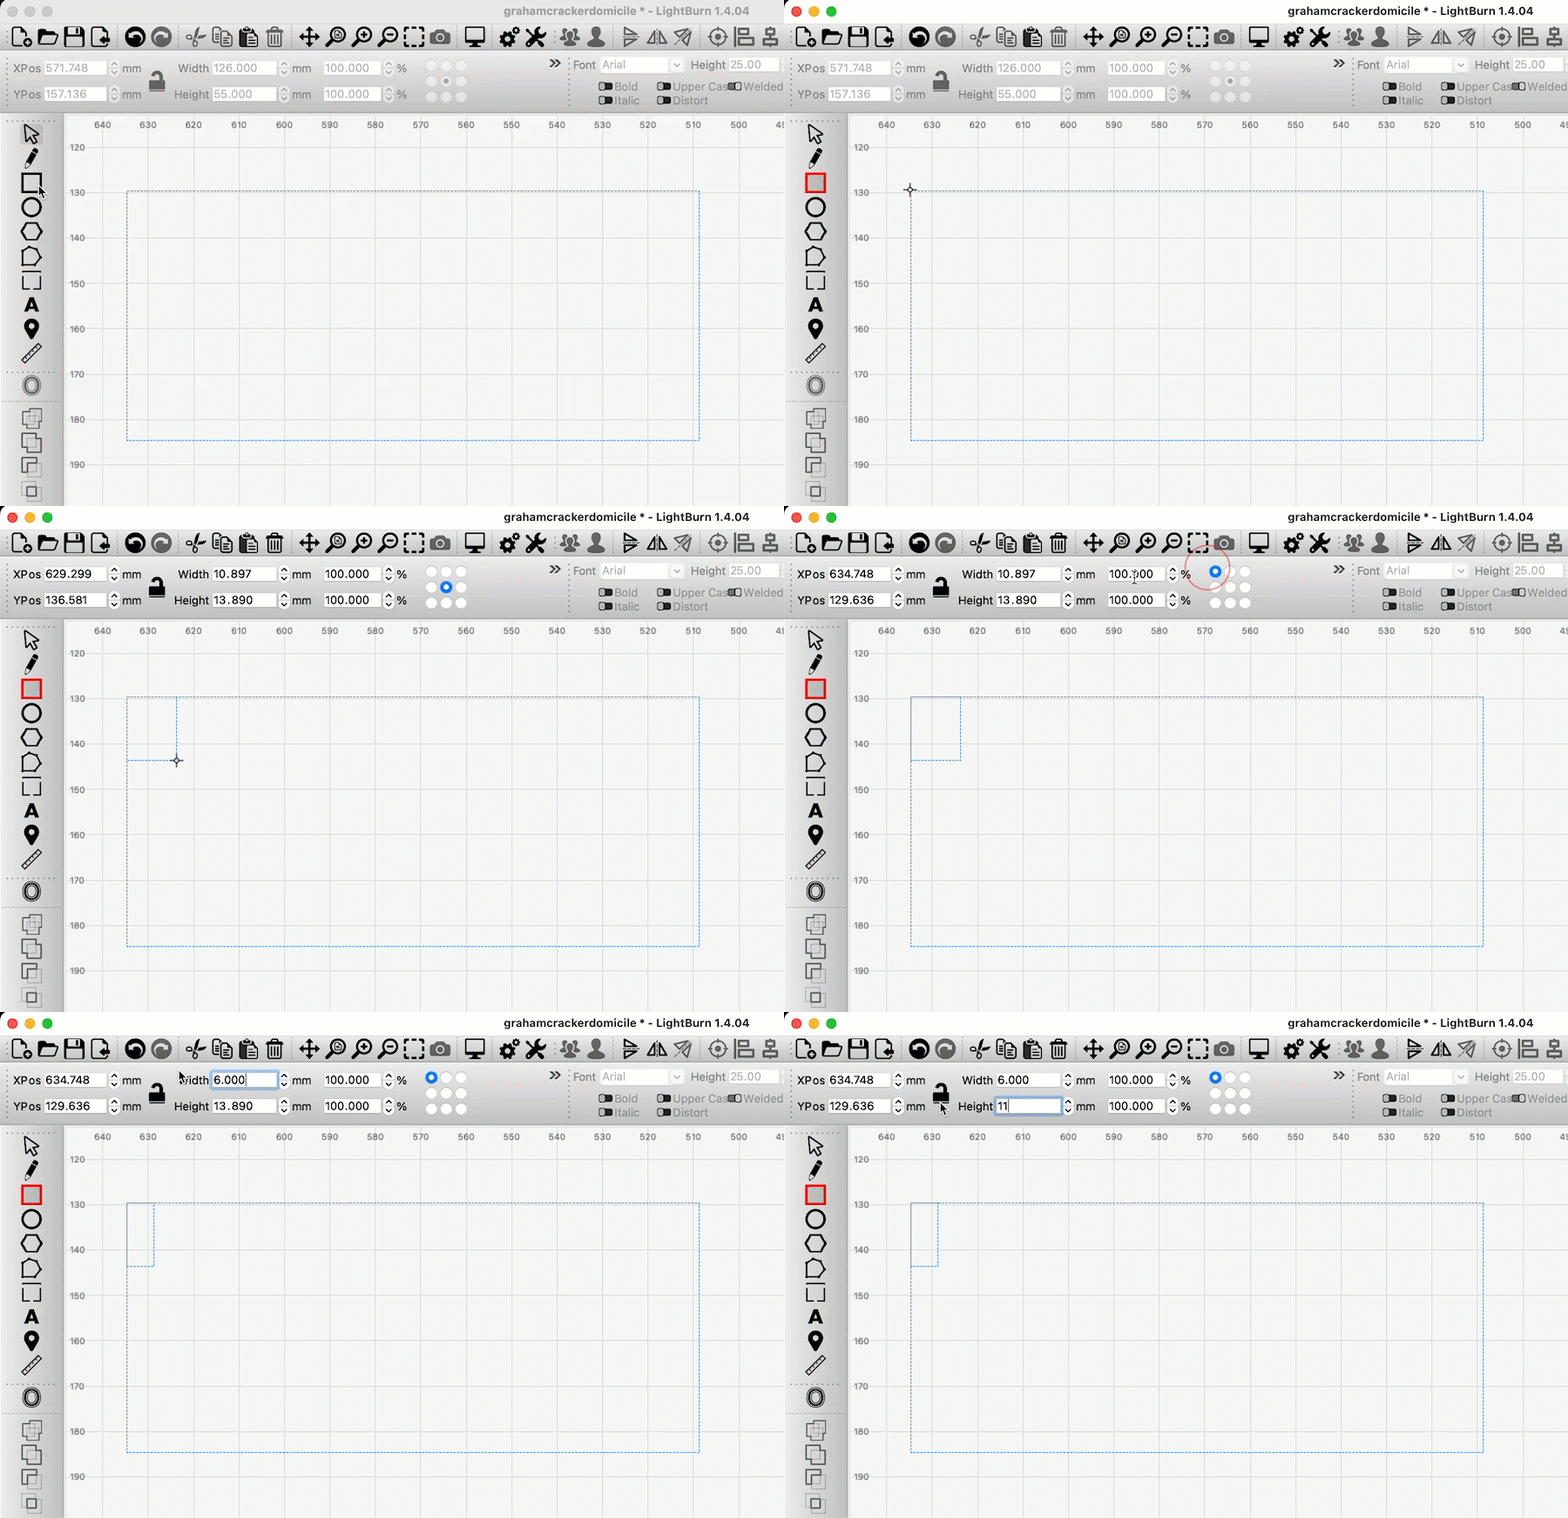
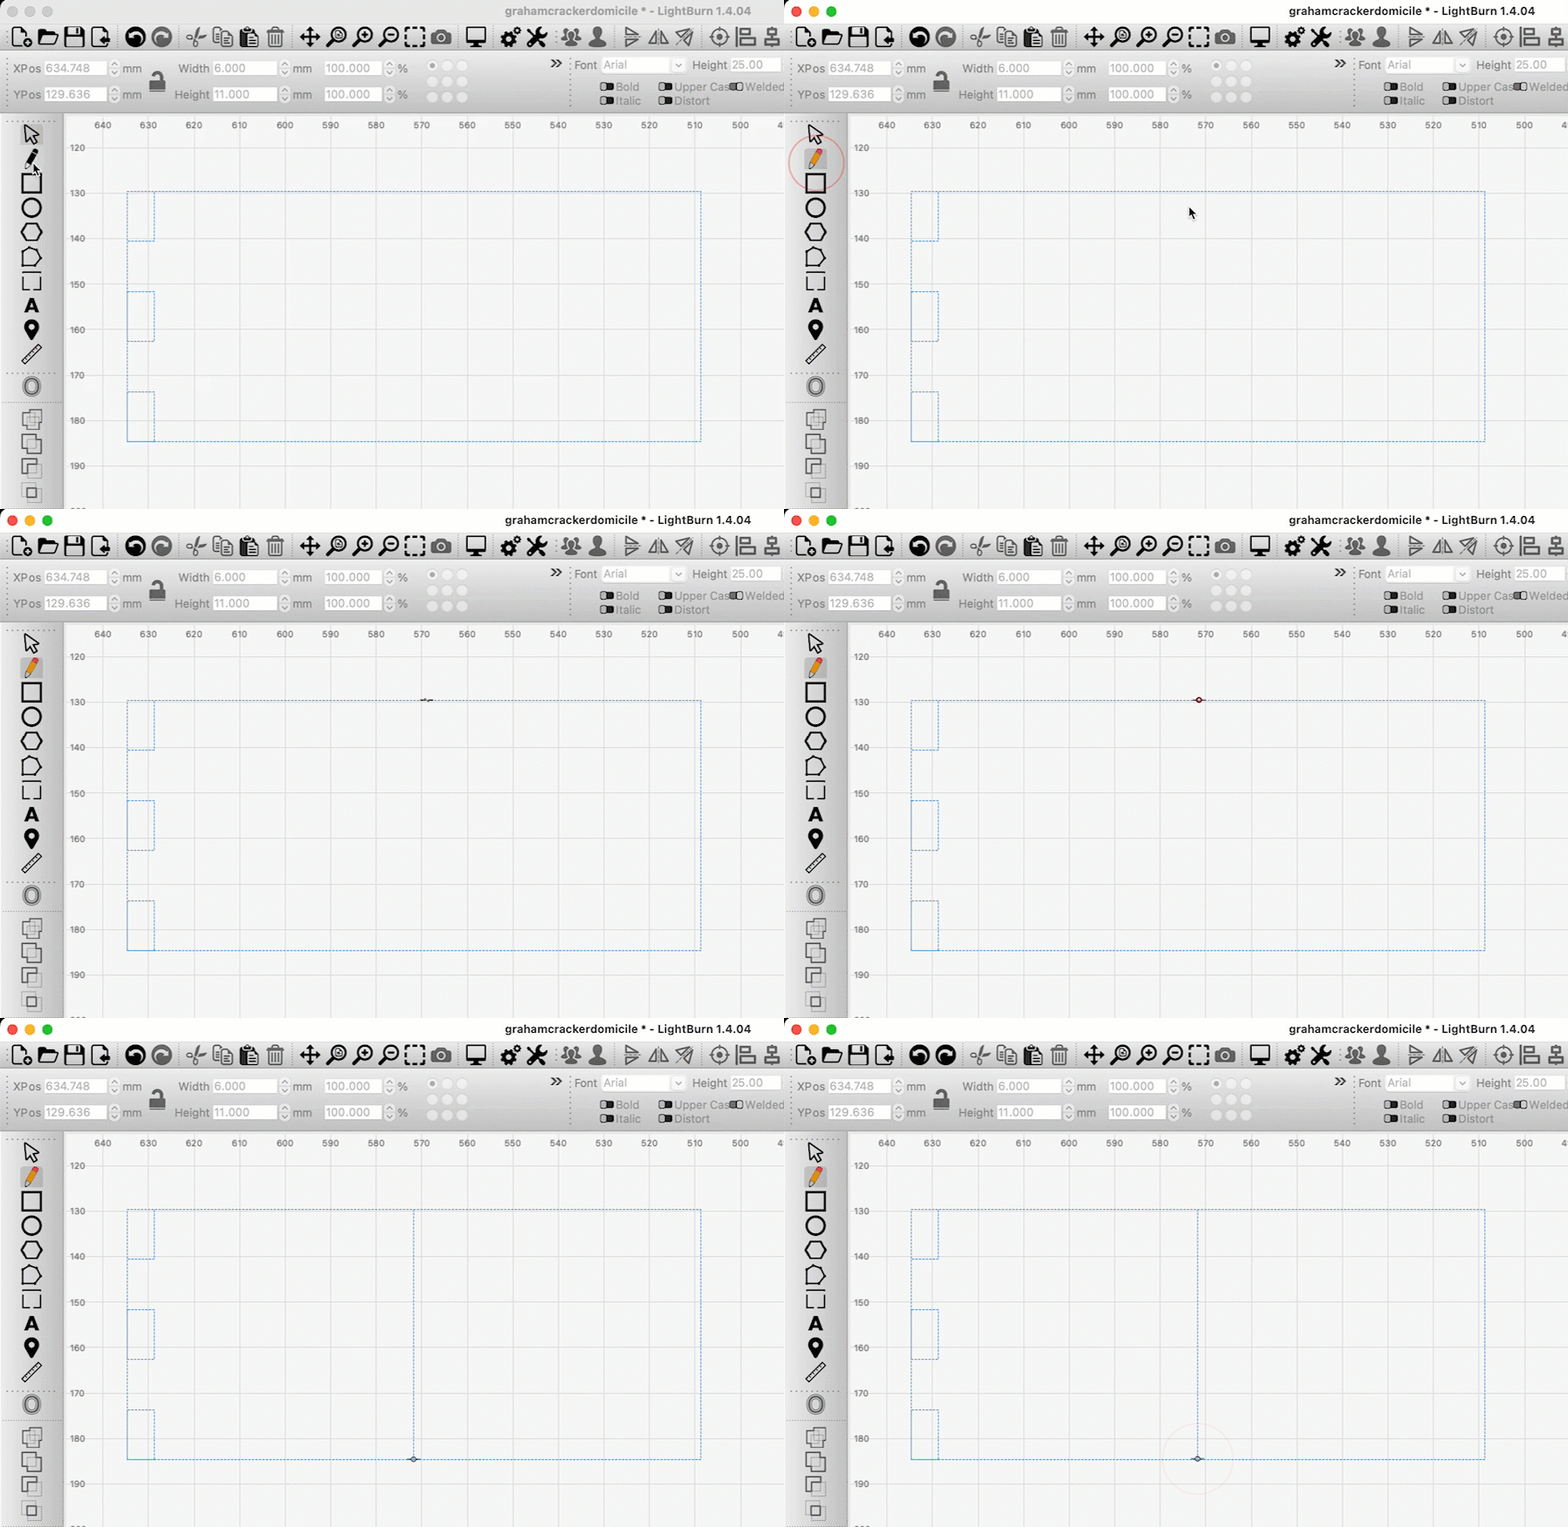
Create a new, smaller rectangle, starting from the top left corner of the large rectangle. As you start the rectangle, make sure you see the crosshair icon indicating that the start will be snapped to the corner of the large rectangle.
-
Then, divide the large rectangle's height by 5, and set the small rectangle's height to that value (11 mm in our case). Set the width to a number that's a bit larger than the thickness of the graham cracker (6 mm in our case). Before you adjust height and width, make sure the 9 dot control button is set to the top left corner — that will anchor the shape at that point.
-
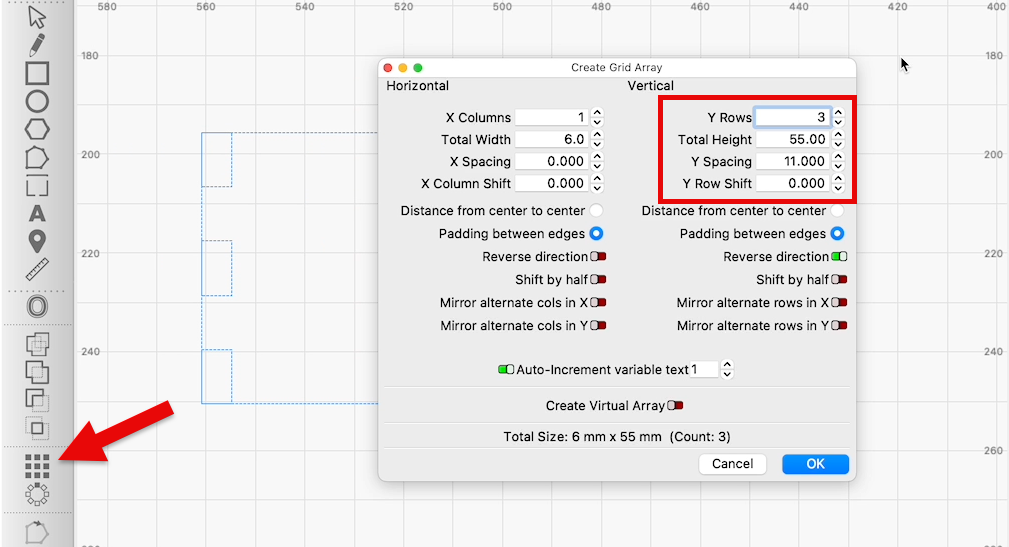
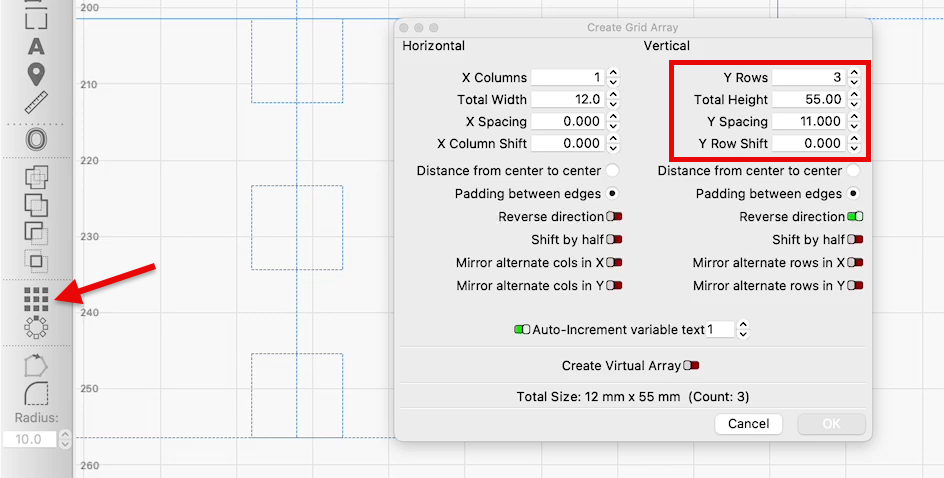
Select the small rectangle, then click the Grid Array tool. Create 3 Y Rows, with Y Spacing set to match the height of the small rectangle, and Padding between edges selected. You'll also need to enable Reverse Direction.
-
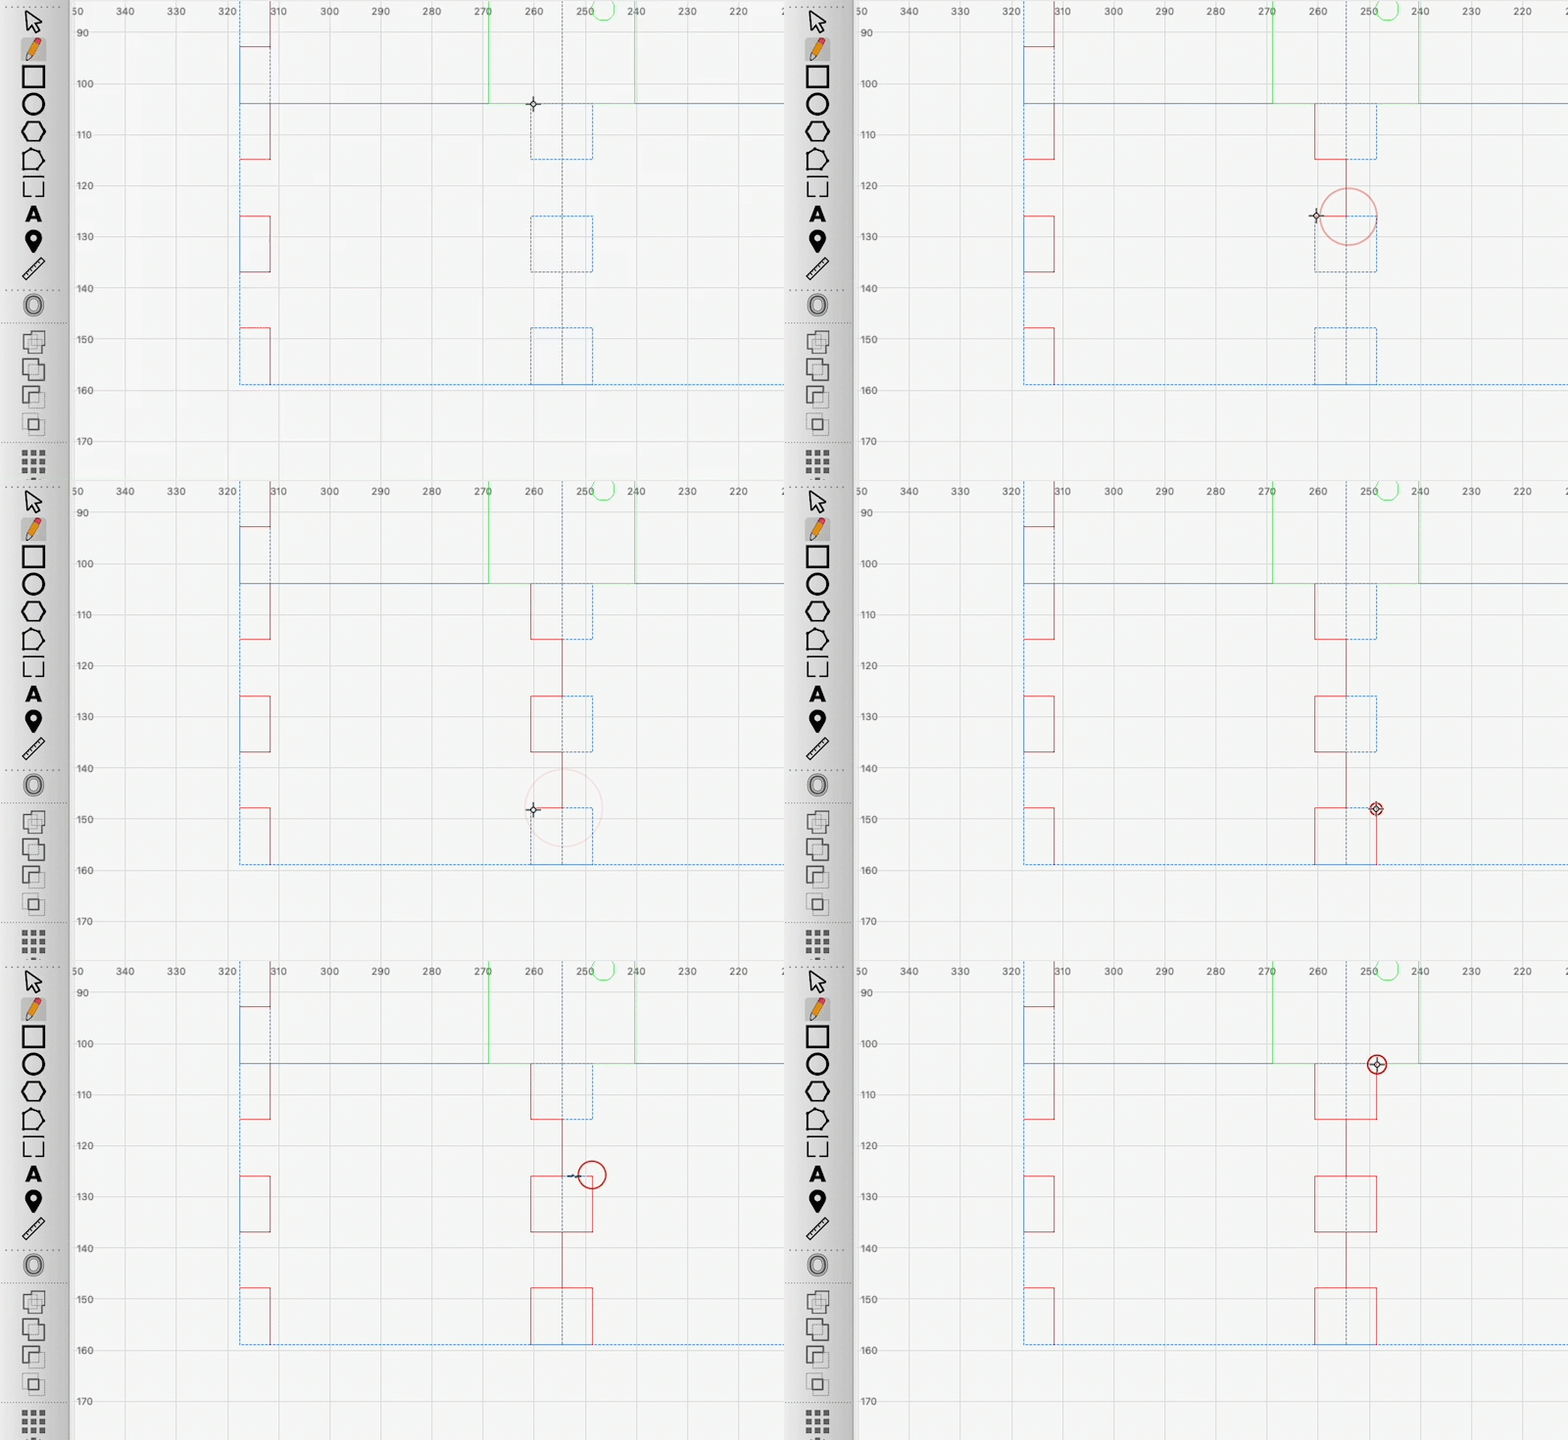
Select the Draw Lines tool ( Ctrl+L / Cmd+L ) and hover over the top center of the large rectangle, moving your cursor over the line until you see the midpoint snap icon appear. When you see the icon, click and extend the line down to the bottom, making sure you see the midpoint snap icon again at the bottom before clicking to release. Press the ESC key to finish drawing that line.
-
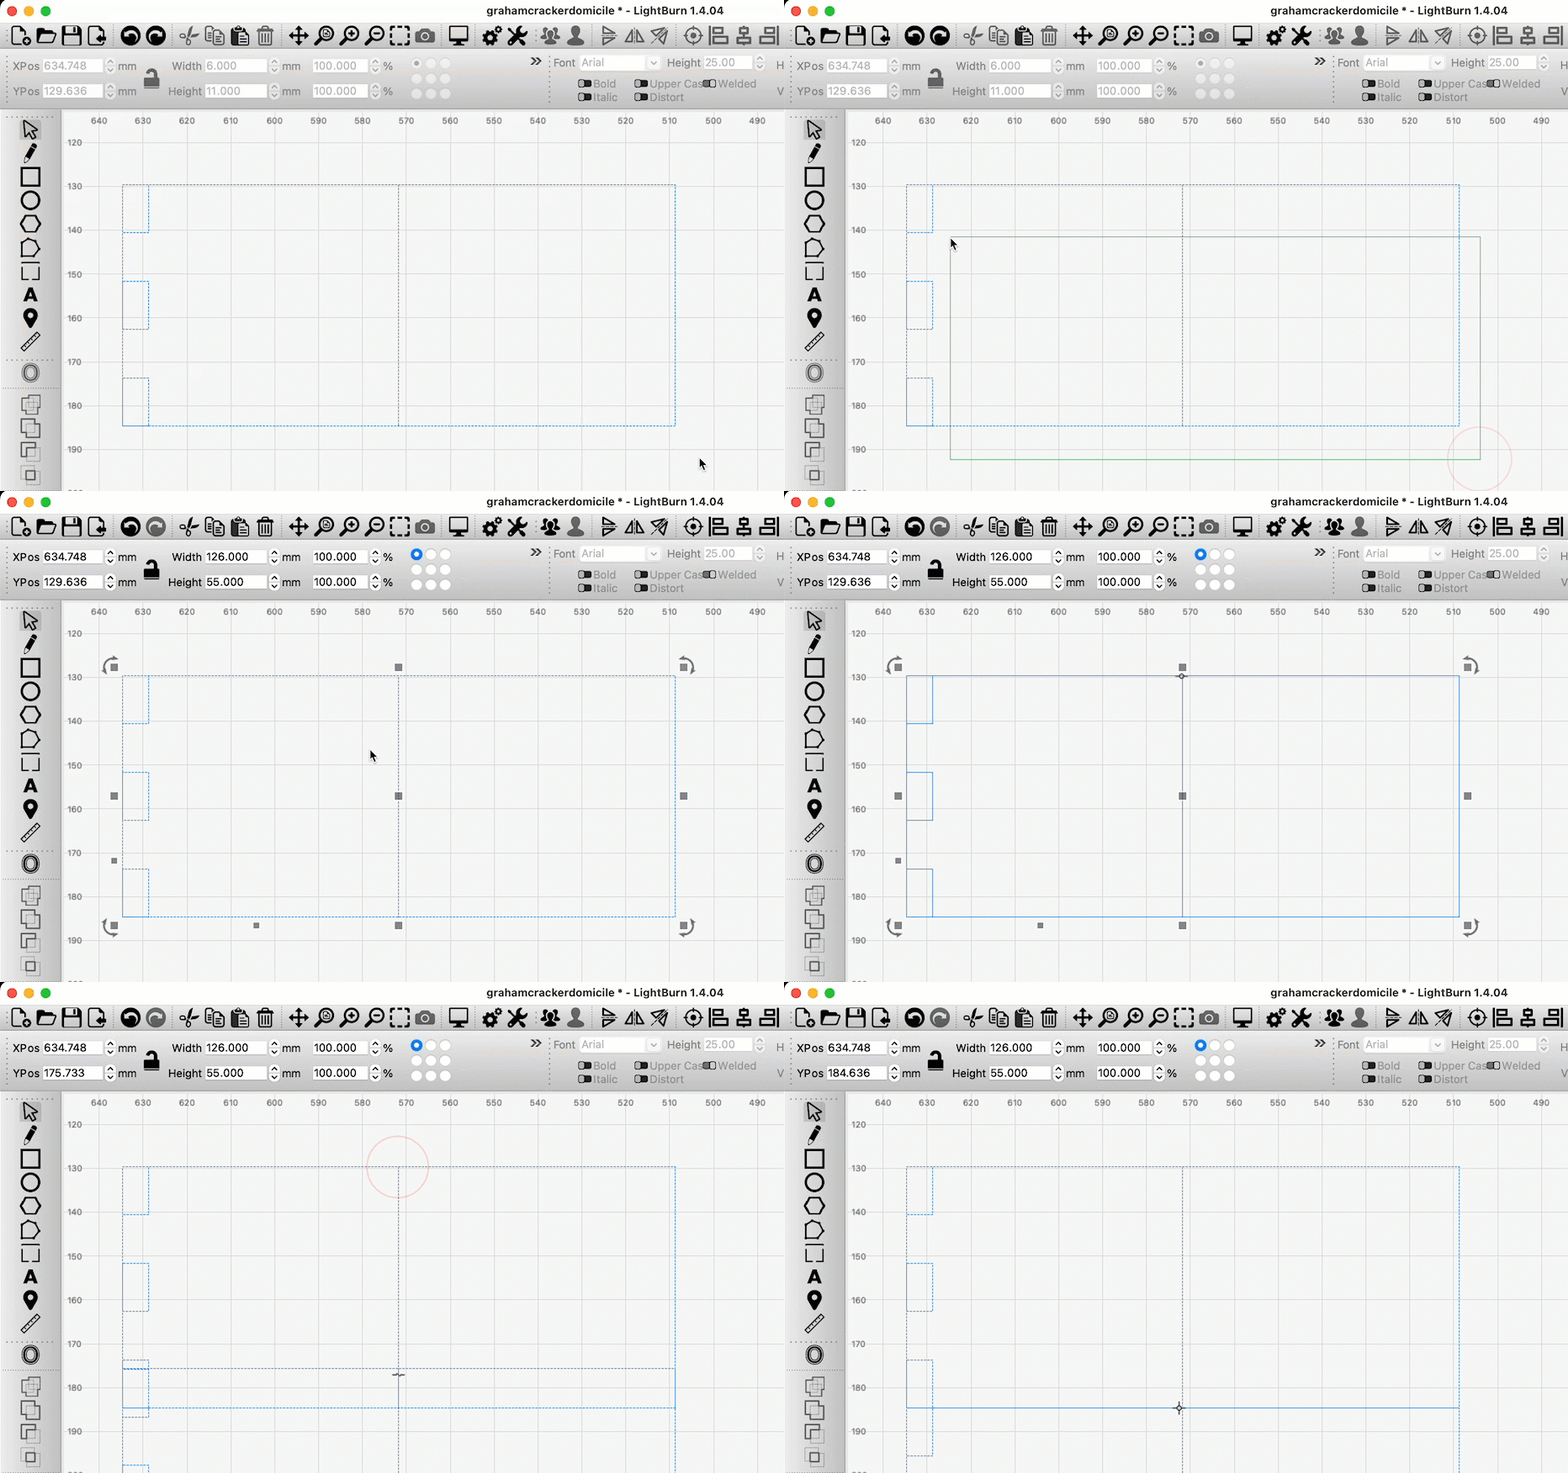
Select everything we've made so far, and Duplicate it ( Ctrl+D / Cmd+D ). Select the duplicate from its top center (click where you see the midpoint snap icon) and drag and snap it to the bottom center of the original. We'll come back to this piece in a bit.
3. Front and Back Walls
So far, all of the objects we've made are set to Tool layers, meant to serve as guidelines. Now, we're going to be creating some actual cut lines we'll be sending to the laser.
-
Change the selected layer to one you like to use for cutting, and enable the Draw Lines tool.
-
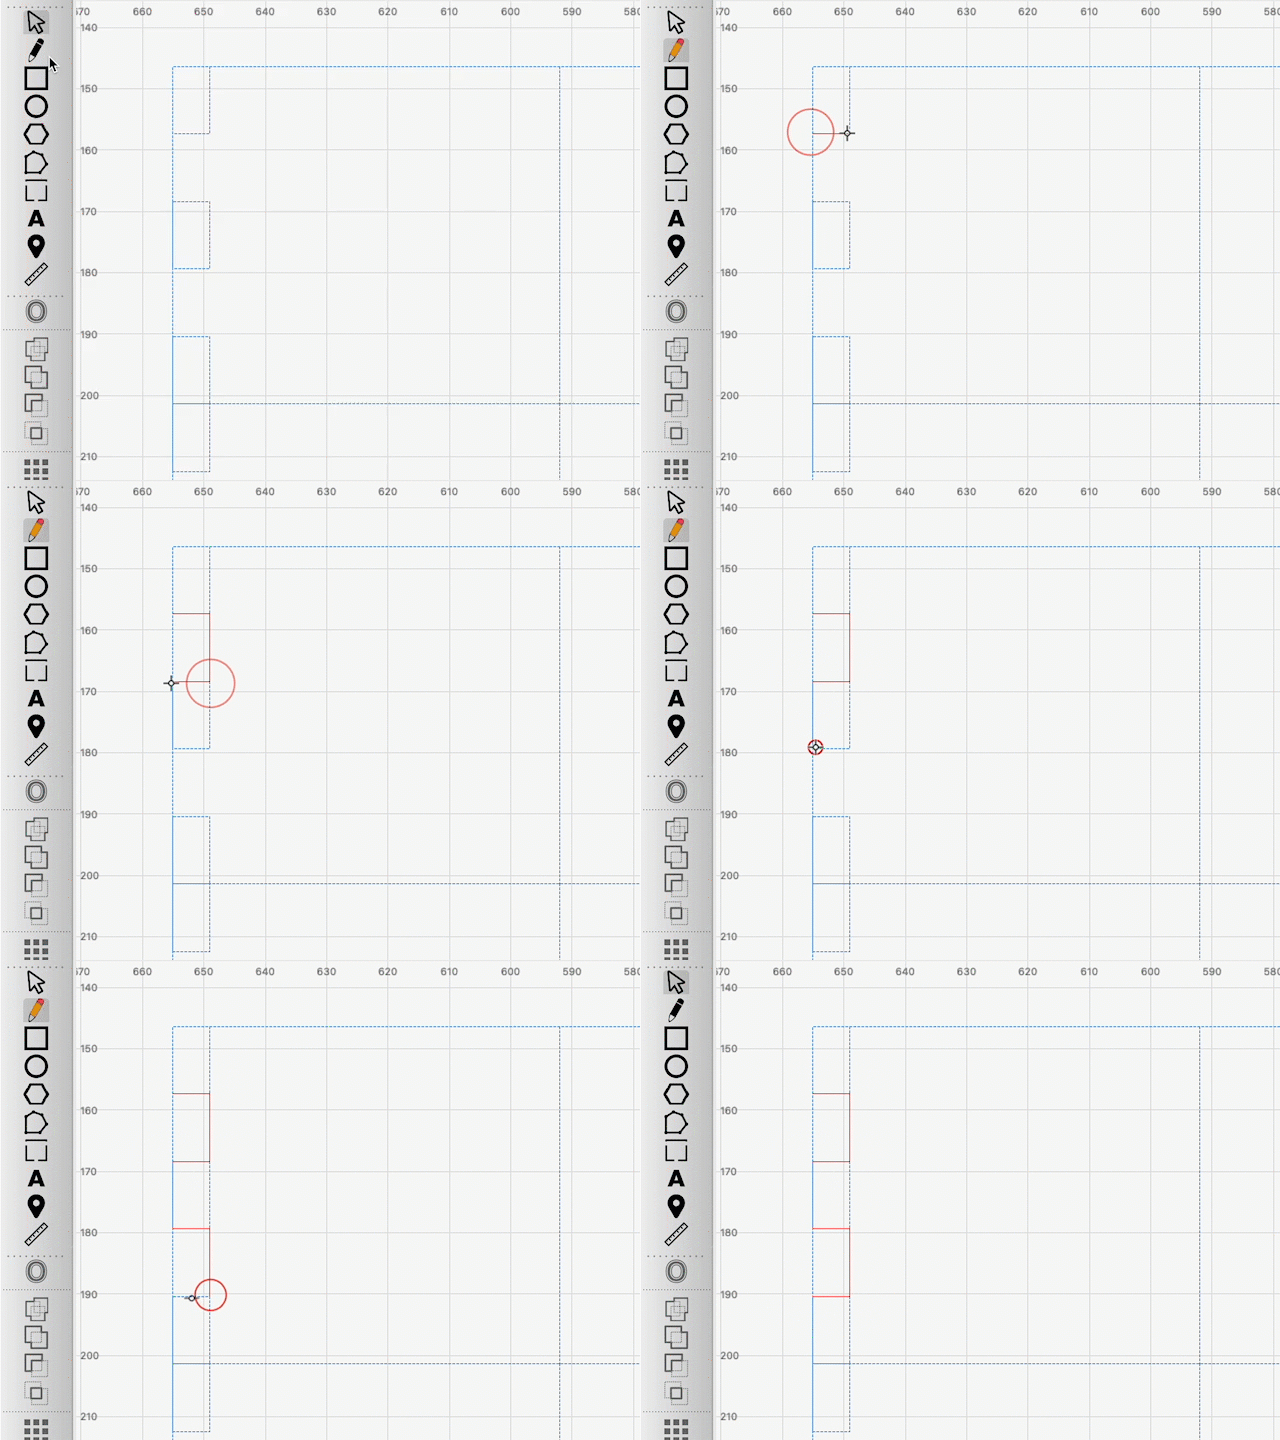
Utilize snapping to start a line at the bottom left corner of the topmost small rectangle — you'll see a crosshair icon when your cursor is over a corner node that you can snap to. Create a line going from that corner to the right corner (again utilizing snapping), then down to the top right of the next rectangle, and finally over to the top left.
-
You should have a red, reversed “C” shape between two of the small rectangles. Notice we're creating only the lines we need to cut away a bit of the graham cracker and create tabs. The outer Tool layer shows us where the graham cracker will be, and where we don't need to cut.
-
Repeat the above process, going from the bottom of the middle rectangle, down to the bottommost rectangle.
-
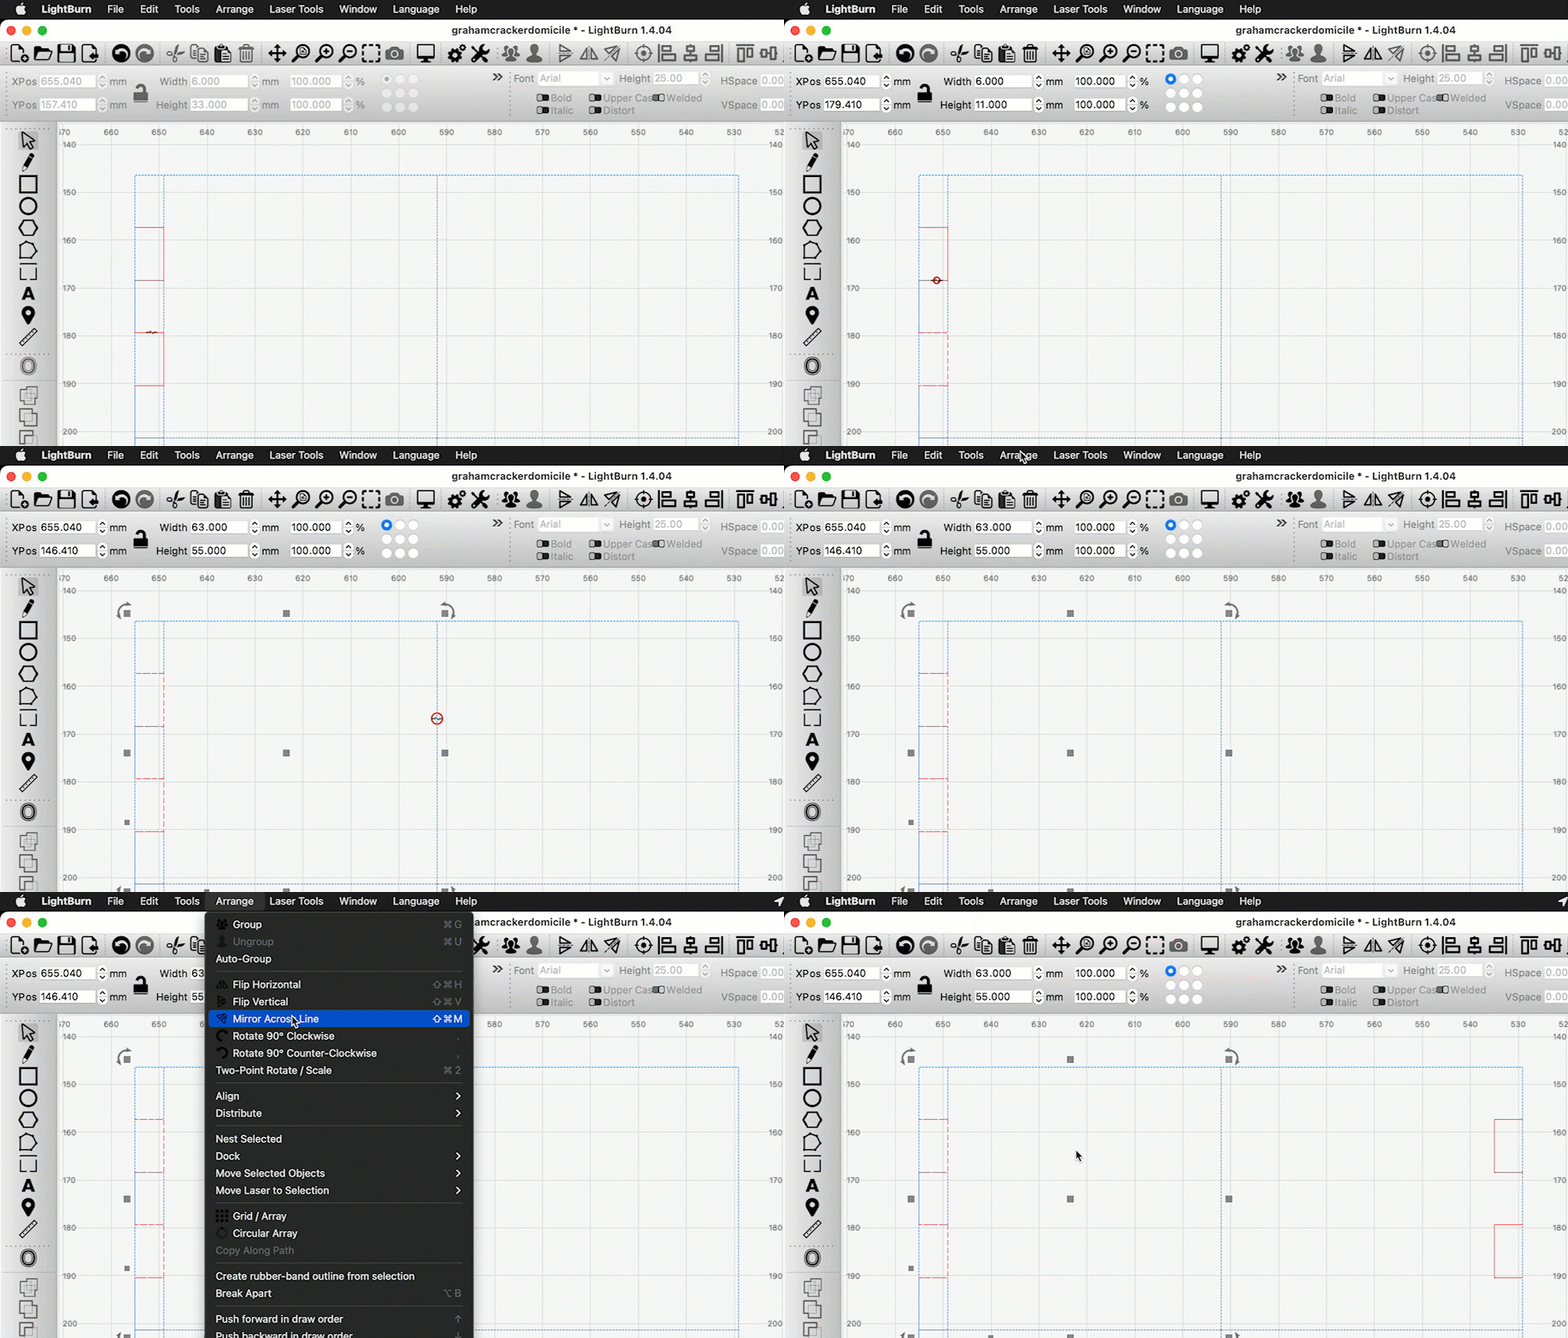
Select both reversed “C” shapes, then select the line we created earlier down the middle of the large rectangle. You can hold Shift while clicking on additional graphics to add them to your selection without losing your current selection. Order of selection matters for this next step, so make sure you follow that exact order.
-
Go to Arrange → Mirror Across Line ( Ctrl+Shift+M / Cmd+Shift+M ). Duplicate “C” shapes will appear on the opposite side of the large rectangle.
-
Duplicate everything and Group it ( Ctrl+G / Cmd+G ), then set it off to the side. You can snap the center right side of the duplicate to the center left side of the original. We'll use these templates to make the front and back walls of our house, and return to the front wall a bit later to add some decorations.
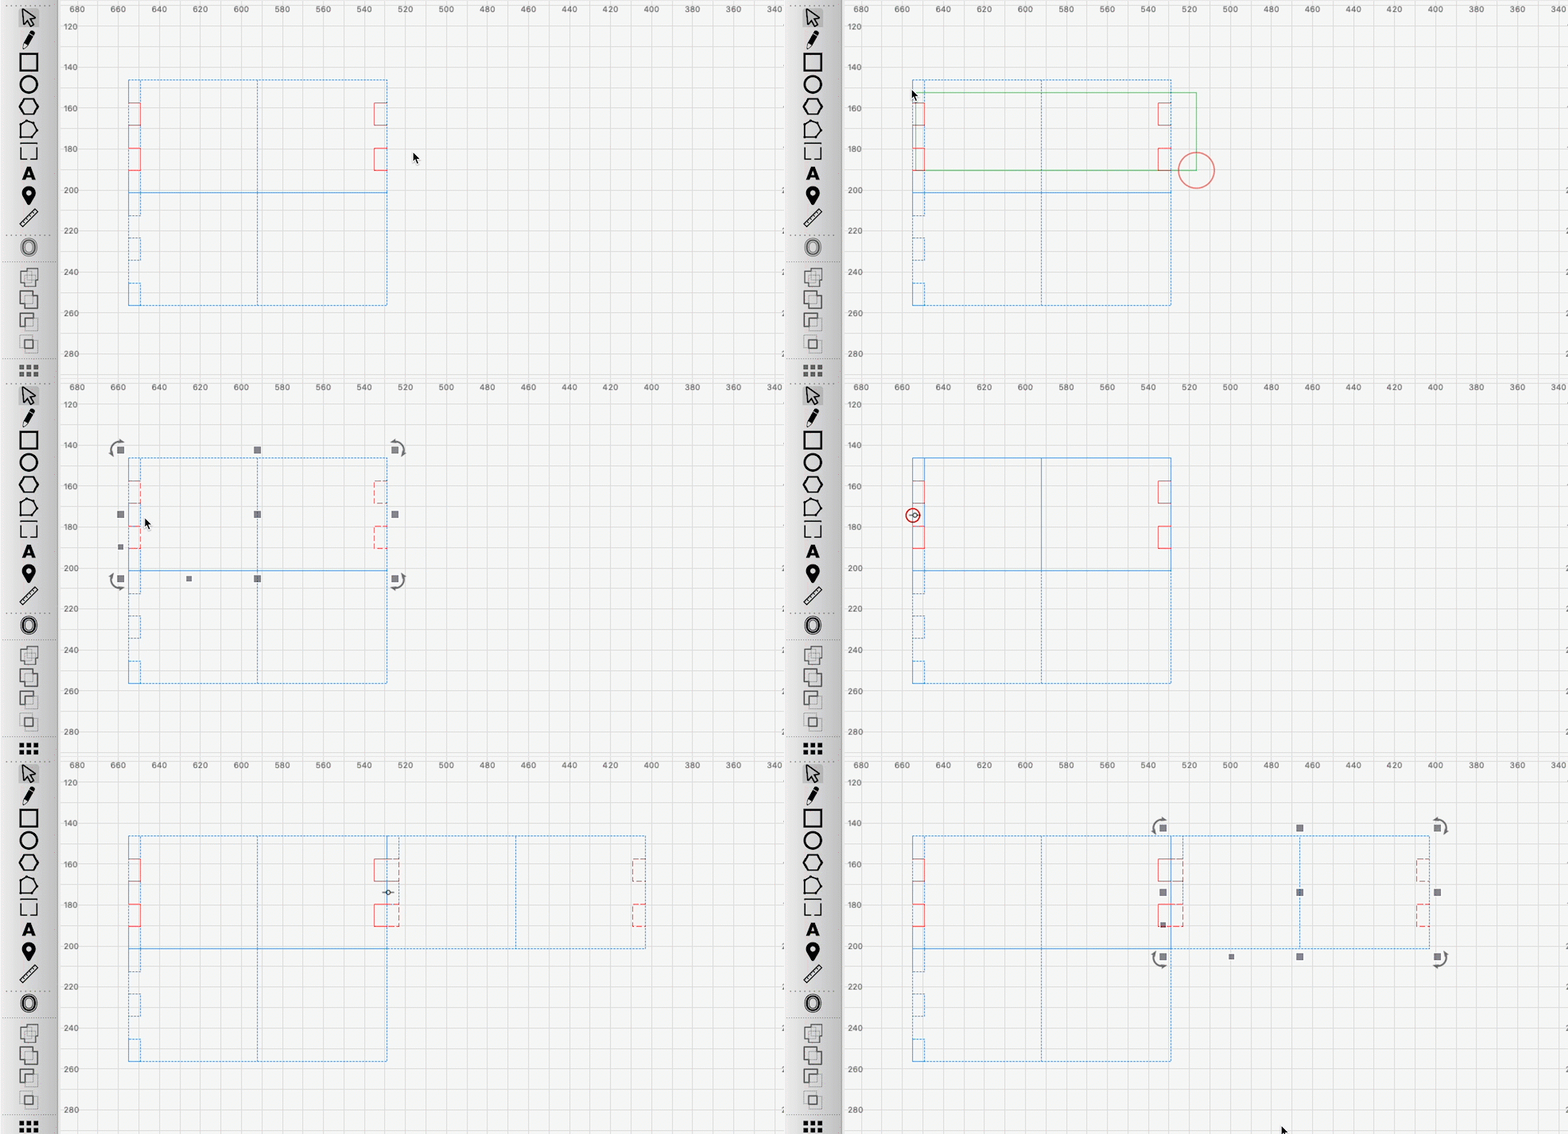
4. Side Walls
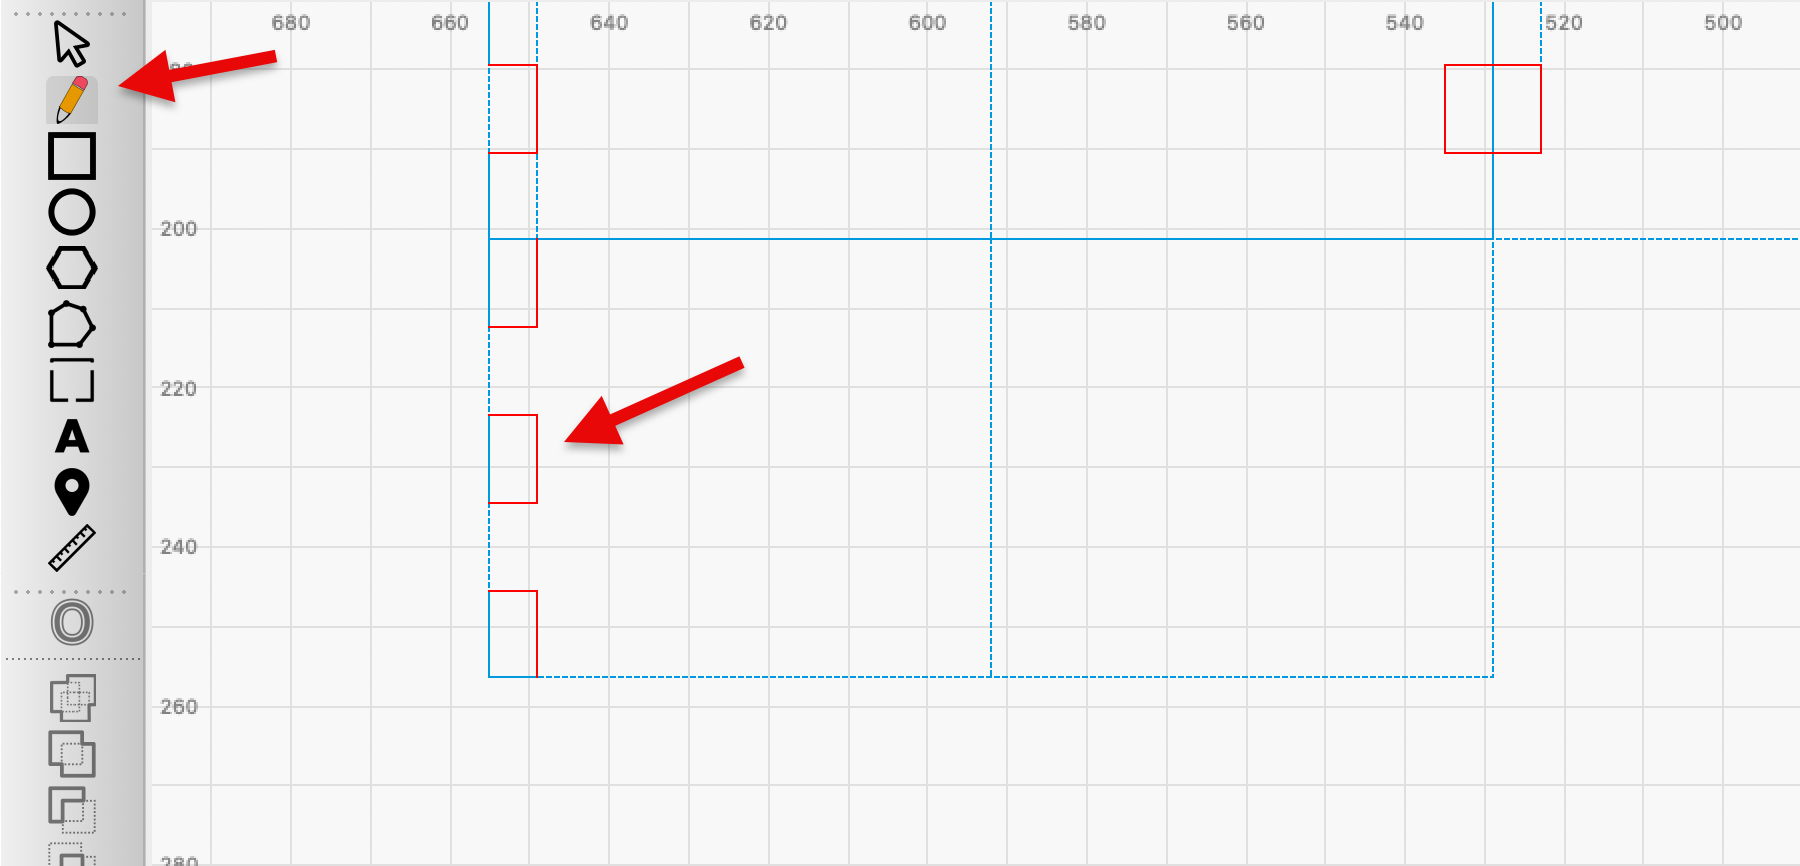
Head down to the spare copy of the large rectangle and three small rectangles we made in Step 1E. We'll use this template to create both side walls.
-
Select the cut layer and Draw Lines tool again. Create lines along the small rectangles that are the inverse of the tabs we created on the front and back walls — two reversed “L” shapes and one reversed “C” shape.
-
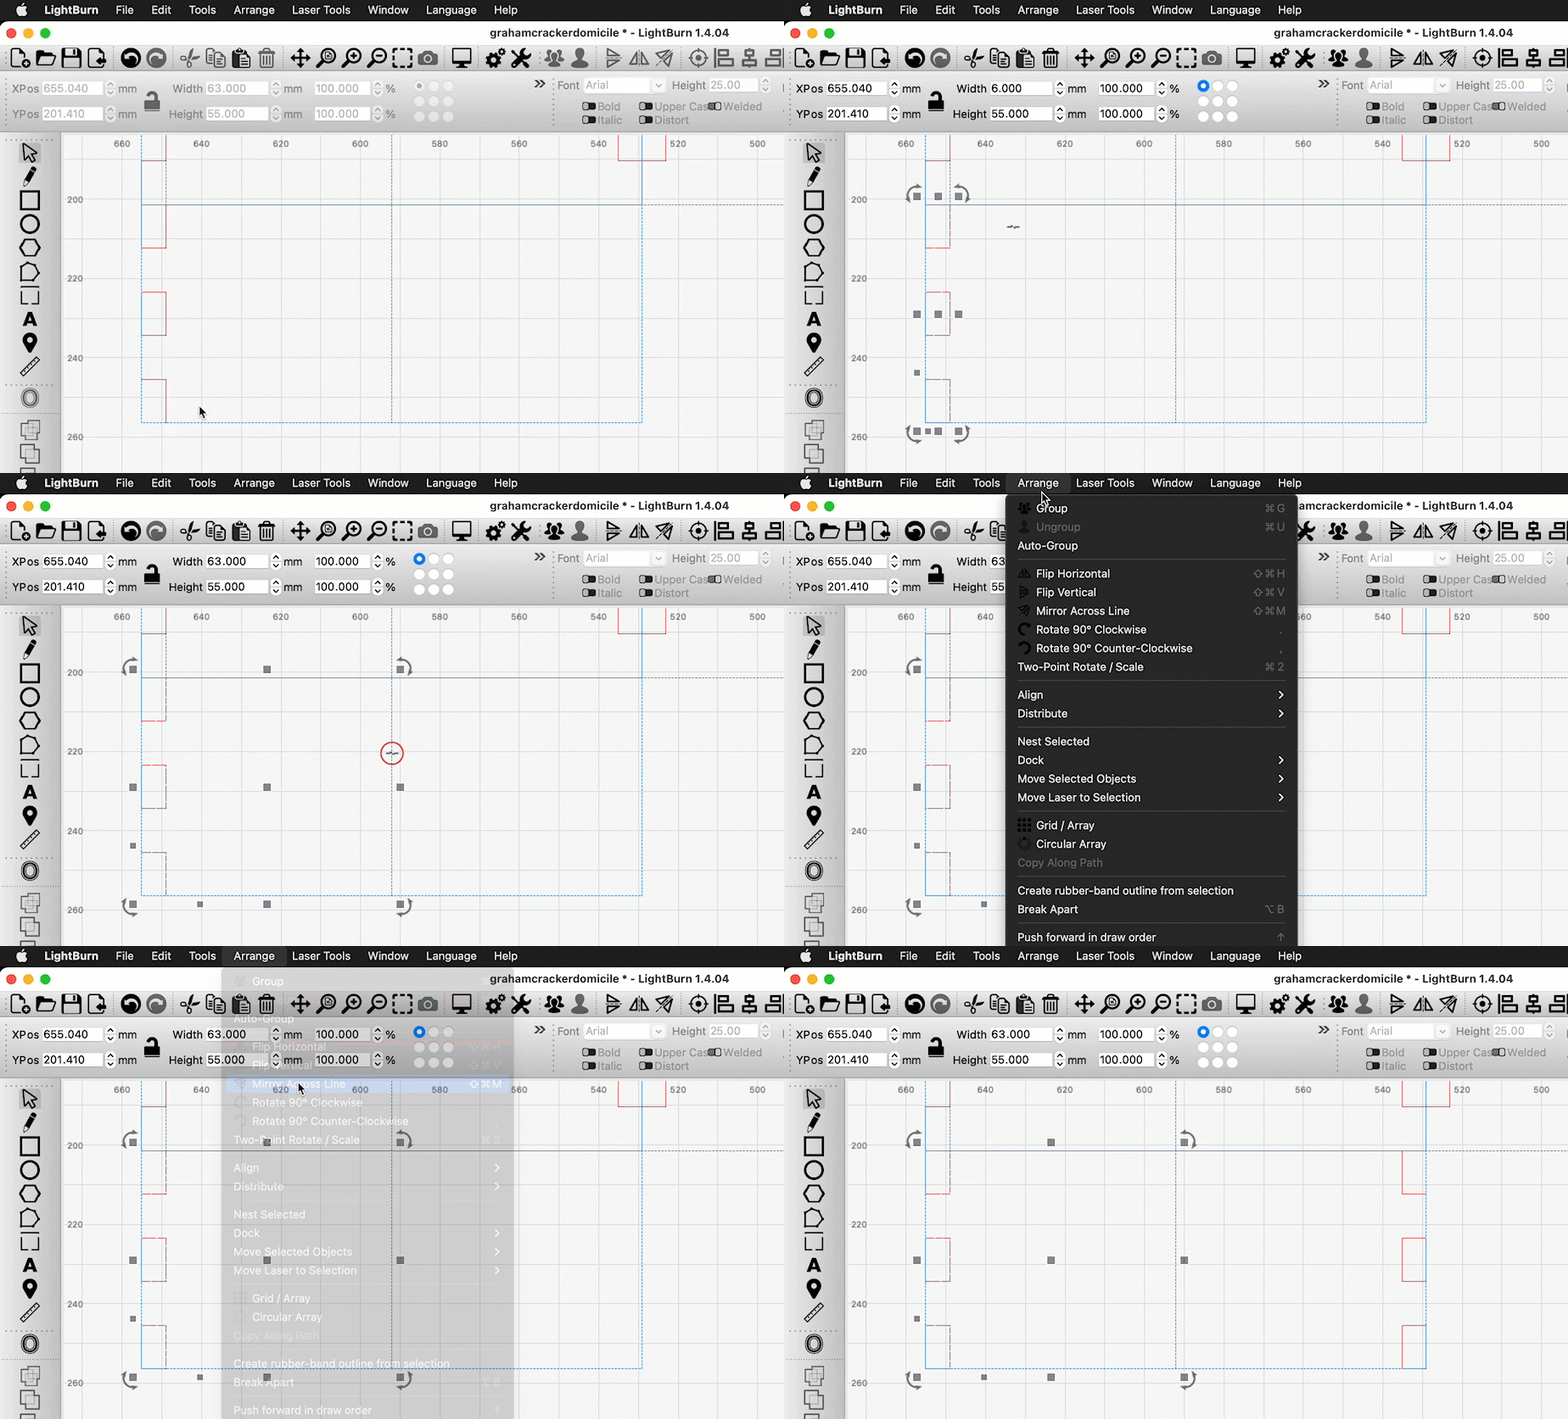
Select the three new red lines, then the line down the center of the larger rectangle, and go to Arrange > Mirror Across Line.
-
We want to divide this rectangle in two to create two sidewalls, so we're also going to add a cutline down the middle to divide the graham cracker, and add tabs in the process.
-
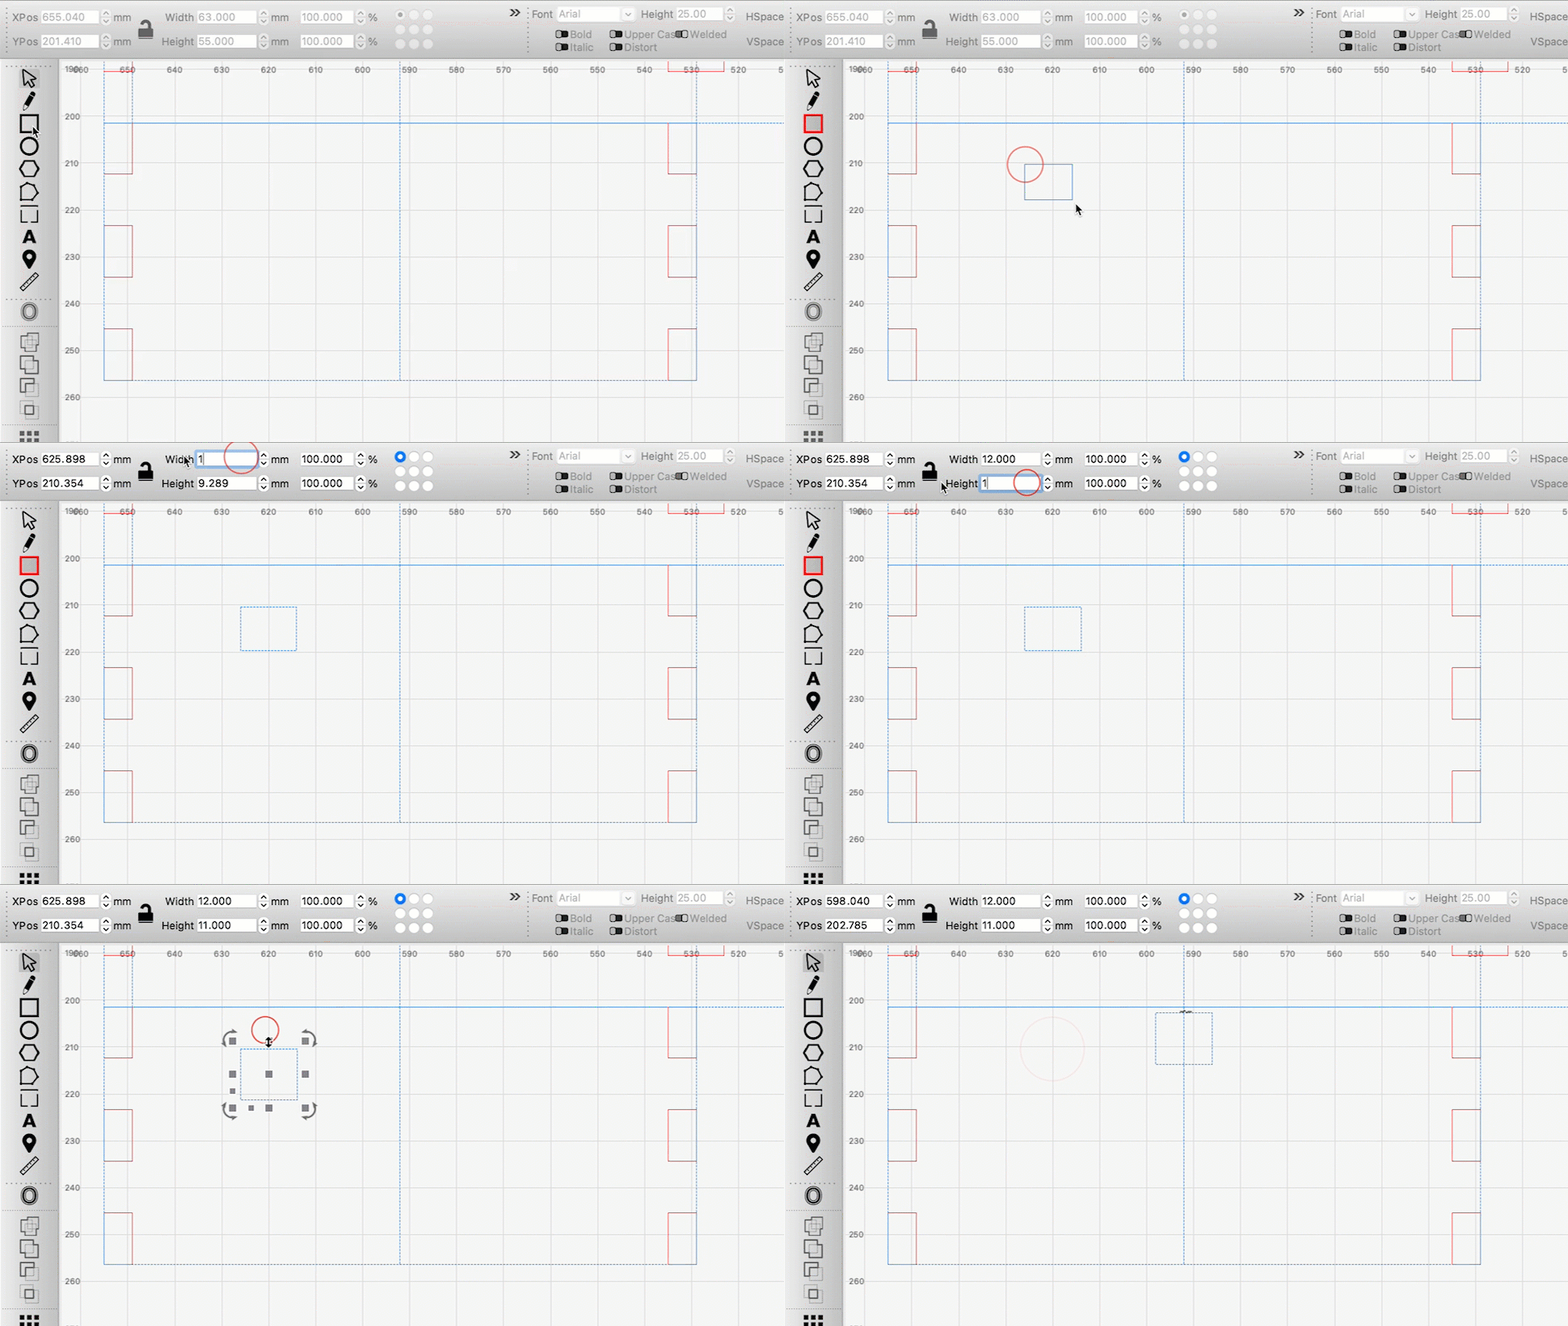
Select a Tool layer and create a new rectangle that is twice the width of the small rectangles on the left side, but exactly the same height. Use snapping to align its top center to the top center of the large rectangle.
-
Select the new rectangle, then the Grid Array tool. As before, create 3 Y Rows, set Y Spacing to match the height of the rectangle, and select Padding between edges.
-
Use the Draw Lines tool to draw a line following the outline of the new rectangles down the center, starting from the top left and going down, then over to the center, then down again, then back over to a side, down, and so on. Then, reverse the process from the bottom up. You can skip the middle lines connecting the rectangles on the way back up. We've got our sidewalls.
5. Roof Supports
Next up, we'll make two walls to support the roof, starting from our basic graham cracker sized template.
-
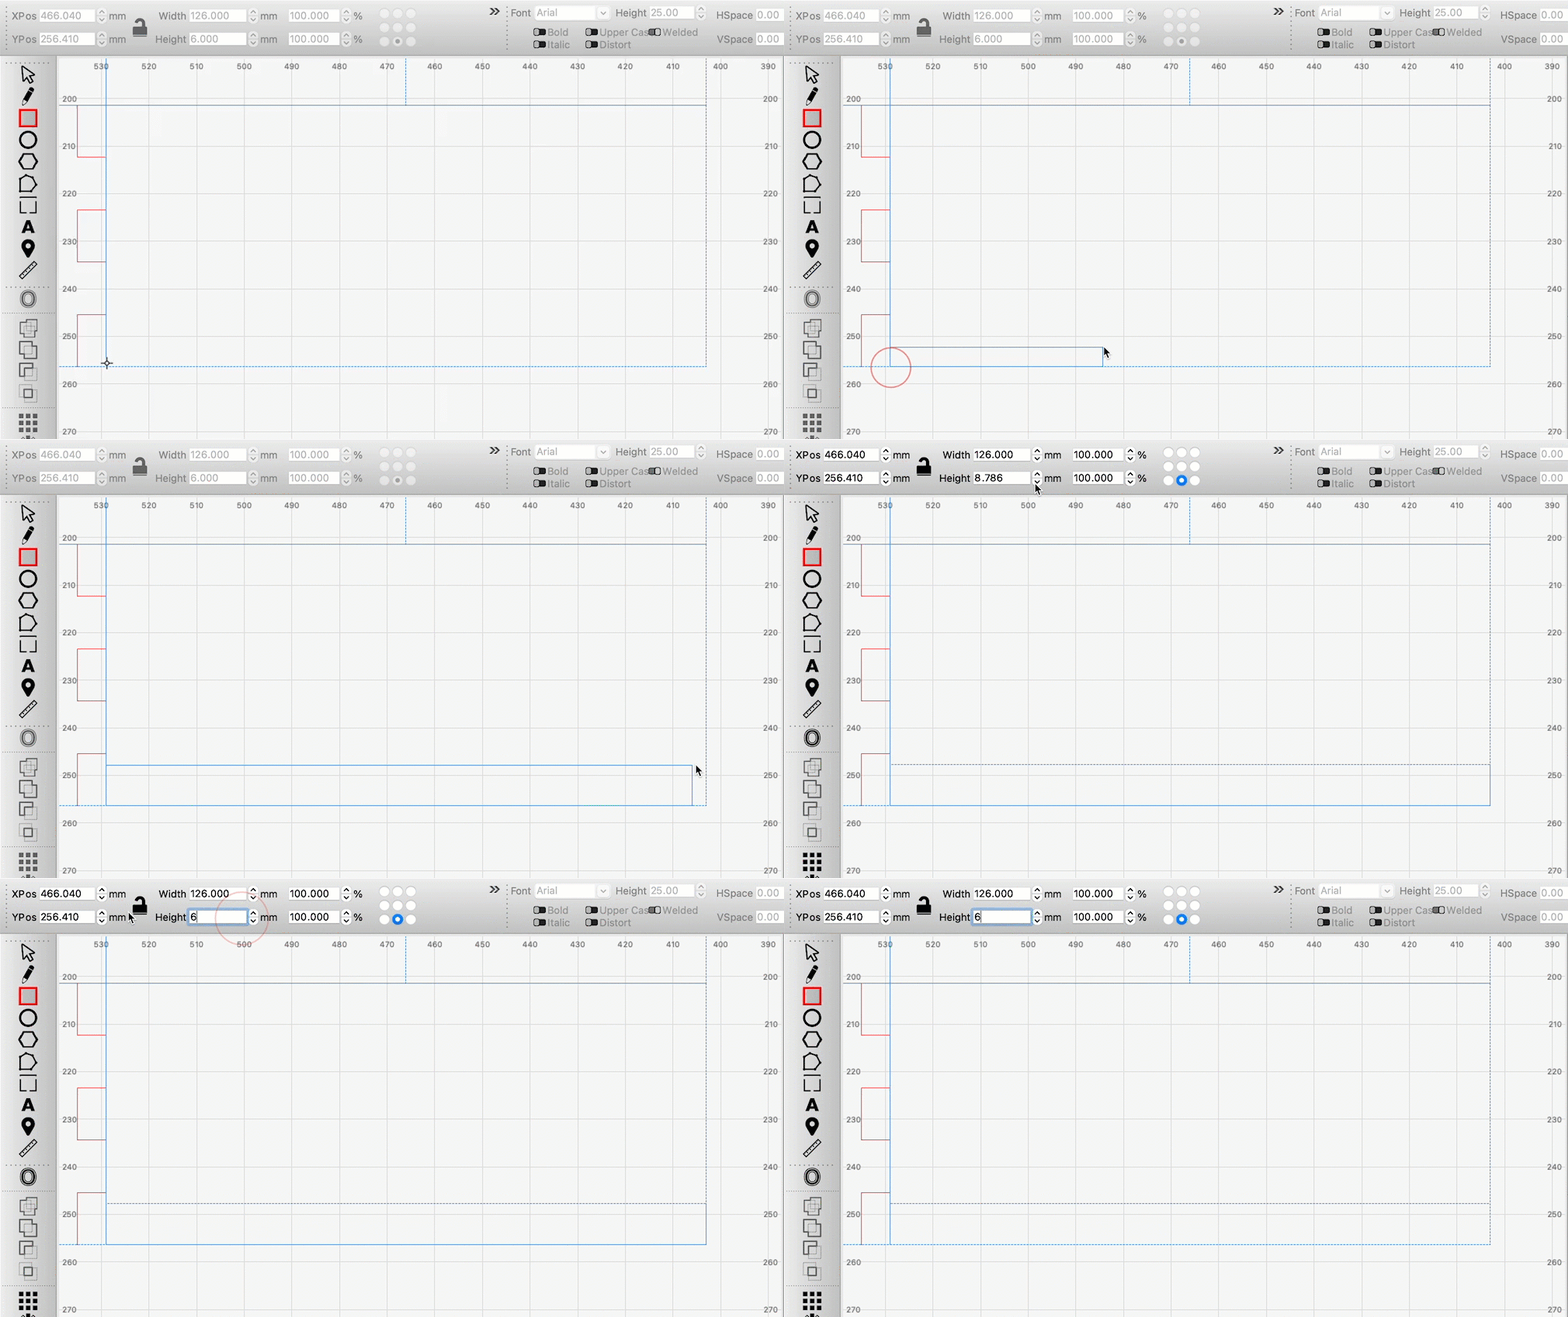
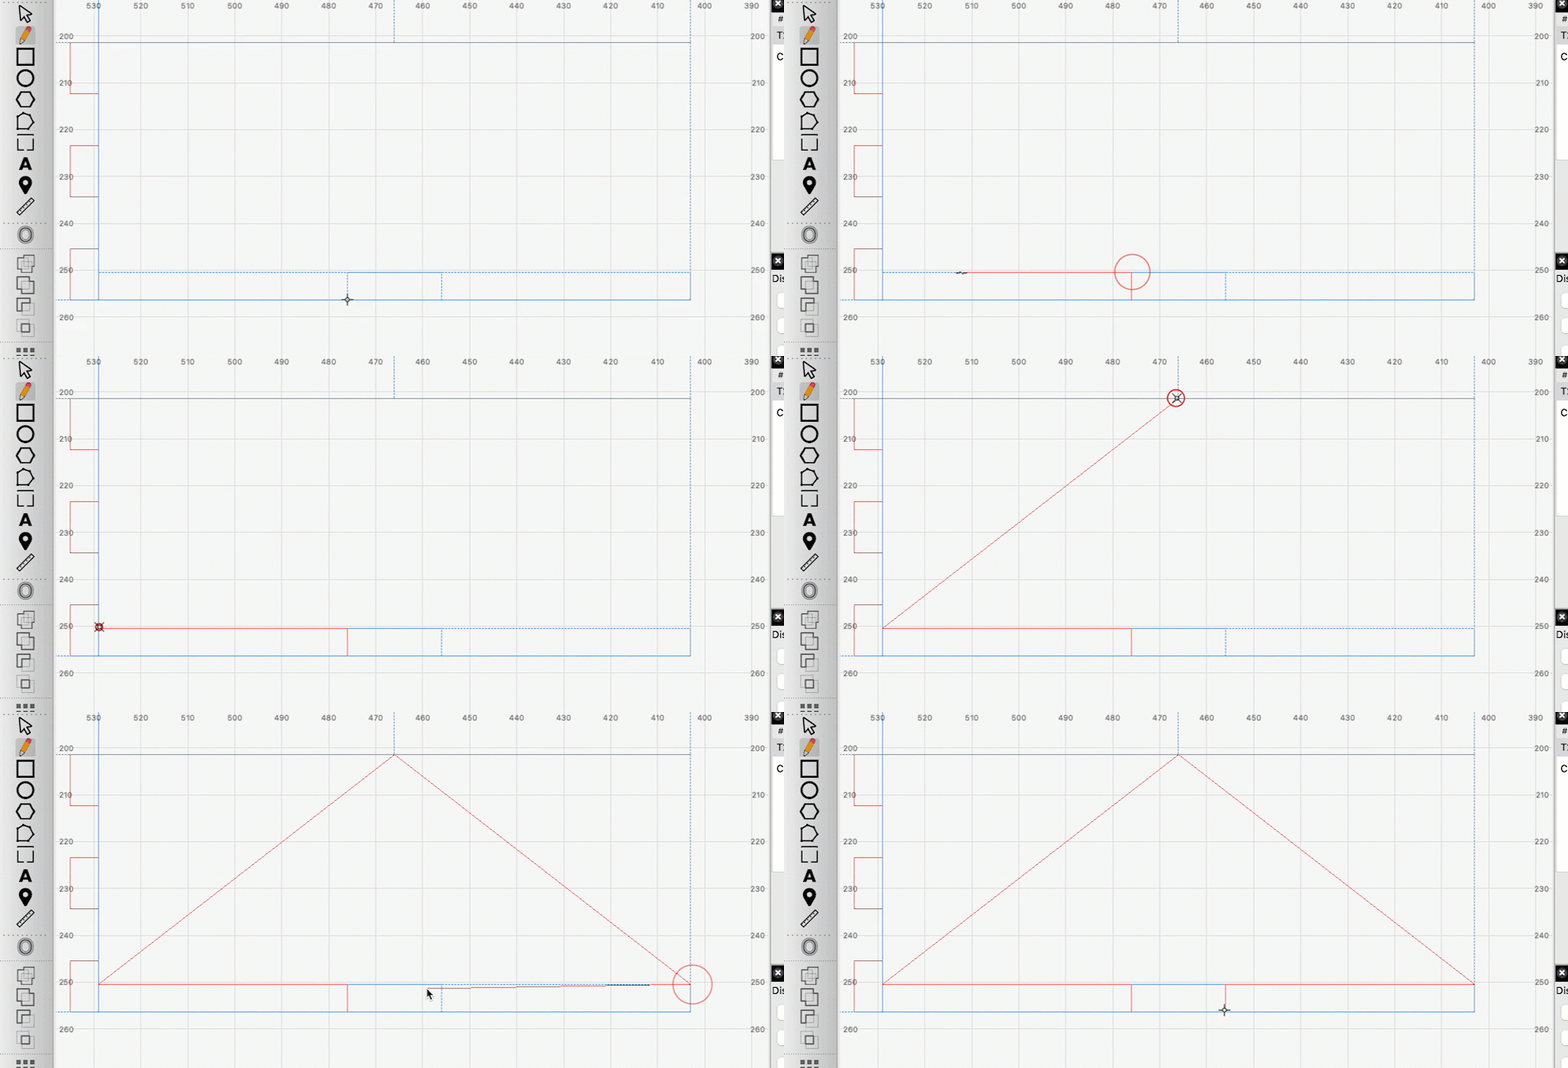
With the Tool layer selected, and starting from the bottom left corner, create a new rectangle extending all the way to the other side, making sure to use snapping on both sides. Adjust its height to be a bit more than the thickness of the graham cracker.
-
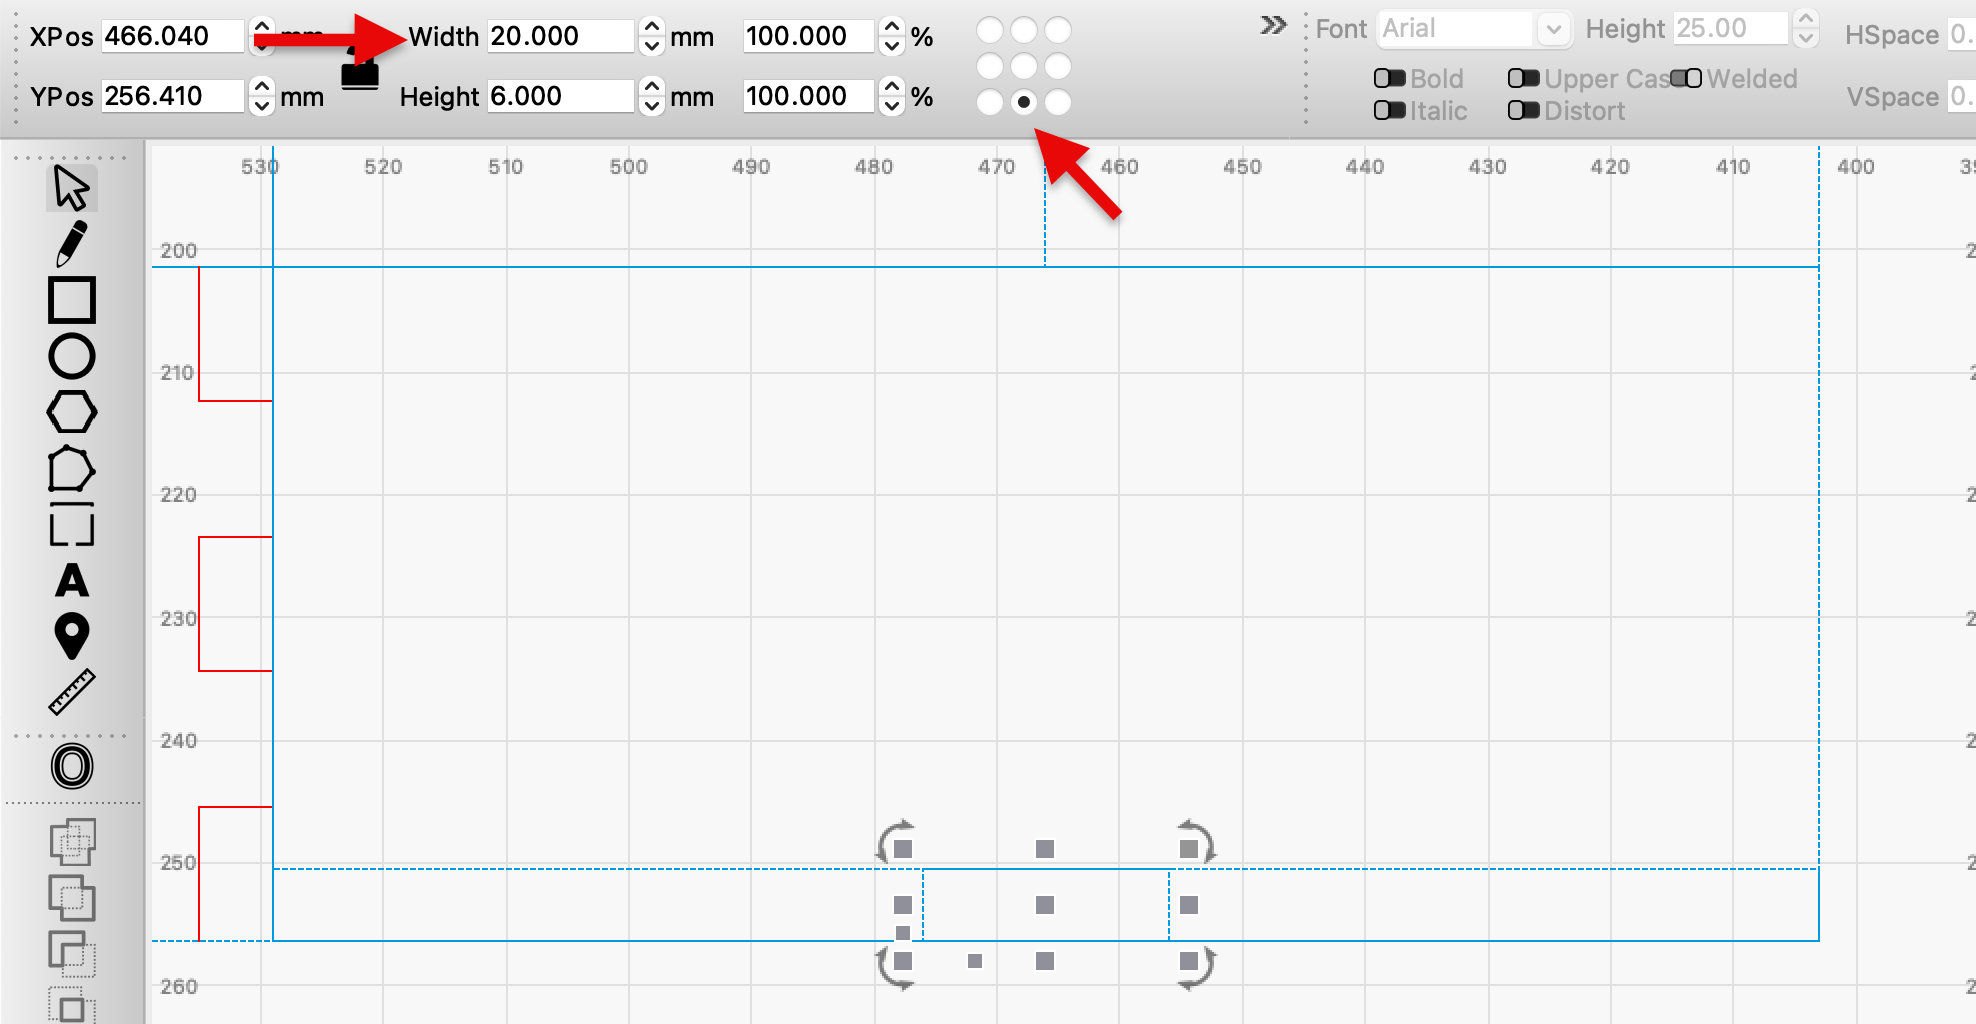
Duplicate the new rectangle and, with the 9 dot control set to the middle center, set the duplicate's width to 20 mm.
-
Select the cut layer and Draw Lines tool again and, starting from the bottom left of the smallest rectangle, work your way up, then over, then make a slanted line across to the top center of the large rectangle, and then the reverse until you get back to the bottom right of the smallest rectangle.
-
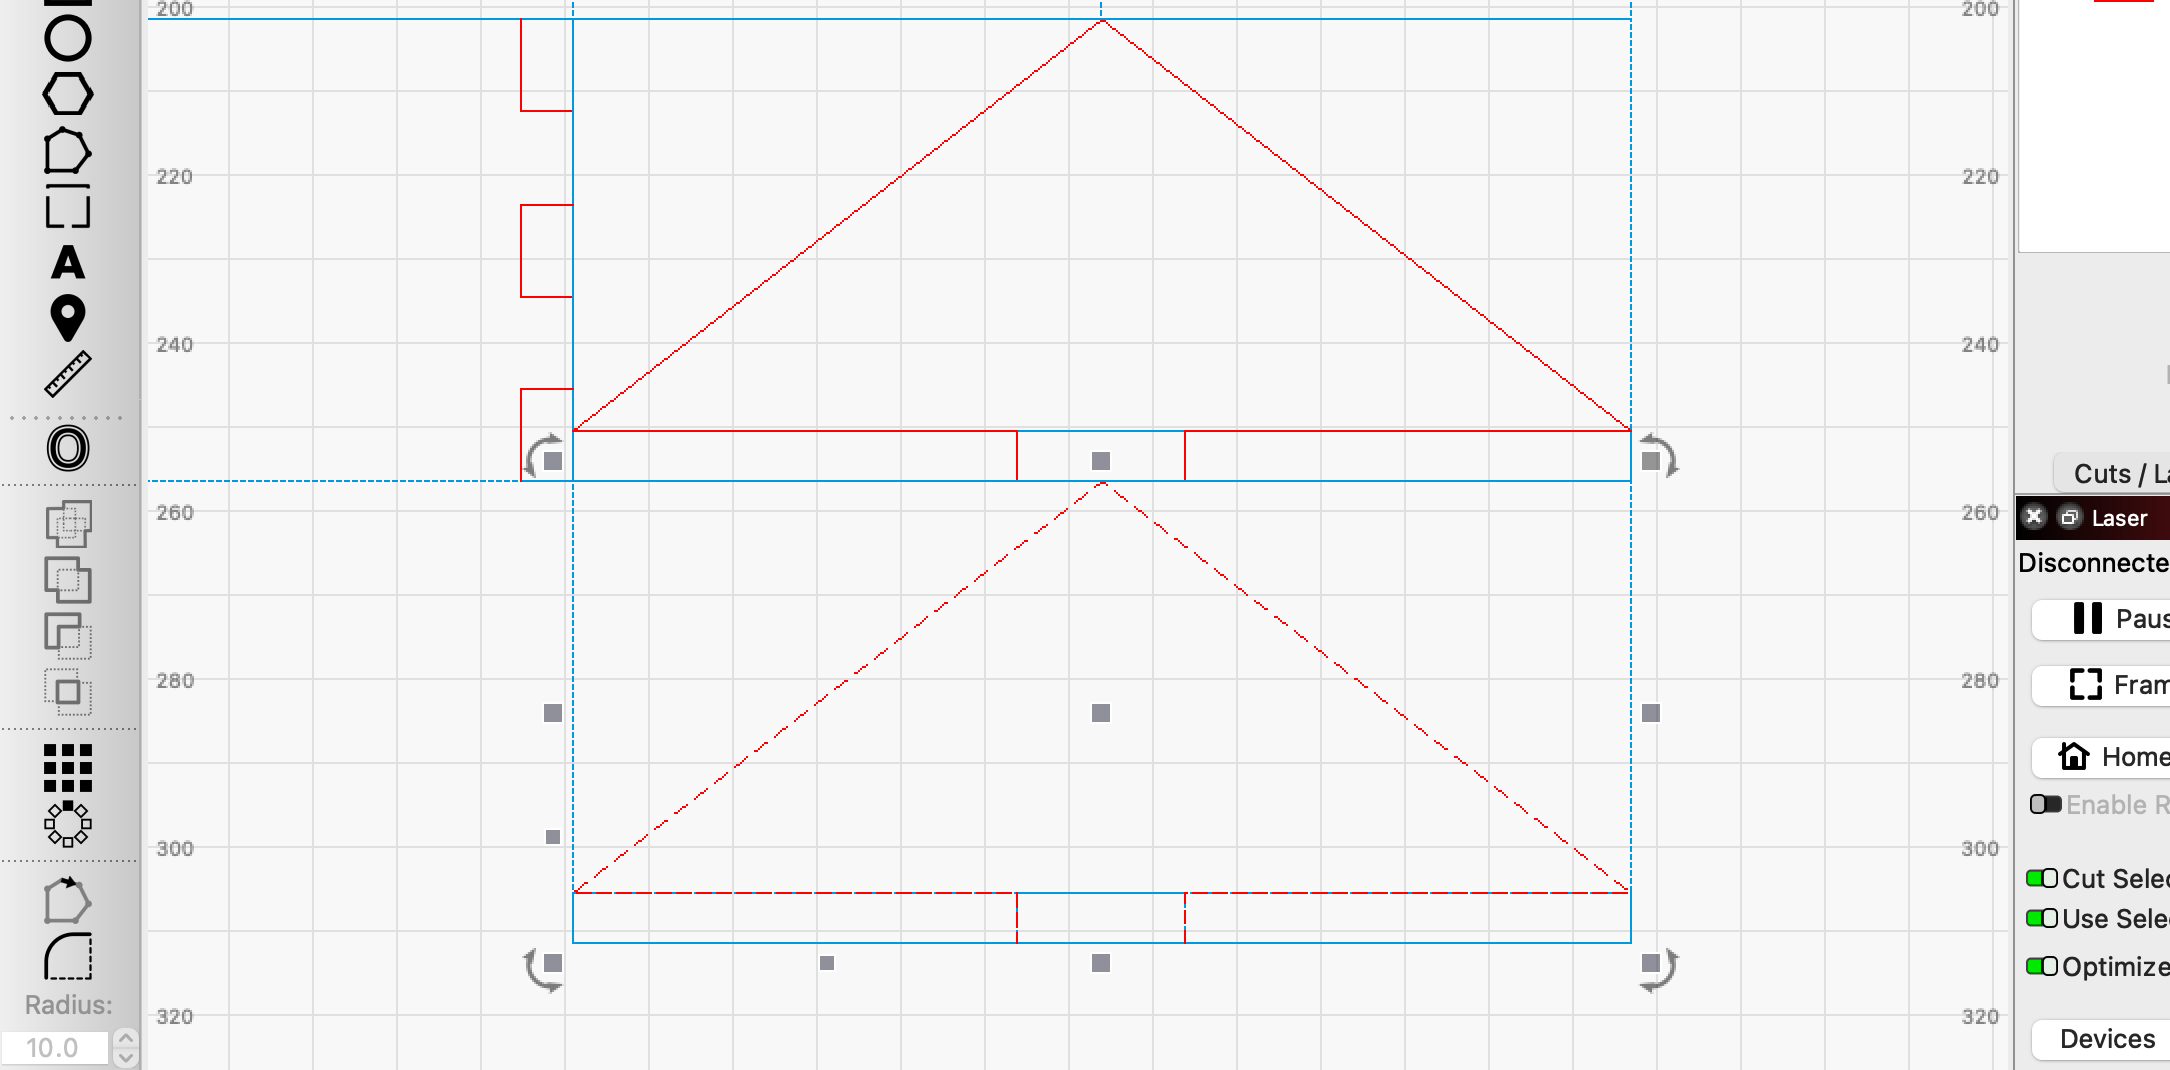
To finish the roof supports, Duplicate that entire template and snap it to the bottom of the original.
6. Interior Ceiling
Start with another of the graham cracker sized rectangles. This one will serve as the inner ceiling of the house, which will hold the pieces that hold the roof.
-
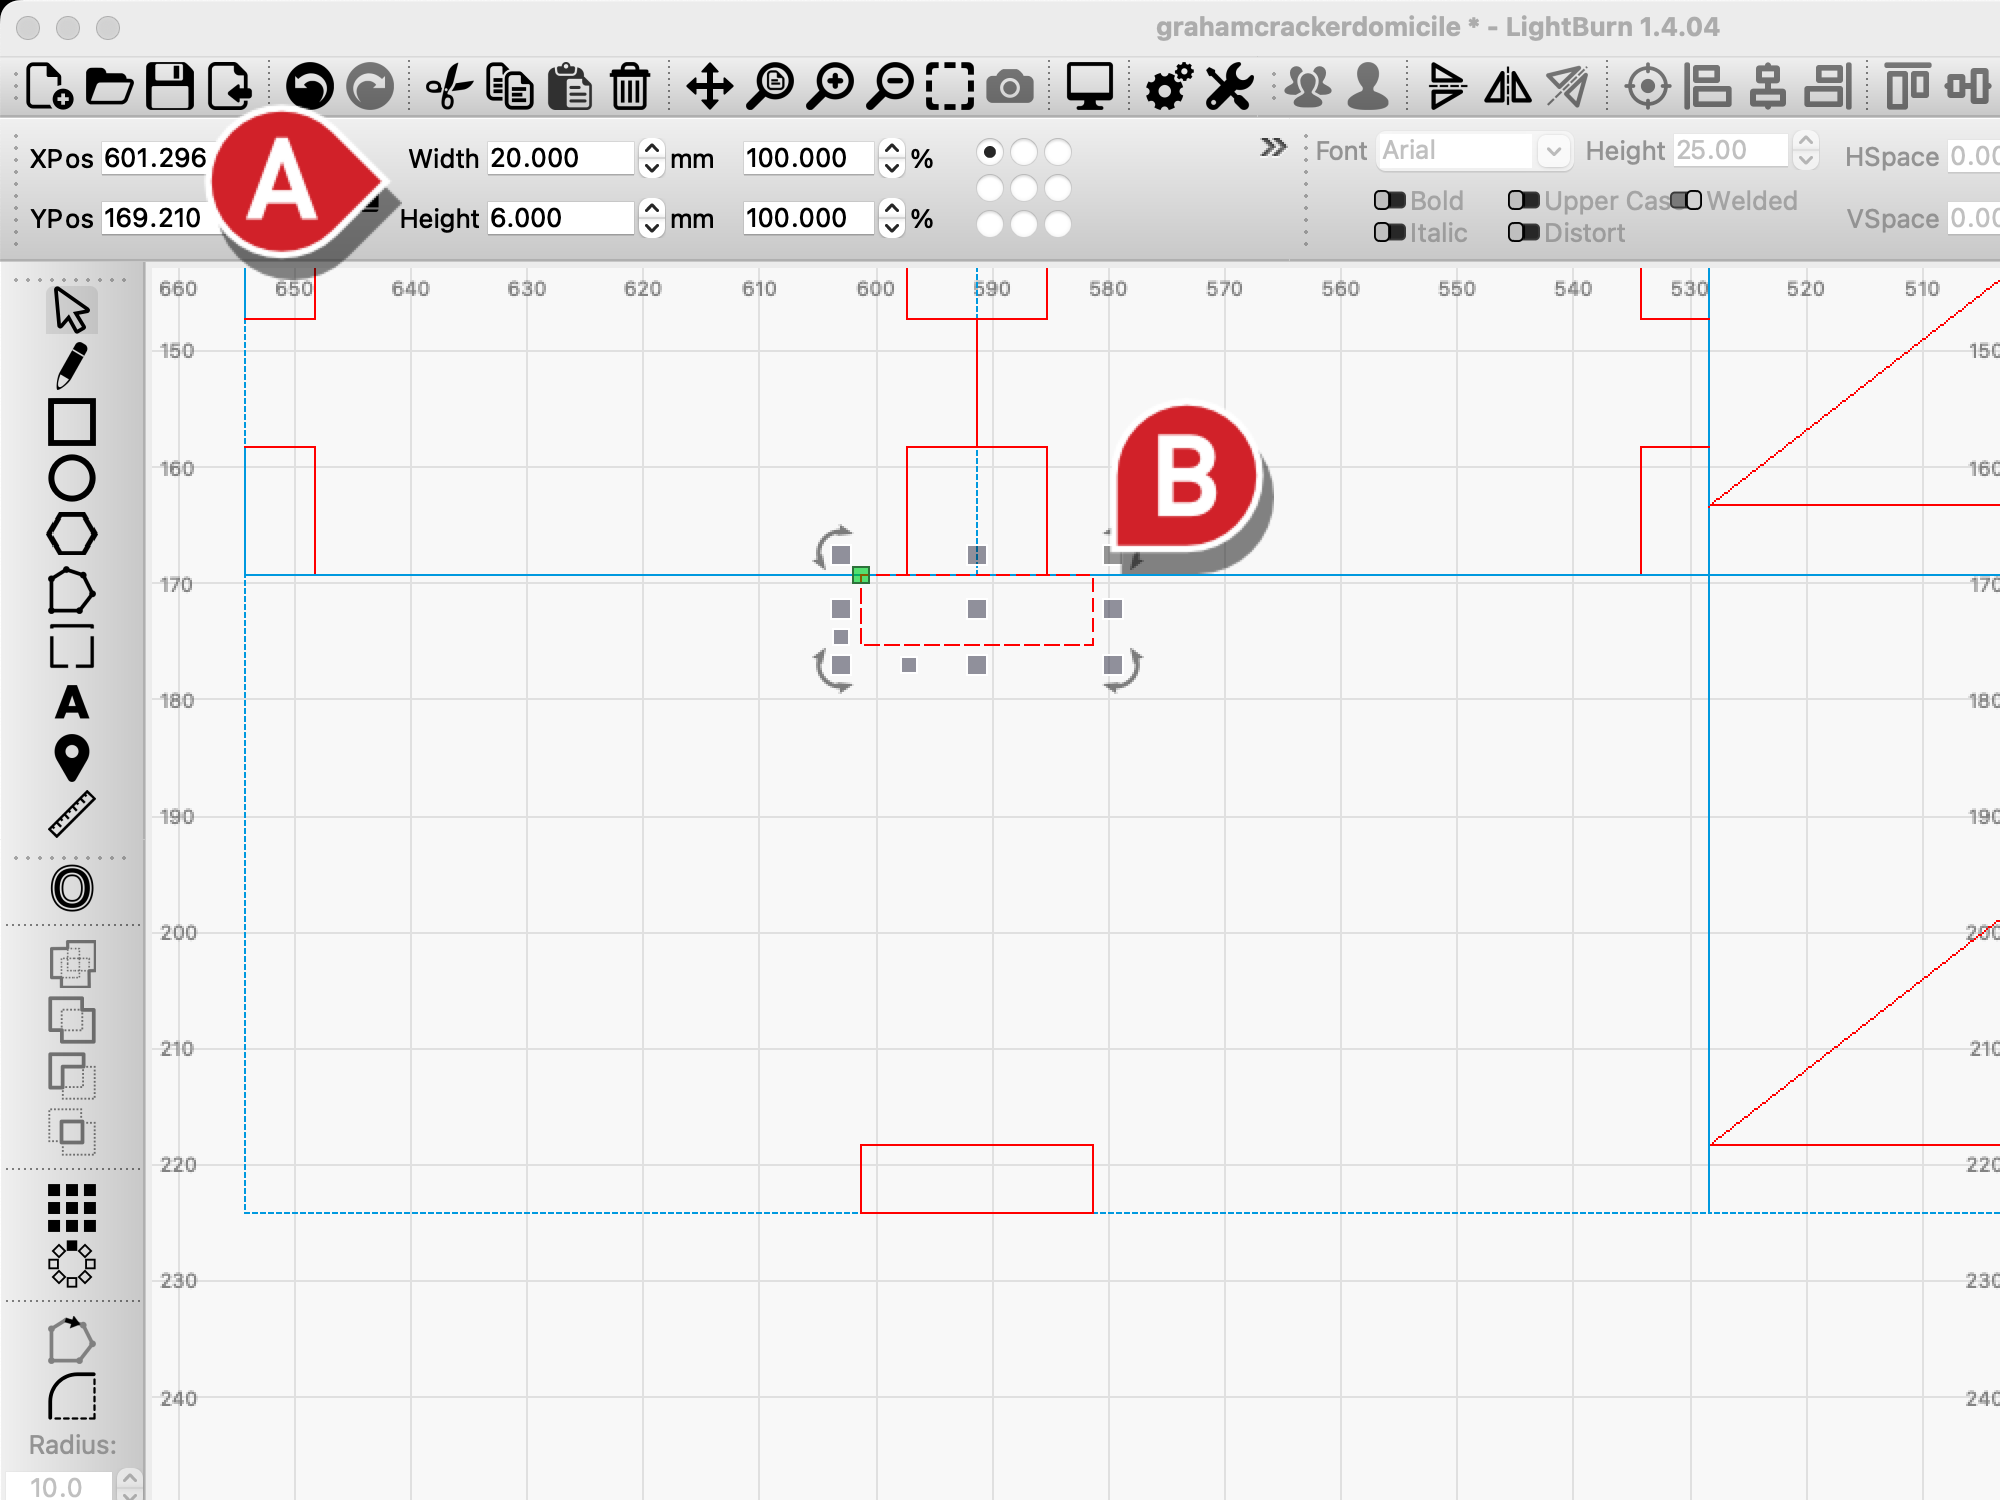
With a cut layer selected, create a small rectangle and set its height to the thickness of your graham cracker and width to whatever value you set in Step 5B — that was 20 mm in our case. Duplicate the small rectangle once you've adjusted its dimensions.
-
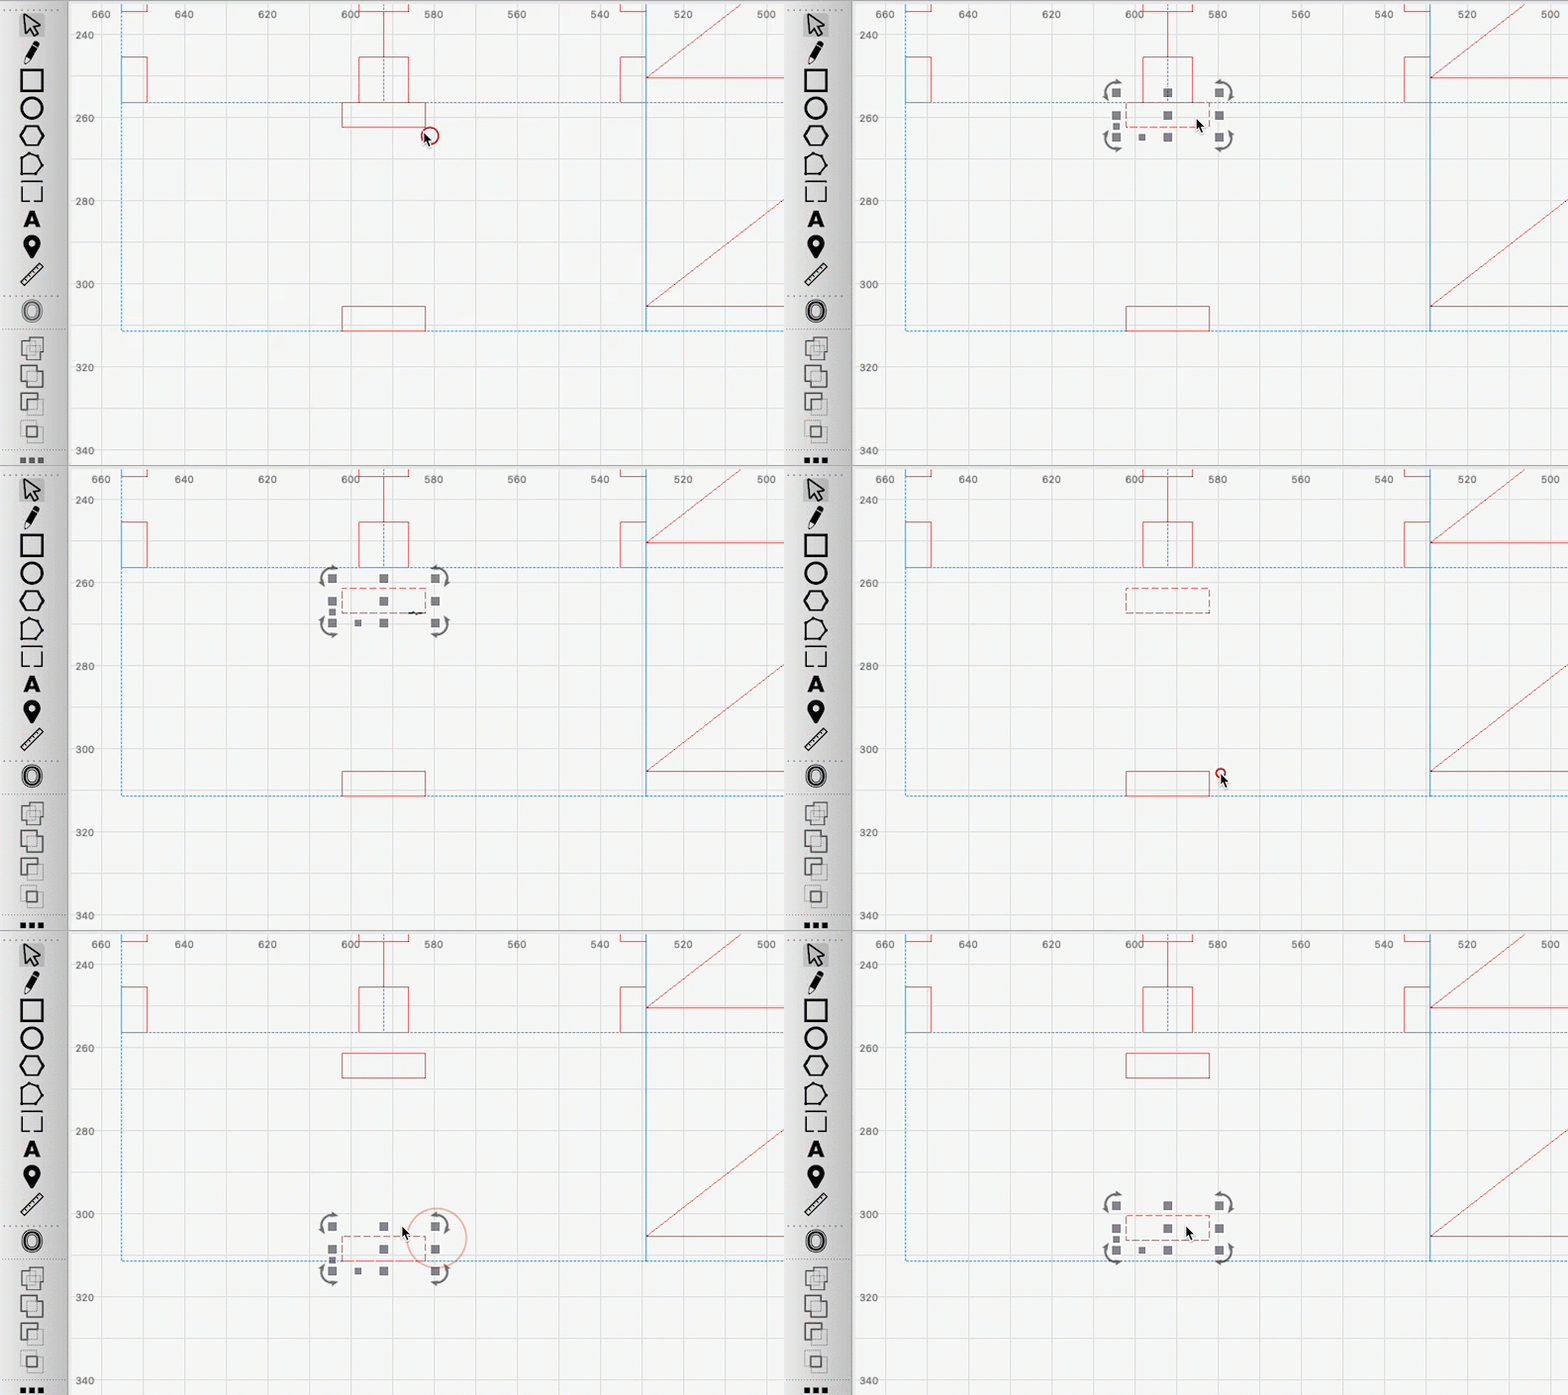
Snap the top center of one duplicate to the top center of the large rectangle, and the bottom center of the other to the bottom center of the large rectangle.
-
Use the arrow keys to nudge the rectangles in a bit toward the center. By default each nudge with an arrow key moves an object 5 mm — one nudge down for the top one and one nudge up for the bottom one will do the trick.
7. Roof
And now, the roof. Start again with a basic graham cracker template.
-
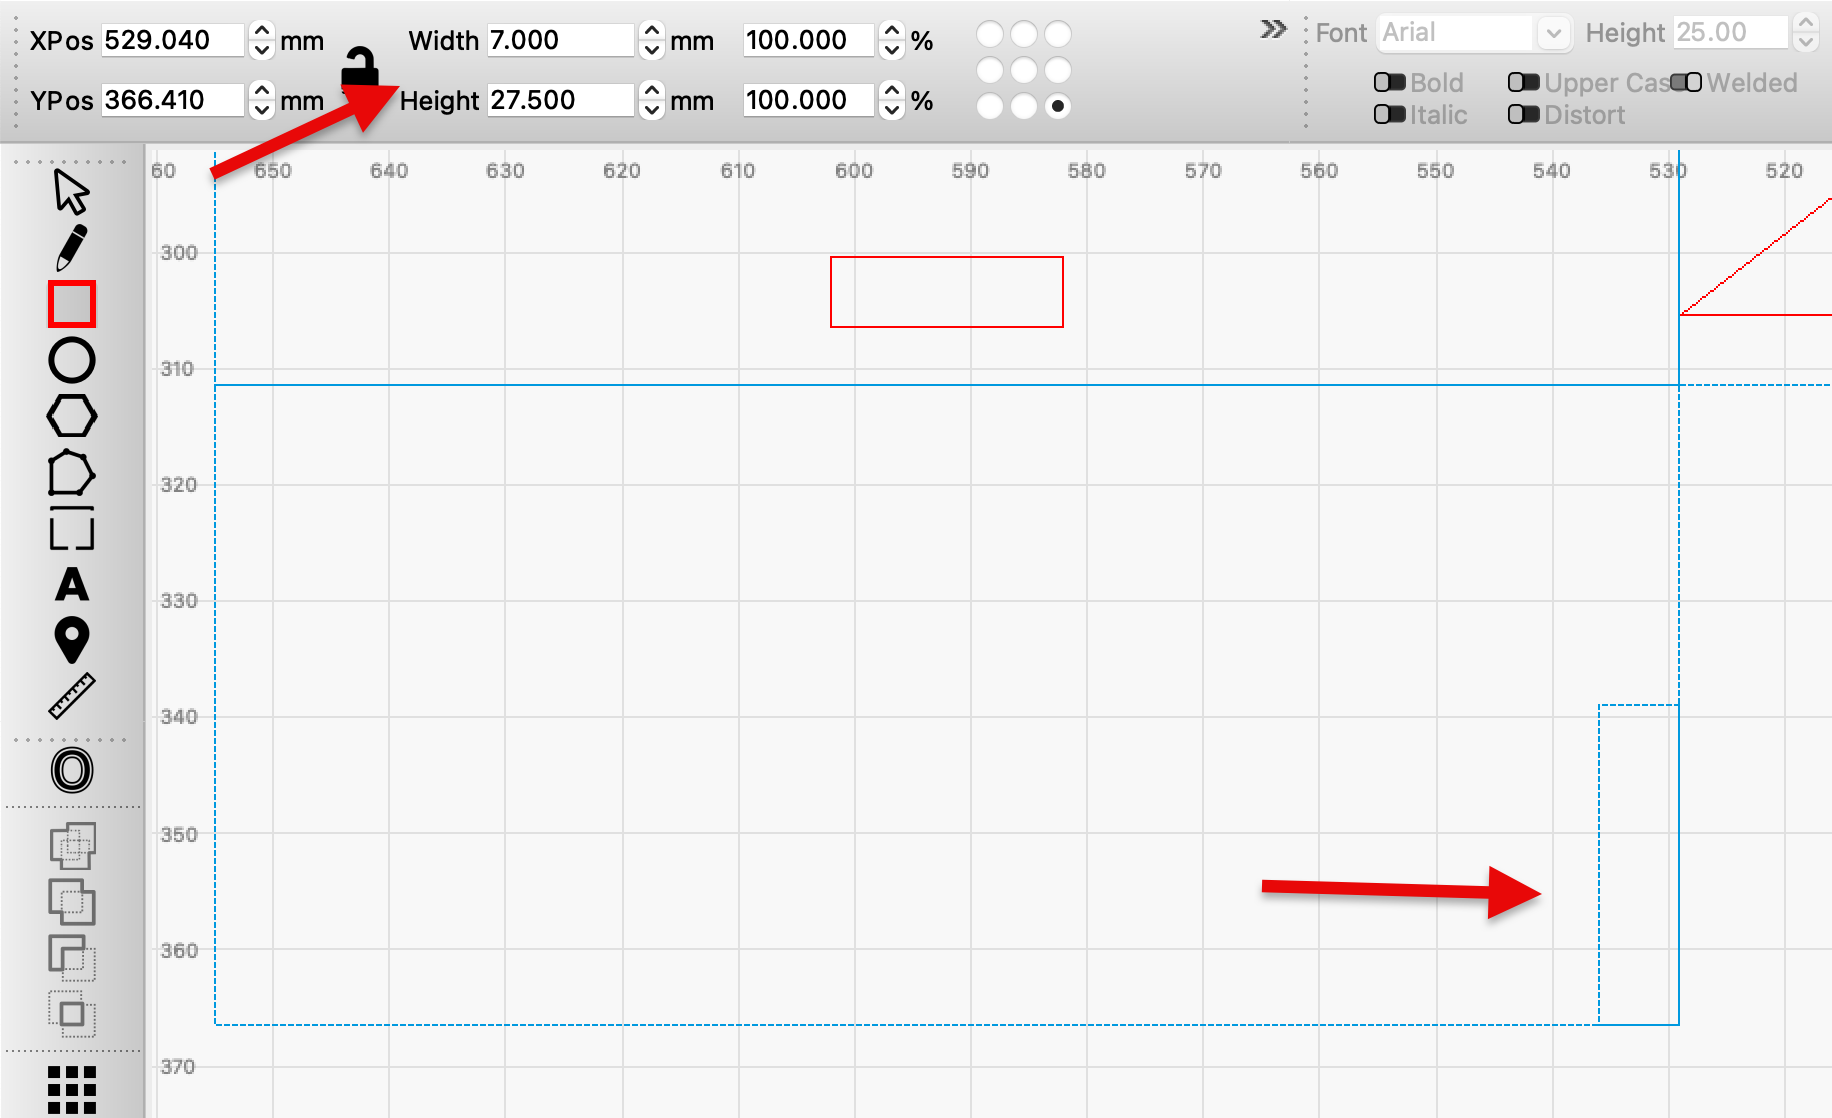
Create a new rectangle, starting from the bottom right corner of the large rectangle. Set its height to half the height of the large rectangle (27.5 mm in our case), and width to a bit more than the thickness of the graham cracker, plus another mm for good measure (7 mm in our case). These slots need a bit of wiggle room for the roof to rest gently on the roof supports.
-
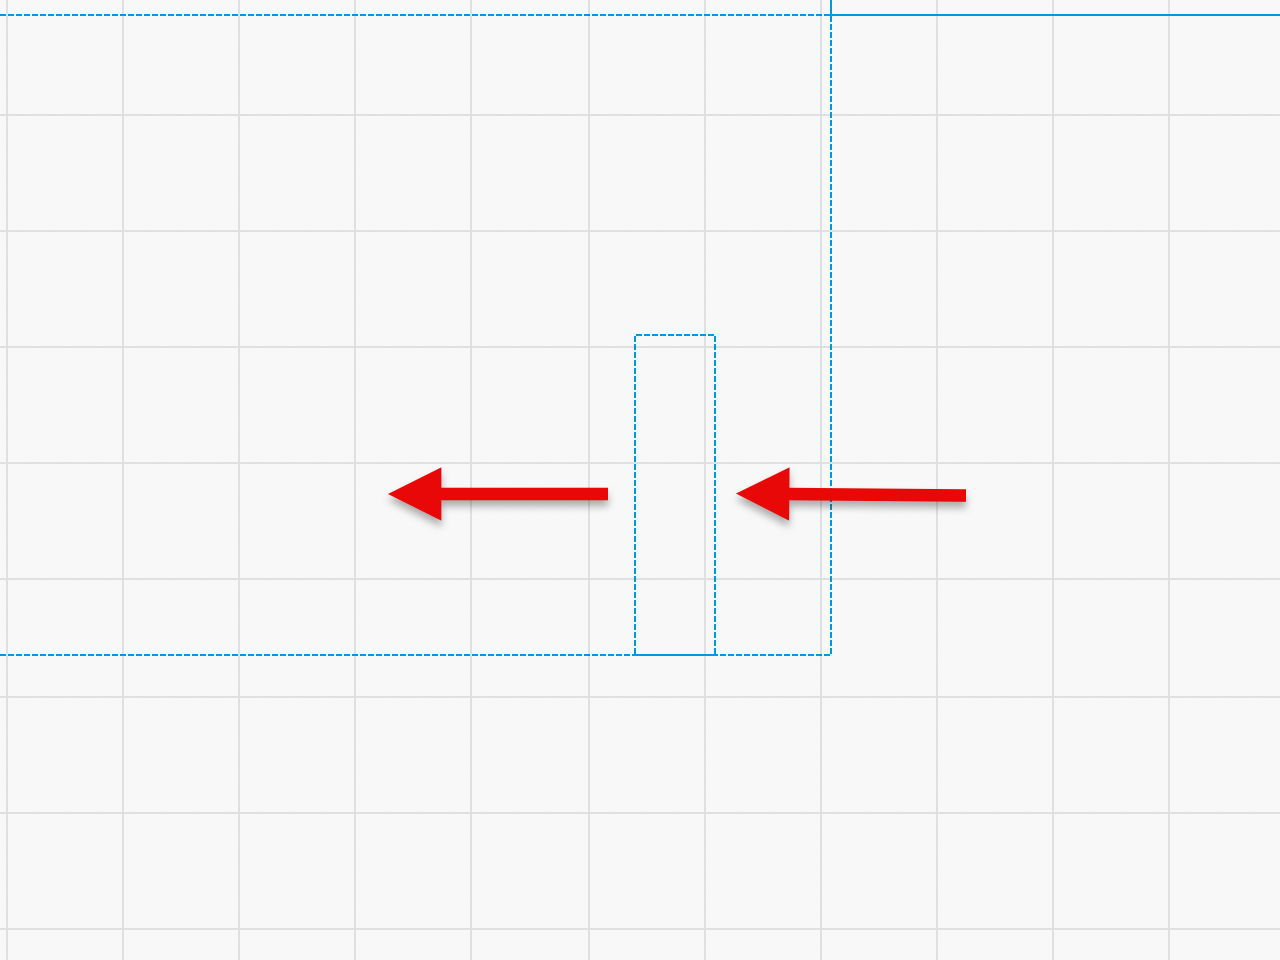
Nudge the rectangle twice to the left (10 mm).
8. Decorate the Roof
Before we add cut lines and duplicate the above roof piece, it's time to start adding decorations.
-
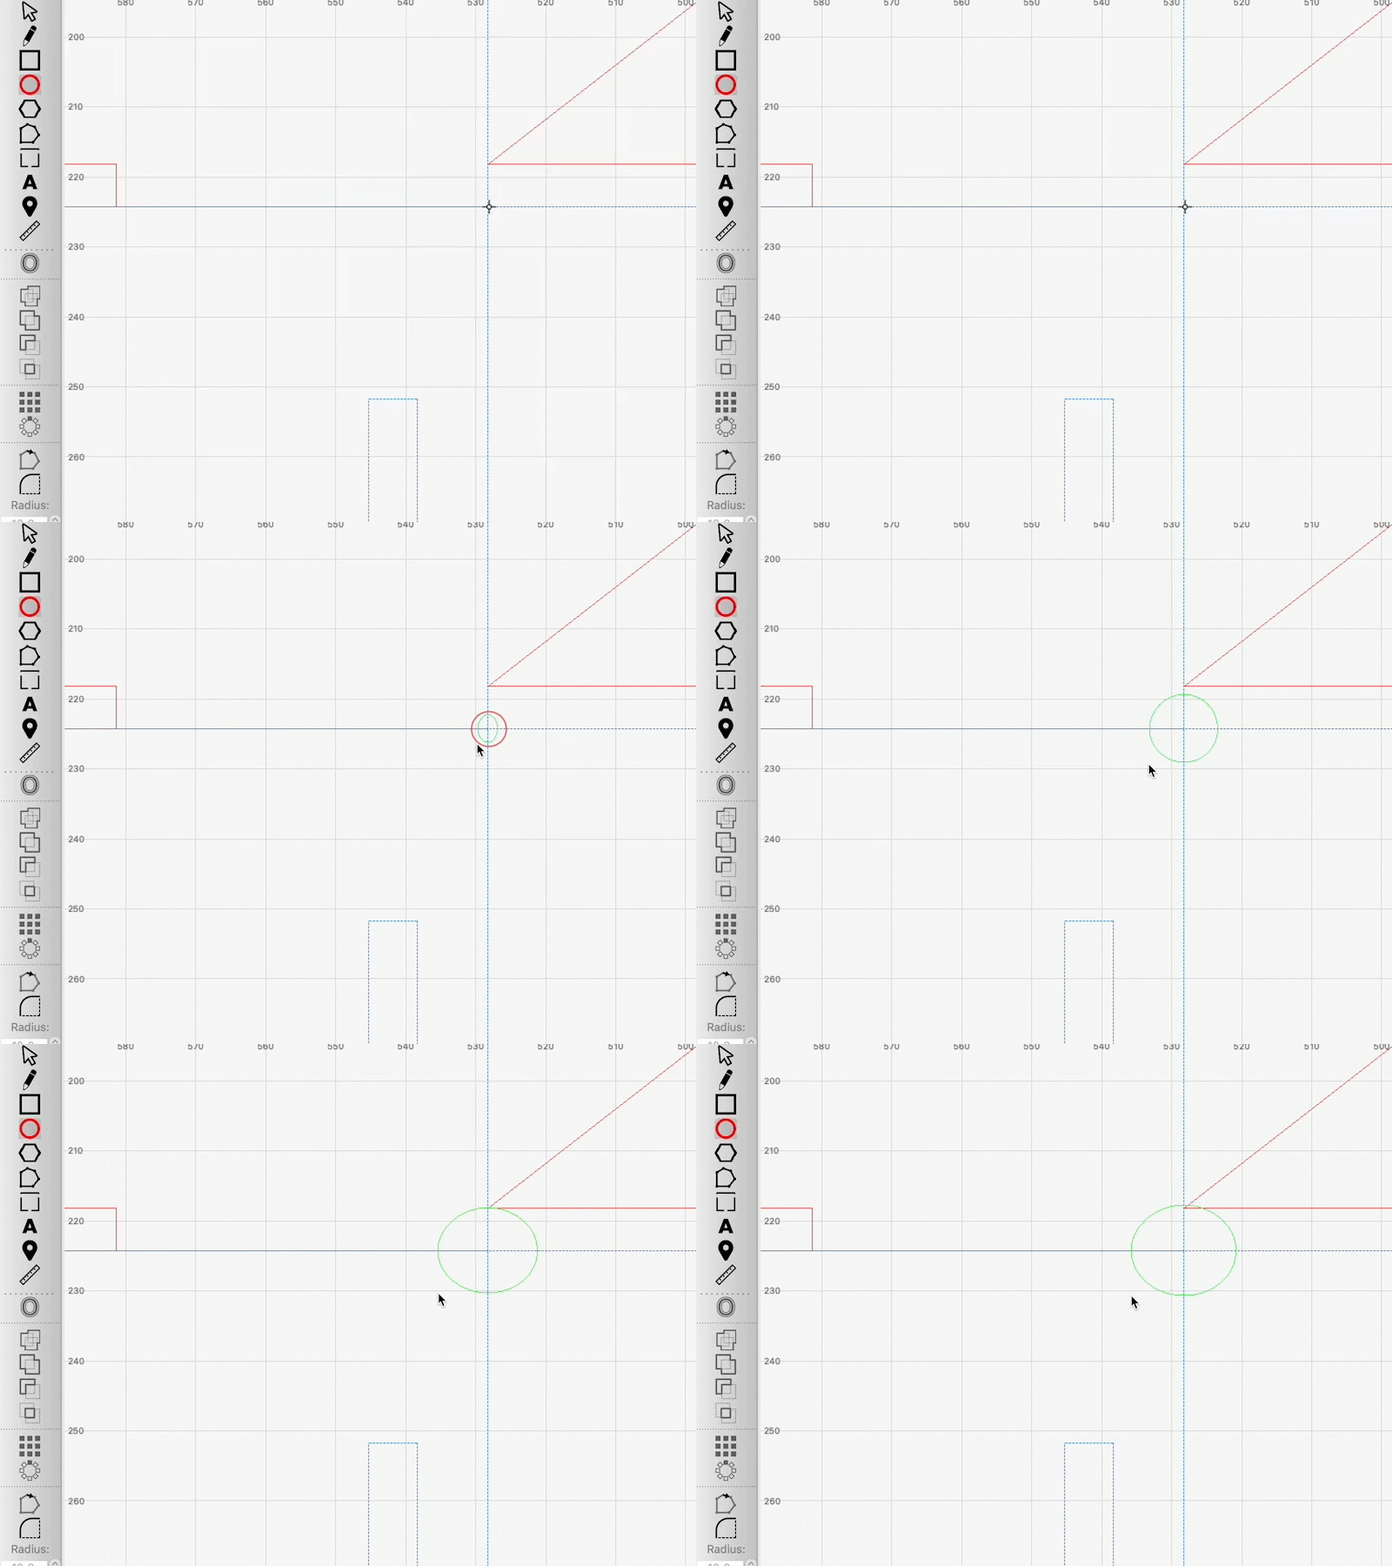
Select the Ellipse ( Ctrl+E / Cmd+E ) tool and any layer you like to use for etching (make sure to set the layer to Line mode). Then hover over the top left corner of the roof piece, hold the CTRL / ⌘ key, and click and drag to start an oval centered on that point.
-
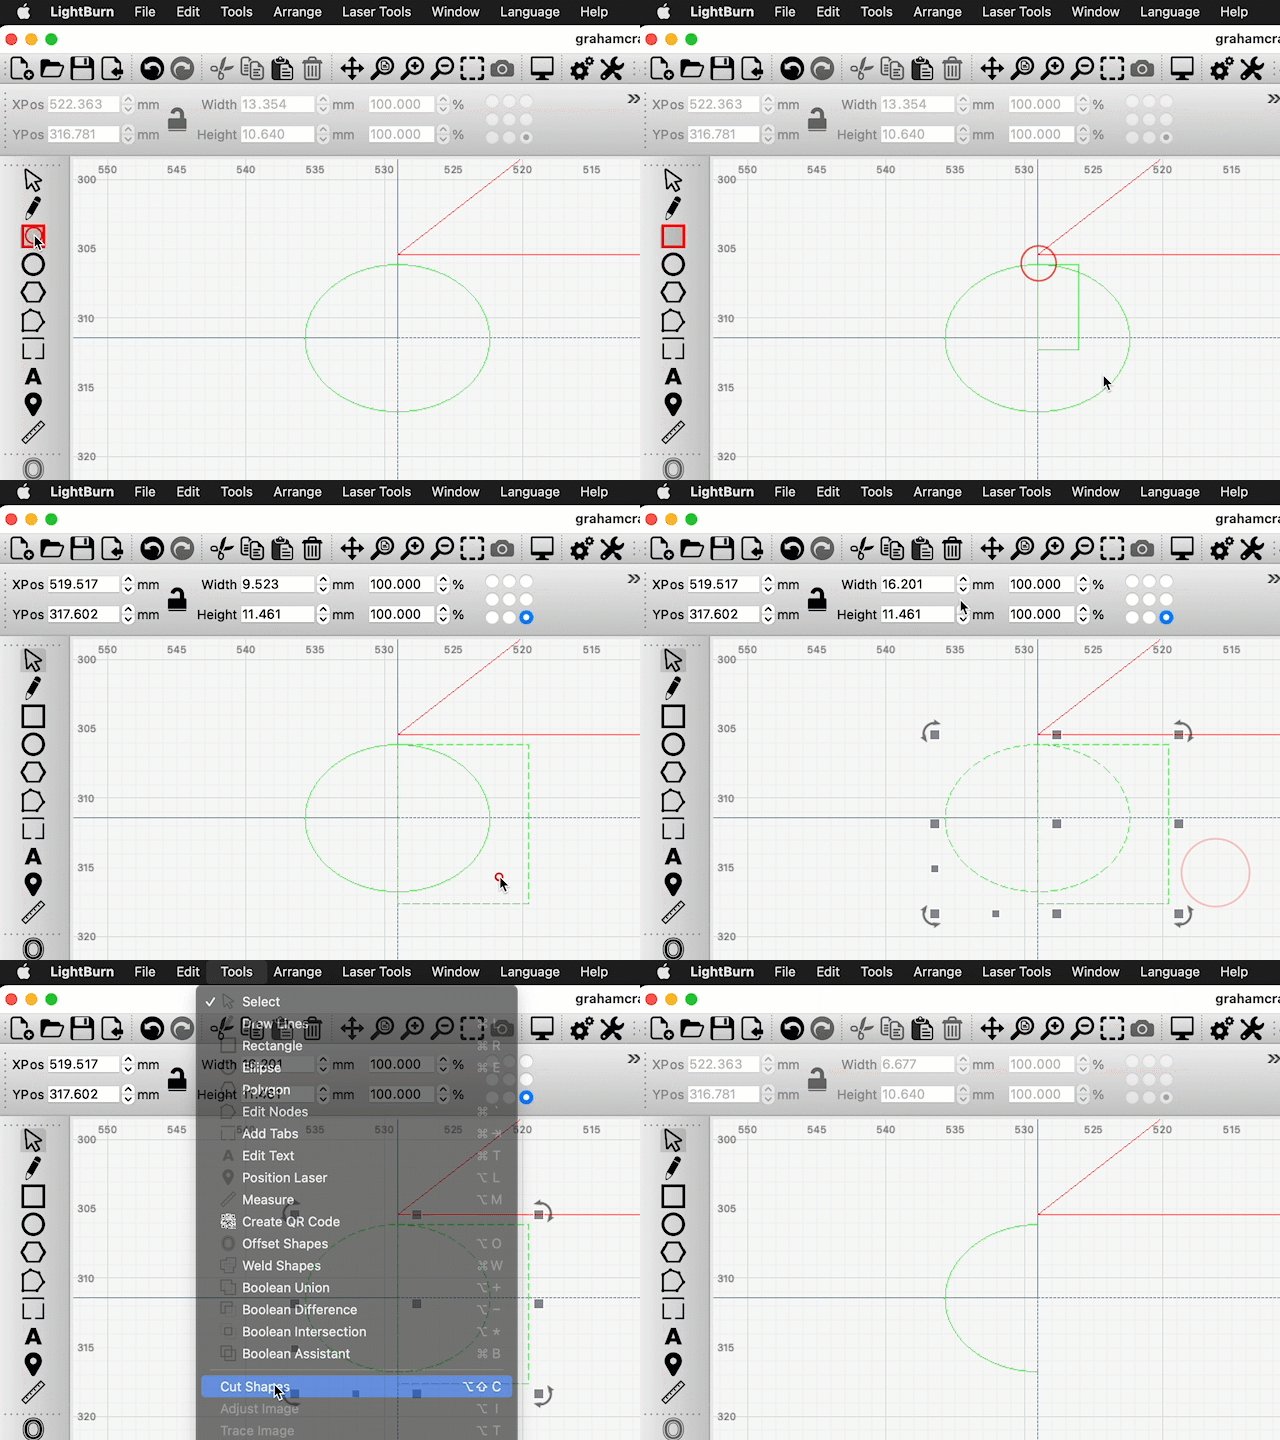
Create a rectangle to use as a cutting shape, starting from the oval's top center and extending to its bottom center, and wide enough that it contains the entire half of the oval to the right. Select the oval, then the line, and go to Tools → Cut Shapes ( Alt+C / Option+C ). The oval will be cut in half — select and delete the half on the right. The rectangle we used as a cutting shape will disappear.
-
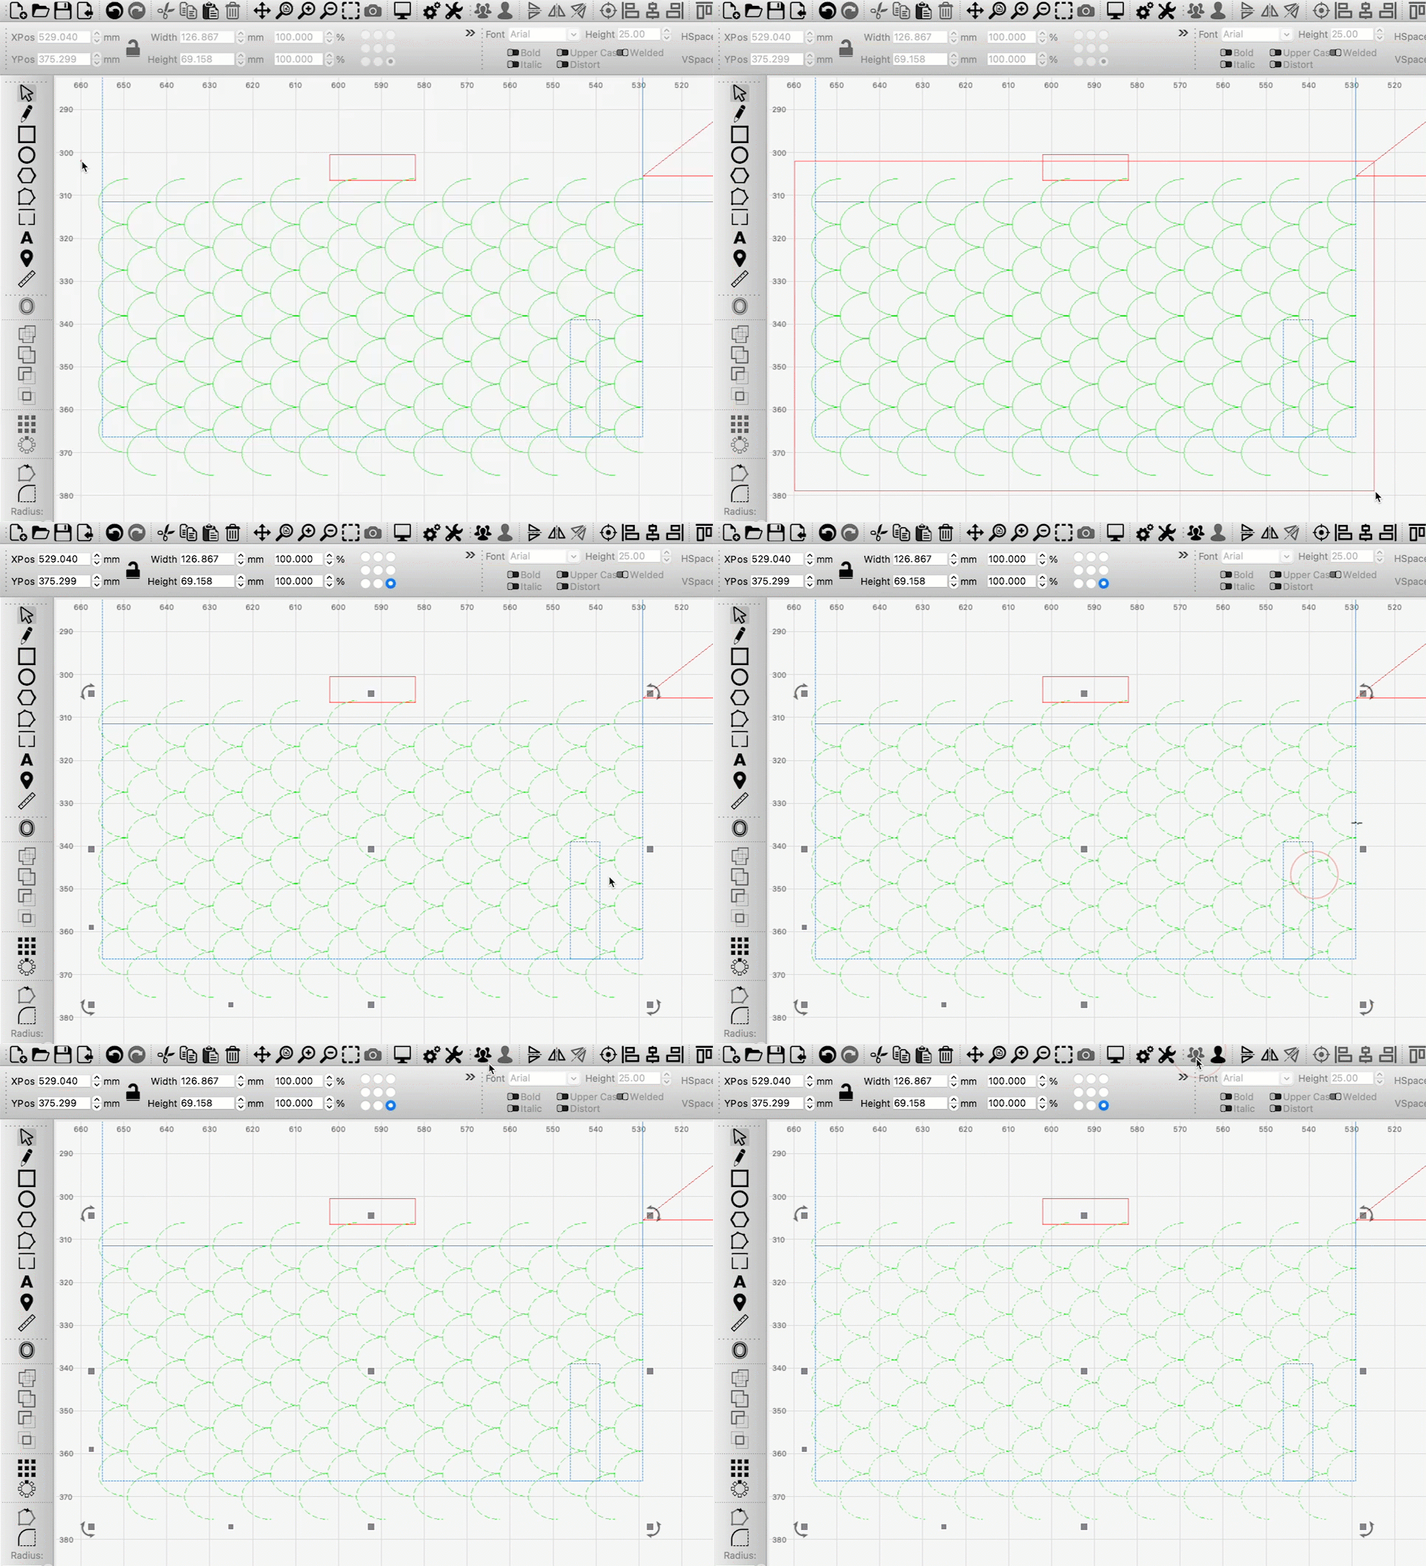
Select the remaining half and then click the Grid Array tool. Create enough X Columns to duplicate the half-oval all the way to the other end of the large rectangle, and enough Y Rows to duplicate them all the way to the bottom. Select Shift by half in the X dimension.
-
Select and Group the resulting array. To do that it's helpful to Drag Select the entire template from the right — grabbing from the right selects only those graphics entirely contained in the box selection. Then hold Ctrl / Cmd while clicking on both the large rectangle and smaller rectangle to deselect them. Finally, with only the arrayed graphics selected, press the Group button.
-
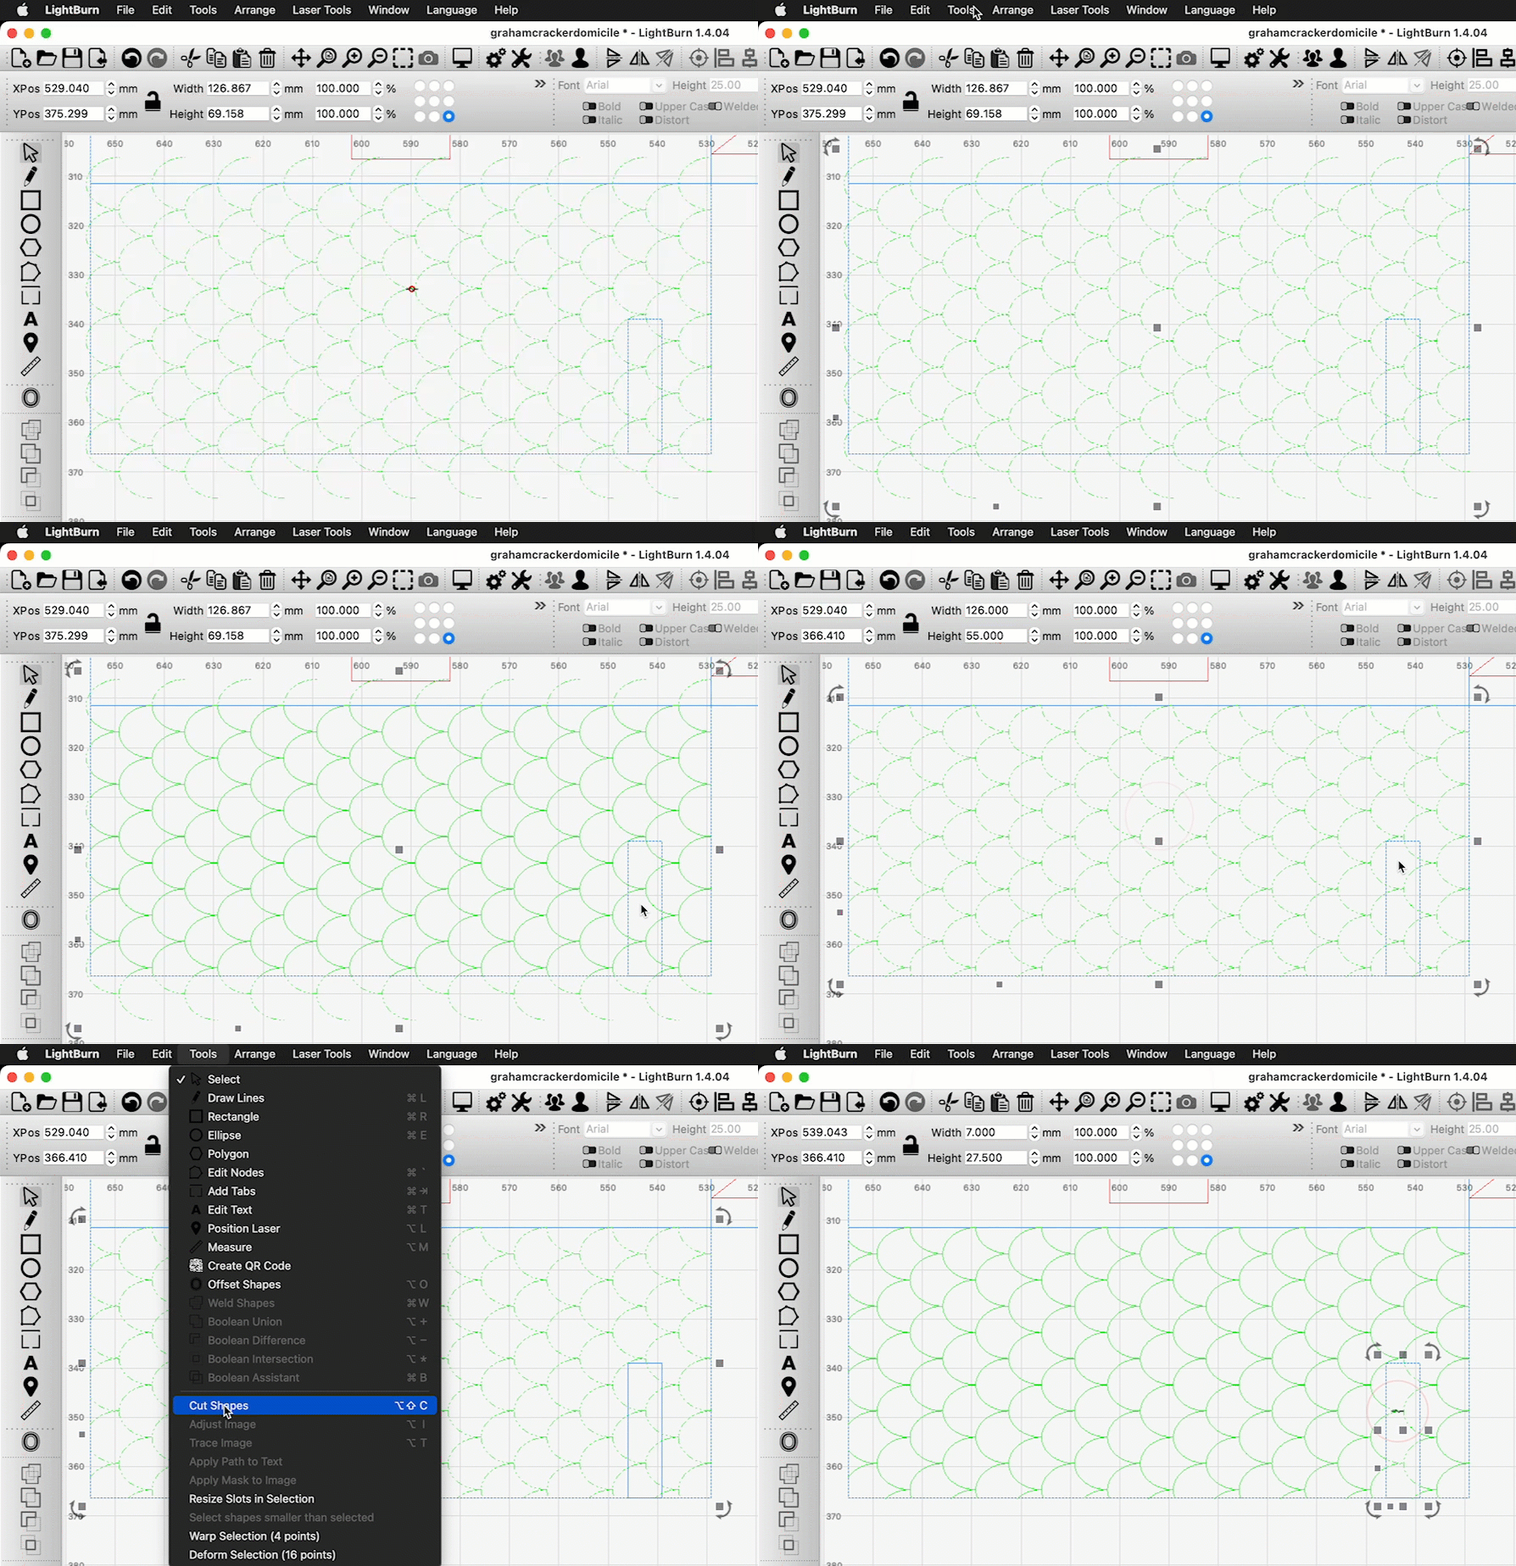
Select both rectangles and Duplicate them. We're going to use them as cutting shapes, but we'll still want the originals around afterward.
-
Select the arrayed tile graphics and then the large rectangle, and go to Tools → Cut Shapes. Delete the remainder that's outside the large rectangle. Re-select the tile array and then the small rectangle, and use the Cut Shapes tool again. Delete the remainder inside the small rectangle.
-
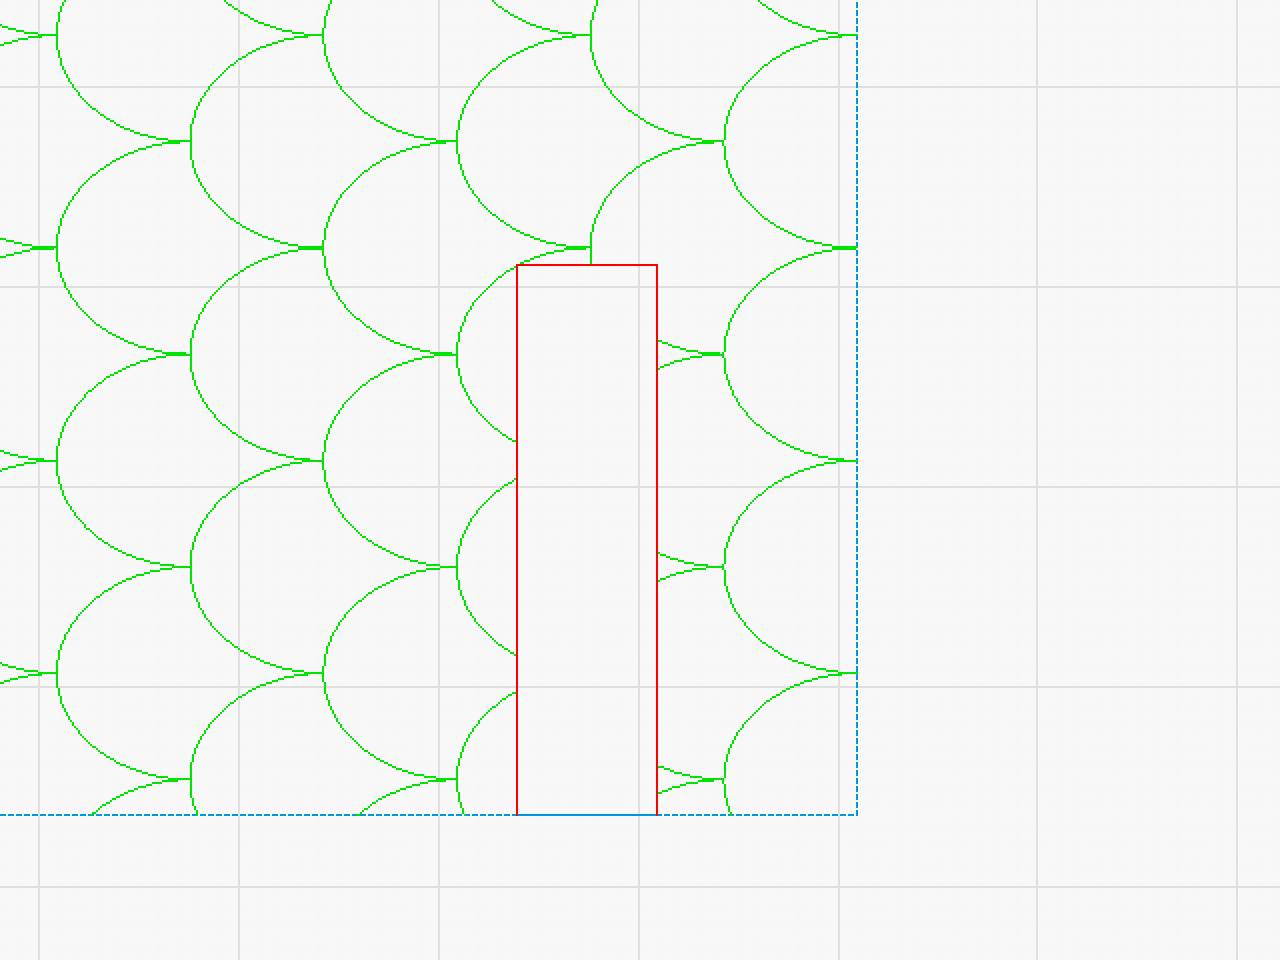
Now select the cut layer and draw lines around 3 sides of the smaller rectangle — every side but the one that's overlapping with the outer edge of the large rectangle.
-
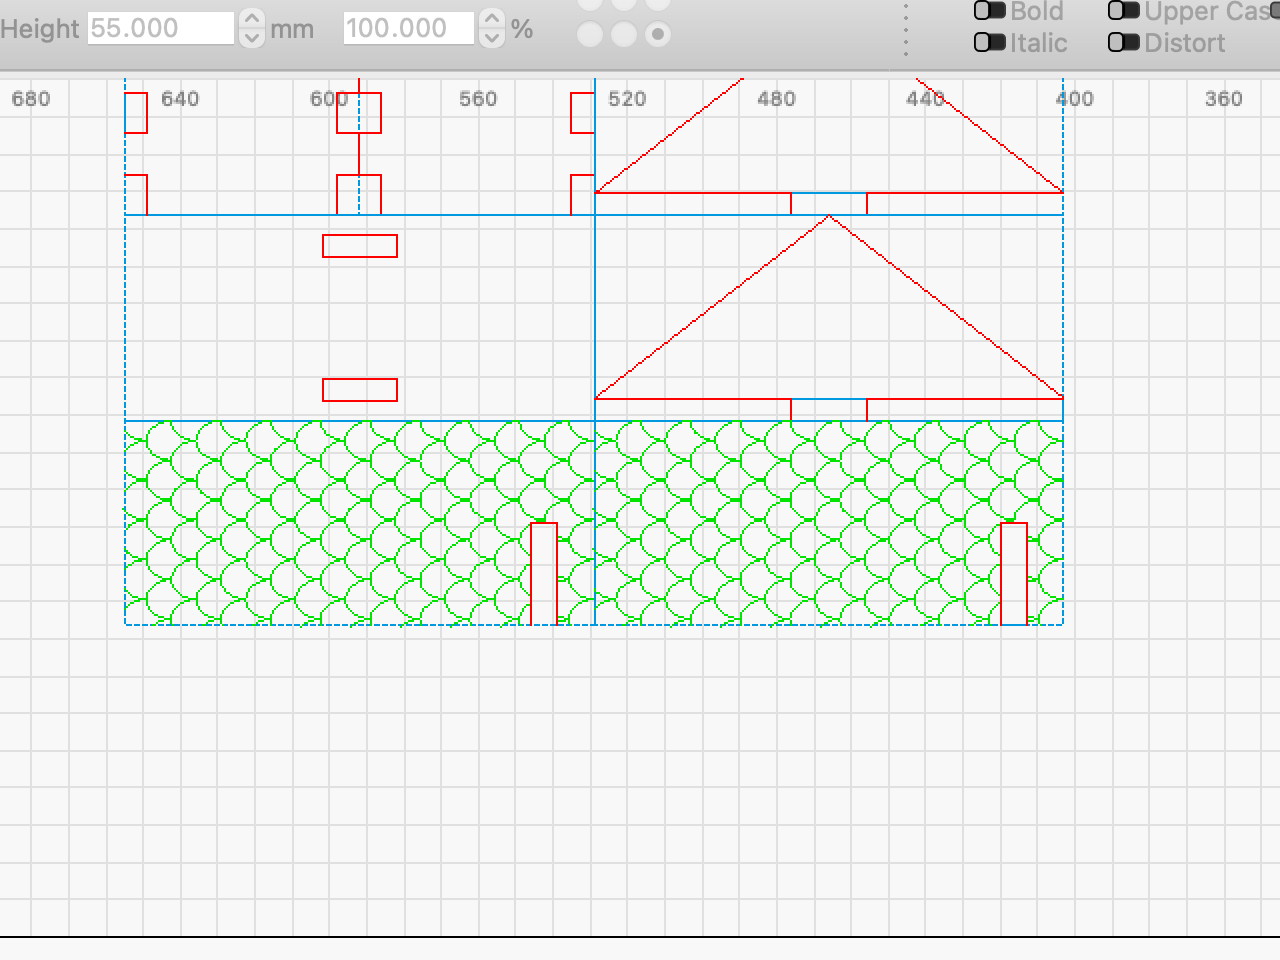
Select everything, Duplicate it, and snap it to the side of the original. These are our two roof panels.
9. Create a Chimney Slot
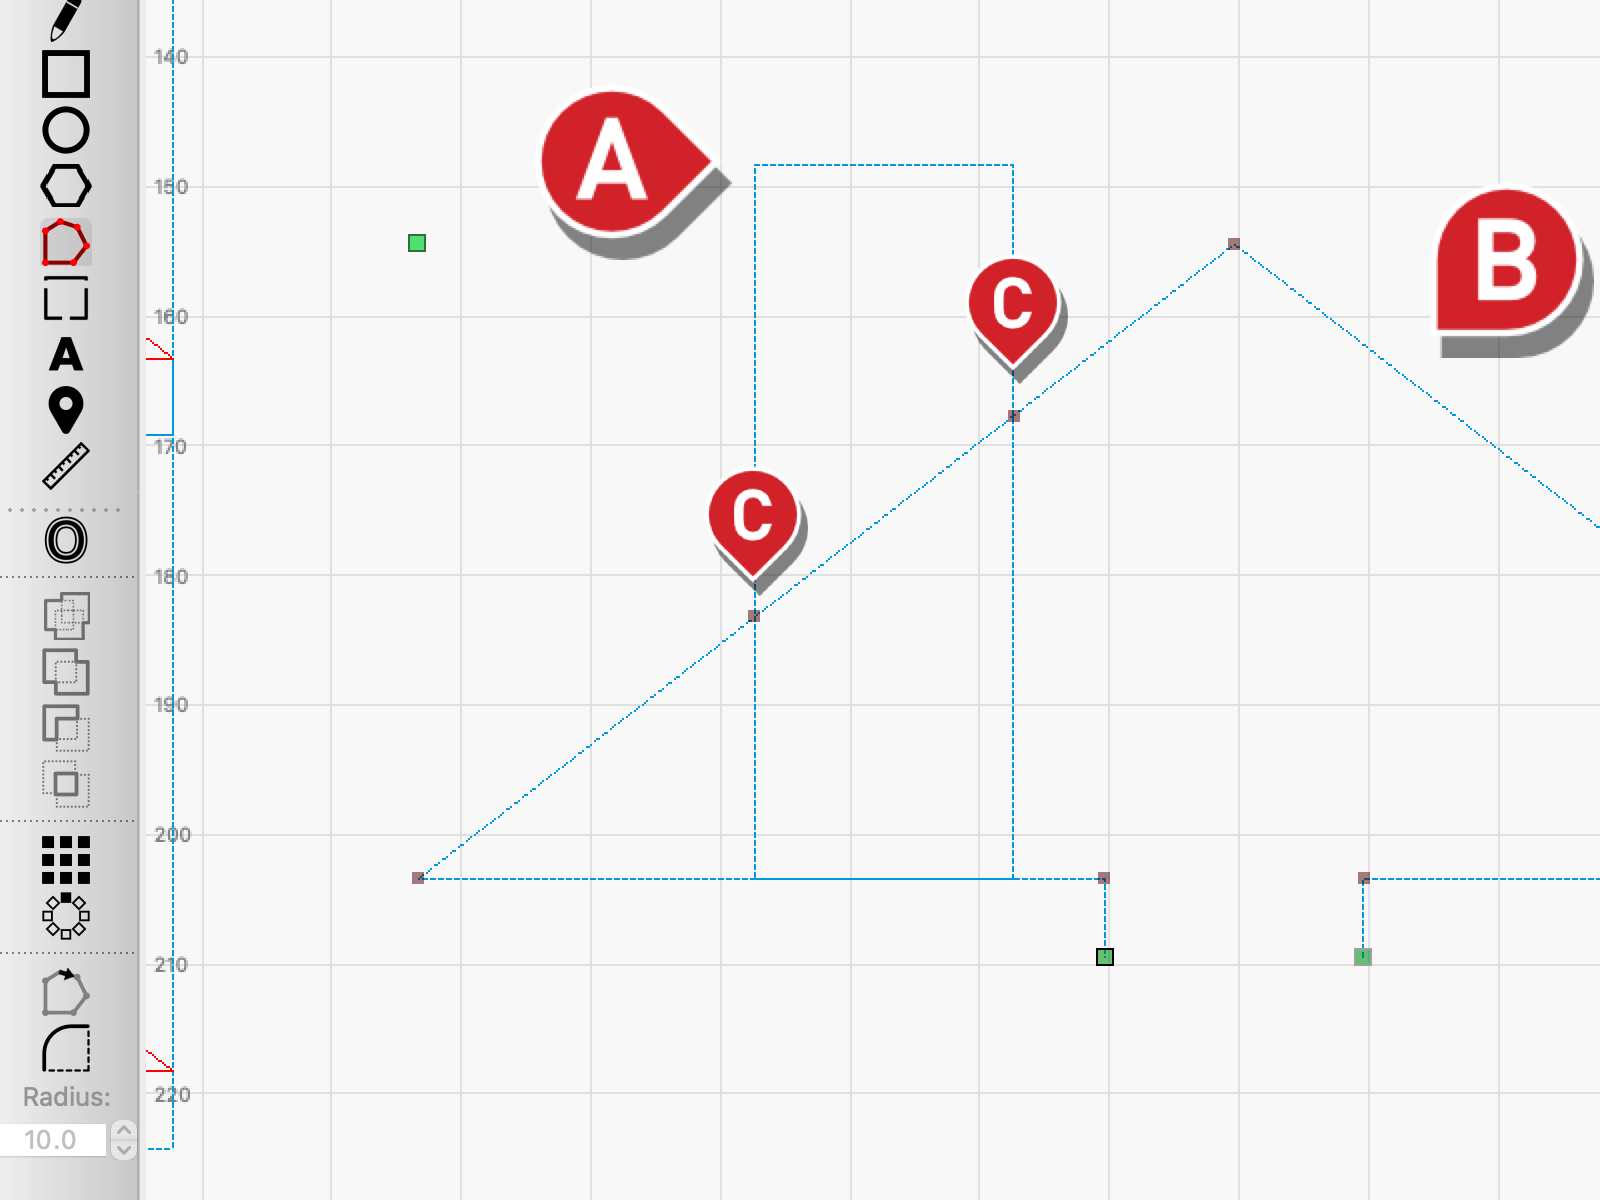
There's one more thing we need to make before we're done with the roof — a hole for a chimney on one of the panels. To make the hole the right size, first we'll need to decide how wide our chimney will be (we decided on 20 mm), and then overlay our roof support to the chimney and measure the length of the slanted line across it.
-
Create a 20 mm wide and 55 mm long rectangle (it doesn't need to be quite this long, but this value will ensure the roof support will fit entirely).
-
Then create a Duplicate of your roof support and lay it across the rectangle.
-
Next, select the Edit Nodes tool ( ++ctrl+`++ / ++cmd+`++ ). Select the roof support, hover over the roofline at both points it intersects with the rectangle, and press I to insert nodes at both intersections.
-
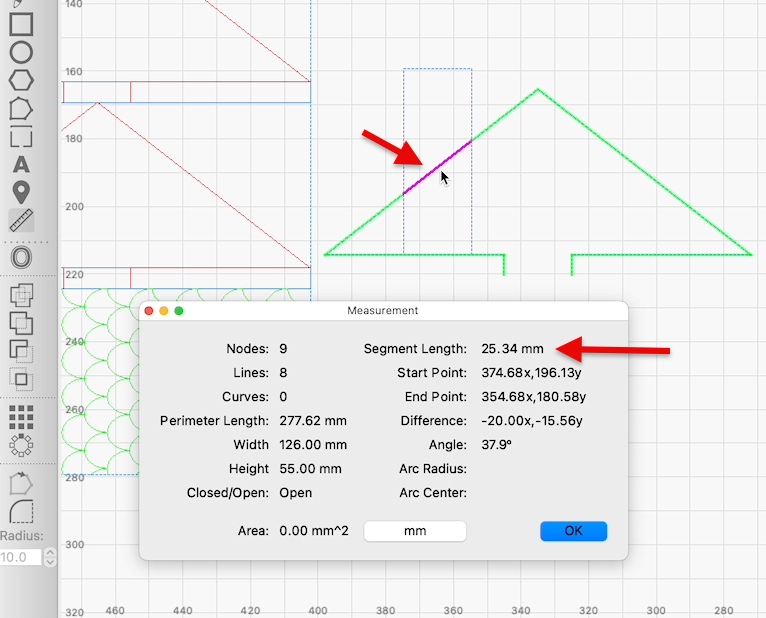
Once you've added the nodes, use the Measure tool ( Alt+M / Option+M ) to hover over the line between the rectangle, and record the Segment Length. Write the measurement down somewhere and delete these shapes.
-
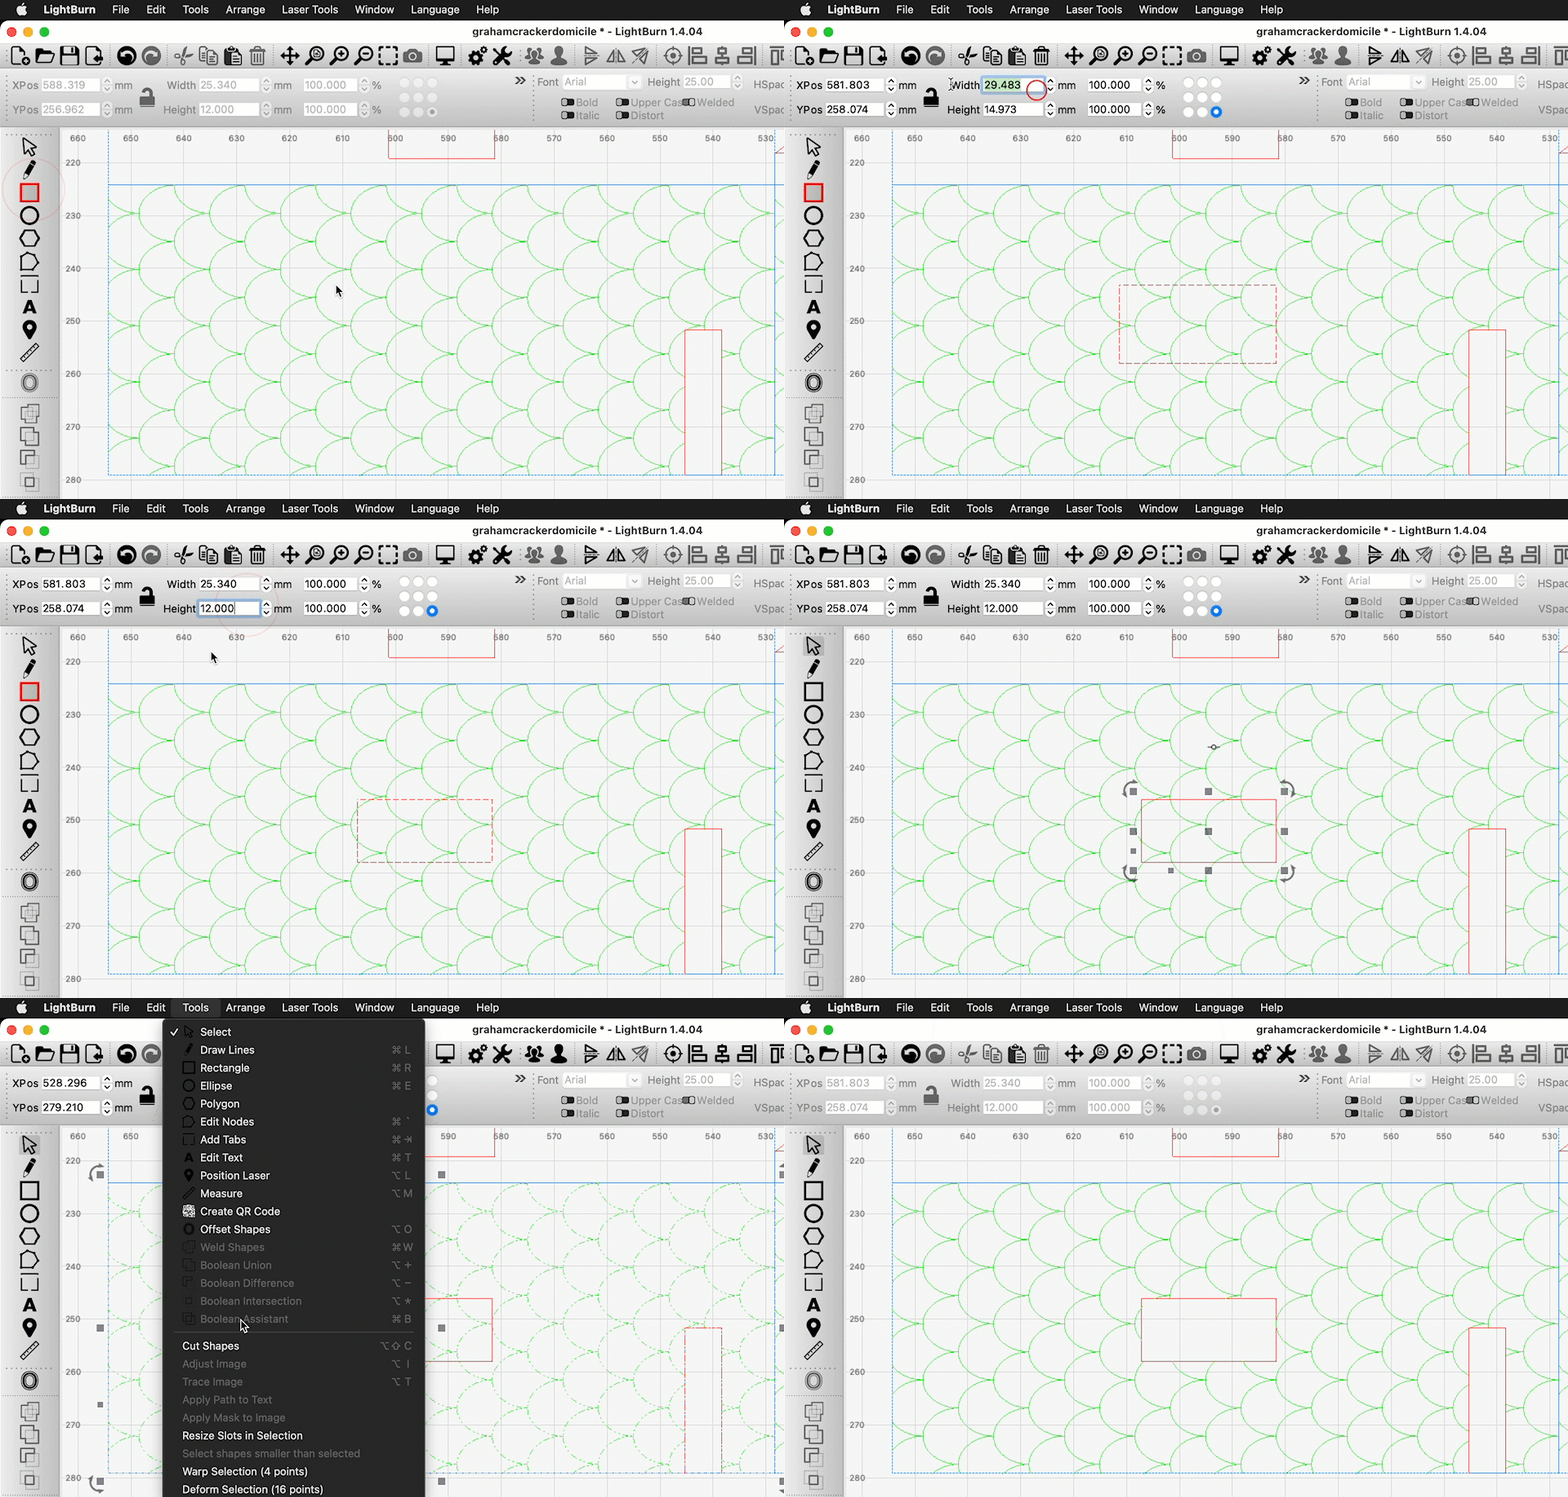
On one of the roof panels, create another rectangle, on a cut layer, with its height set to twice the thickness of the graham cracker (12 mm in our case), and width to the length you just recorded (25.34 mm in our case). Position it roughly in the center of the panel, and Duplicate it.
-
Select the tile array, then the duplicate of the chimney slot rectangle, and use Cut Shapes again. Delete what's left inside the rectangle.
10. Chimney
Making the chimney will require another graham cracker, so make or Duplicate another graham cracker sized rectangle.
-
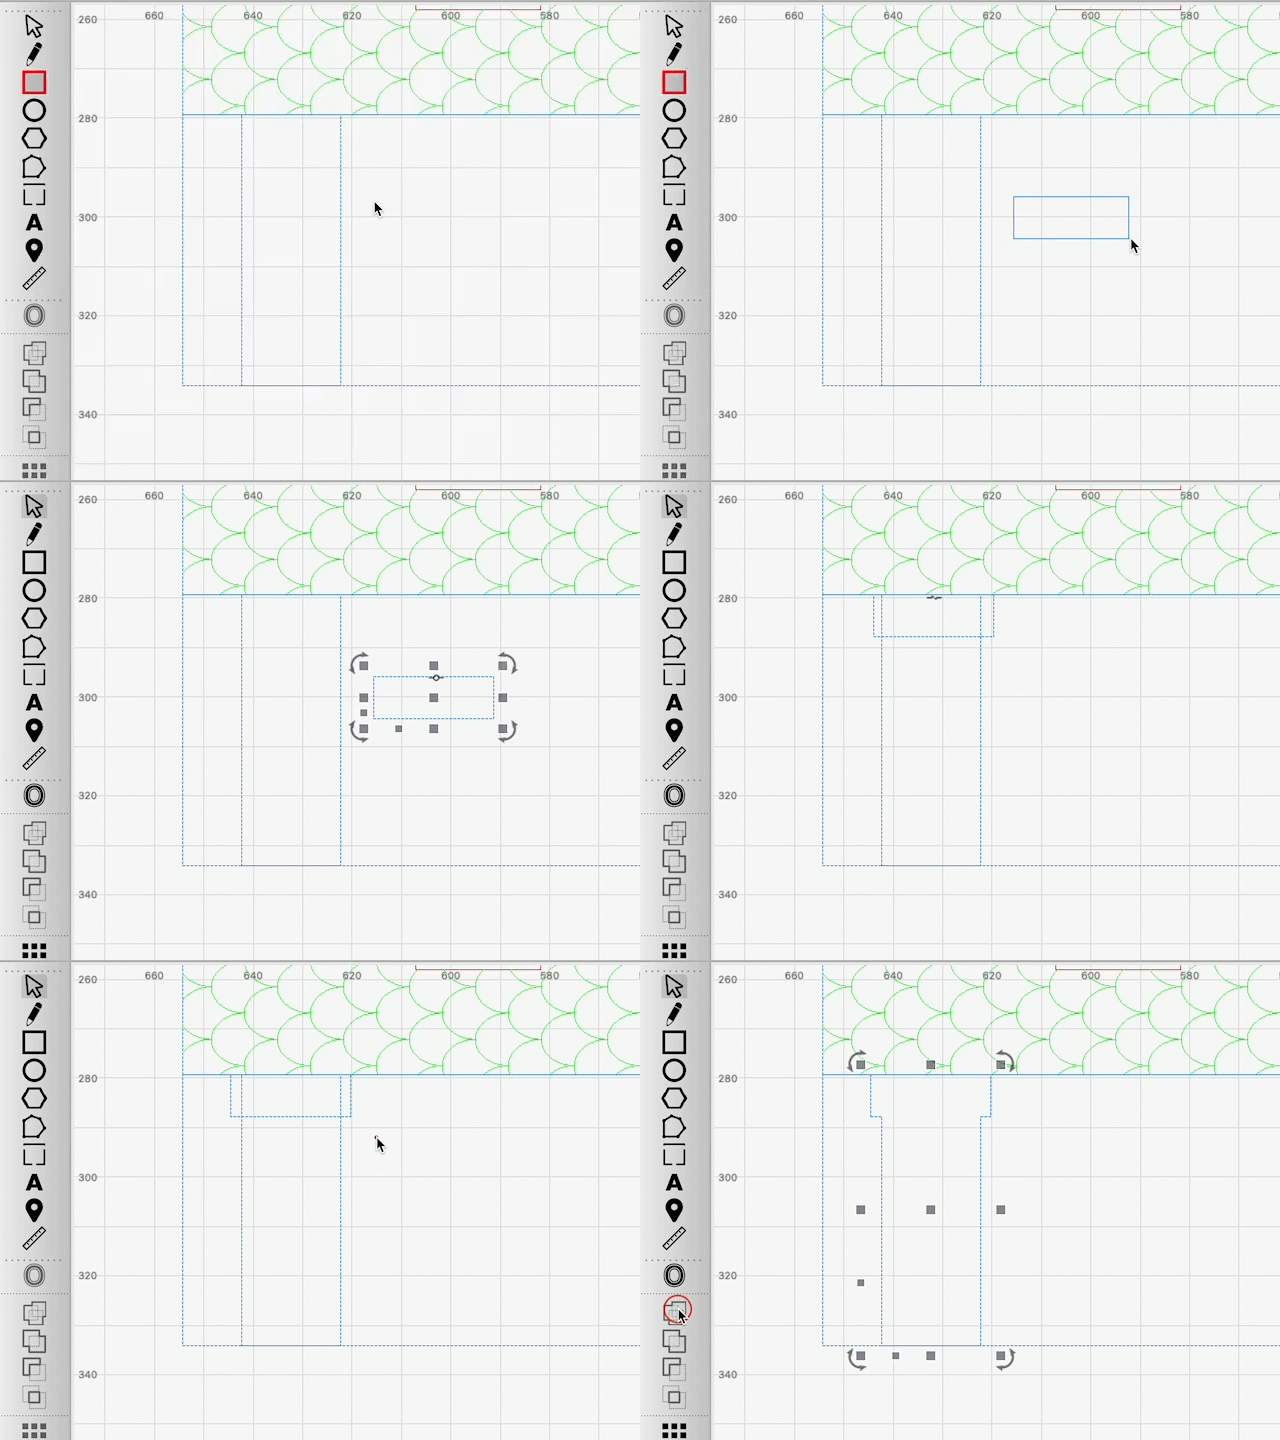
Then, with a Tool layer selected, make two rectangles within it. The first should be the width you decided on earlier, and the same height as the full, large rectangle. The second should be wider than the first, and quite a bit shorter — think of the rim around the top of a chimney. Snap the second to the top center of the first.
-
Select both and Weld ( Ctrl+W / Cmd+W ) them together.
-
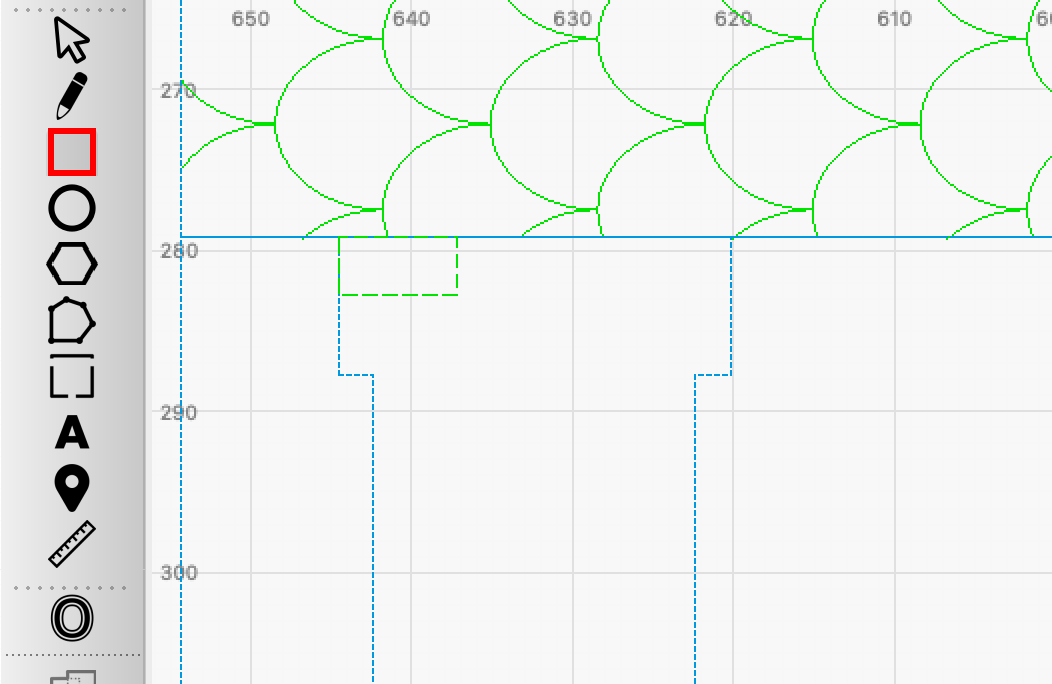
Create another small rectangle, set to the etch layer, roughly the size of a “brick” that's proportional to the chimney we've made.
-
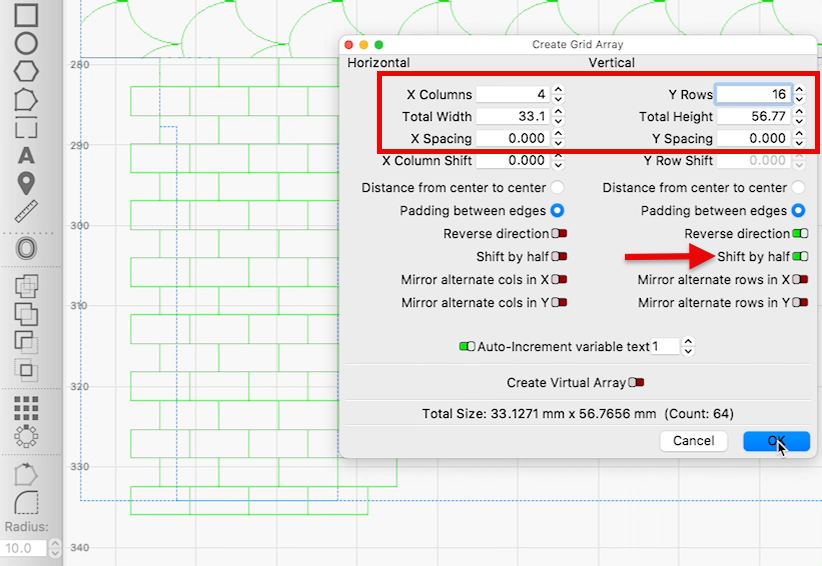
Select it, then use the Grid Array tool to array it in sufficient columns and rows that it covers the entire chimney. Enable Shift by half in the Y dimension.
-
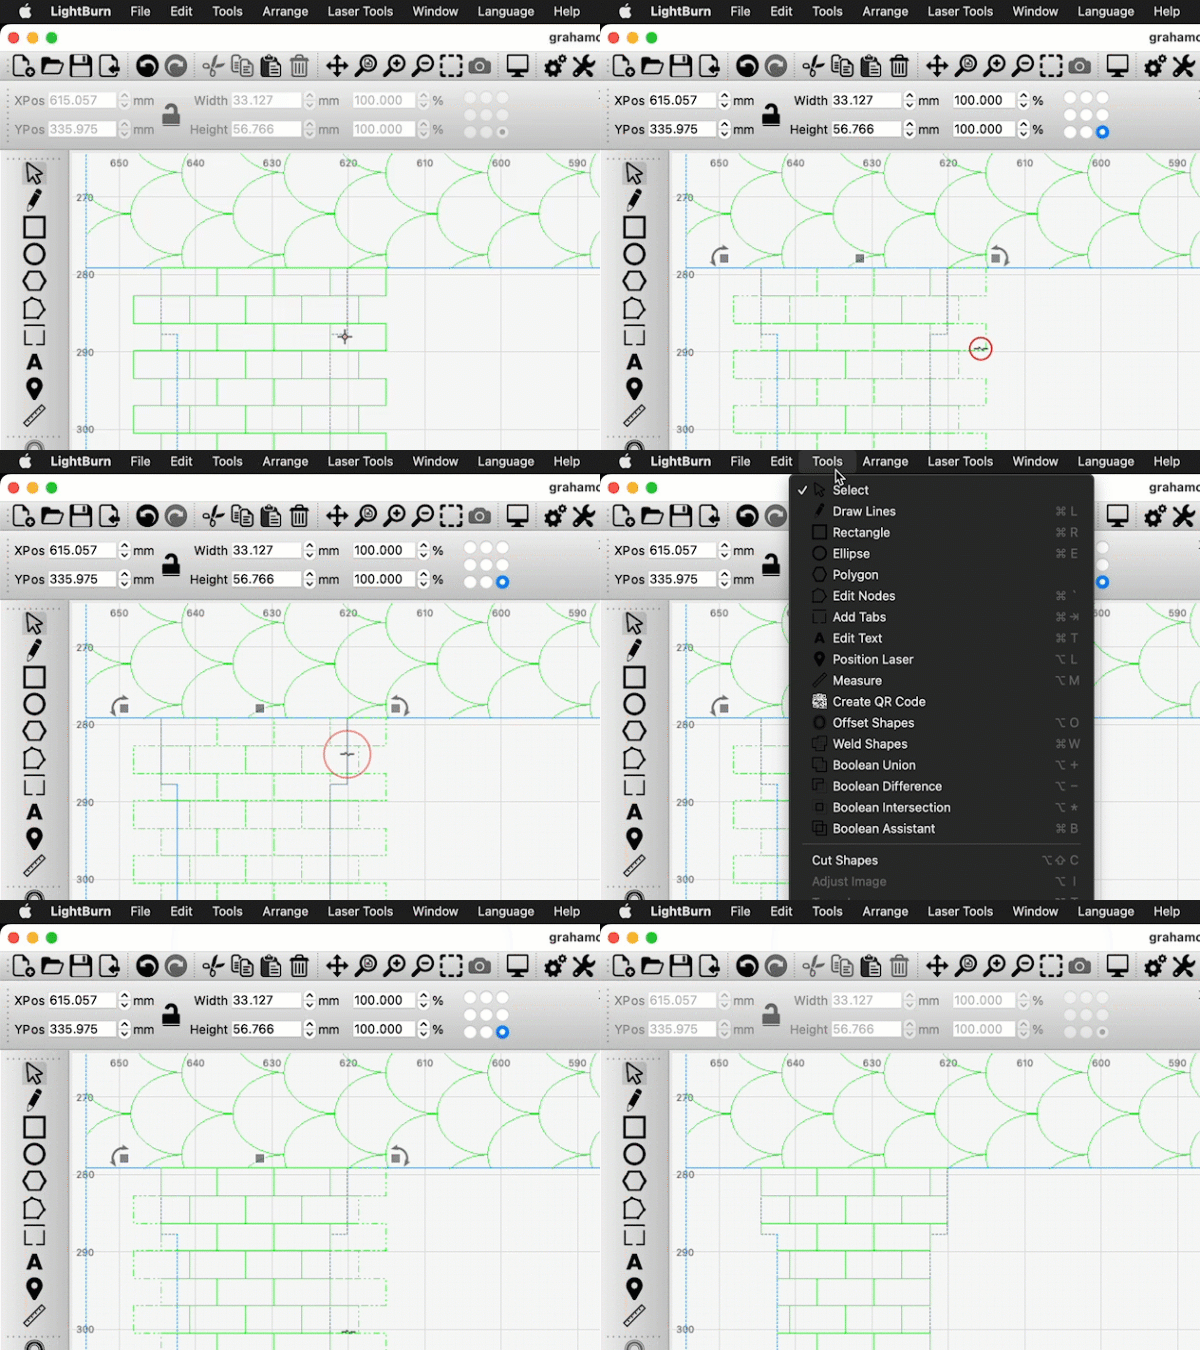
Select and group the arrayed bricks, then Duplicate the chimney outline. Finally, select the arrayed bricks, then the duplicate chimney, and use Cut Shapes. Delete everything outside the chimney.
-
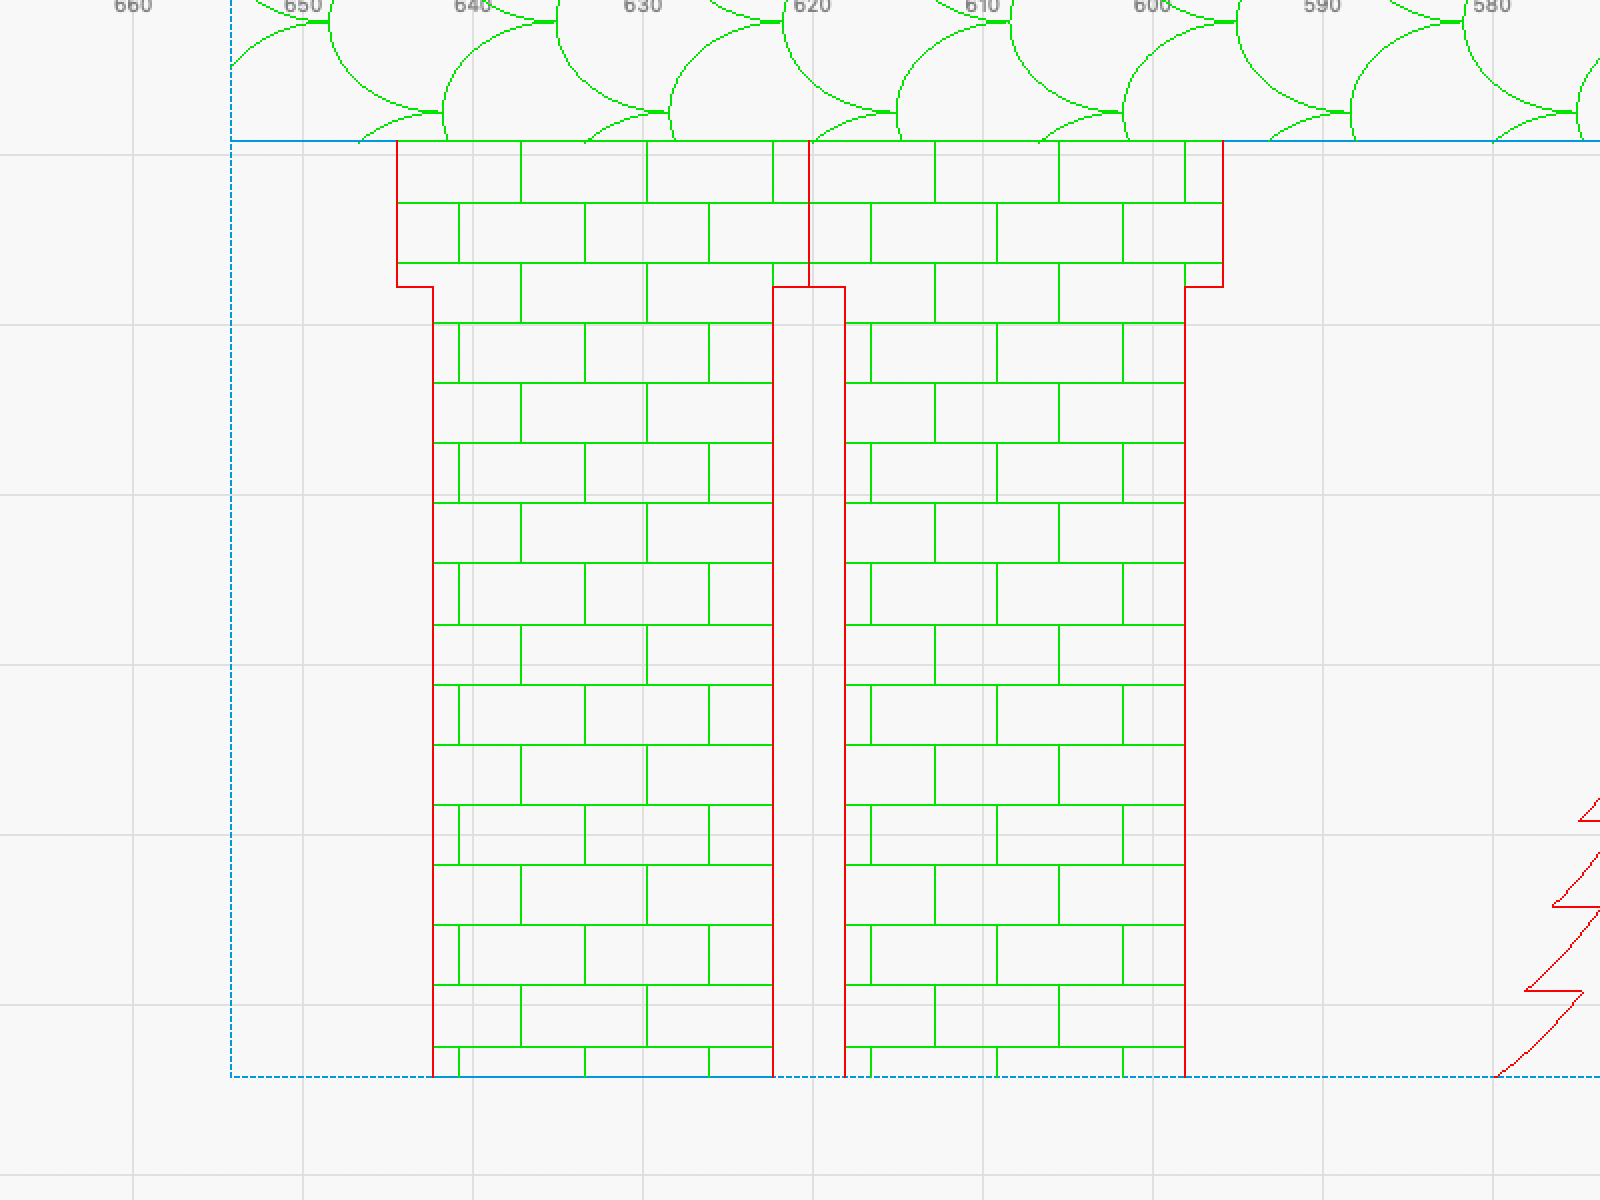
Draw cut lines on all sides of the chimney except for the two sides that are along the outer edge of the large rectangle.
-
Select everything you just made, chimney and bricks, Duplicate them together, and move the duplicate to the side of the original.
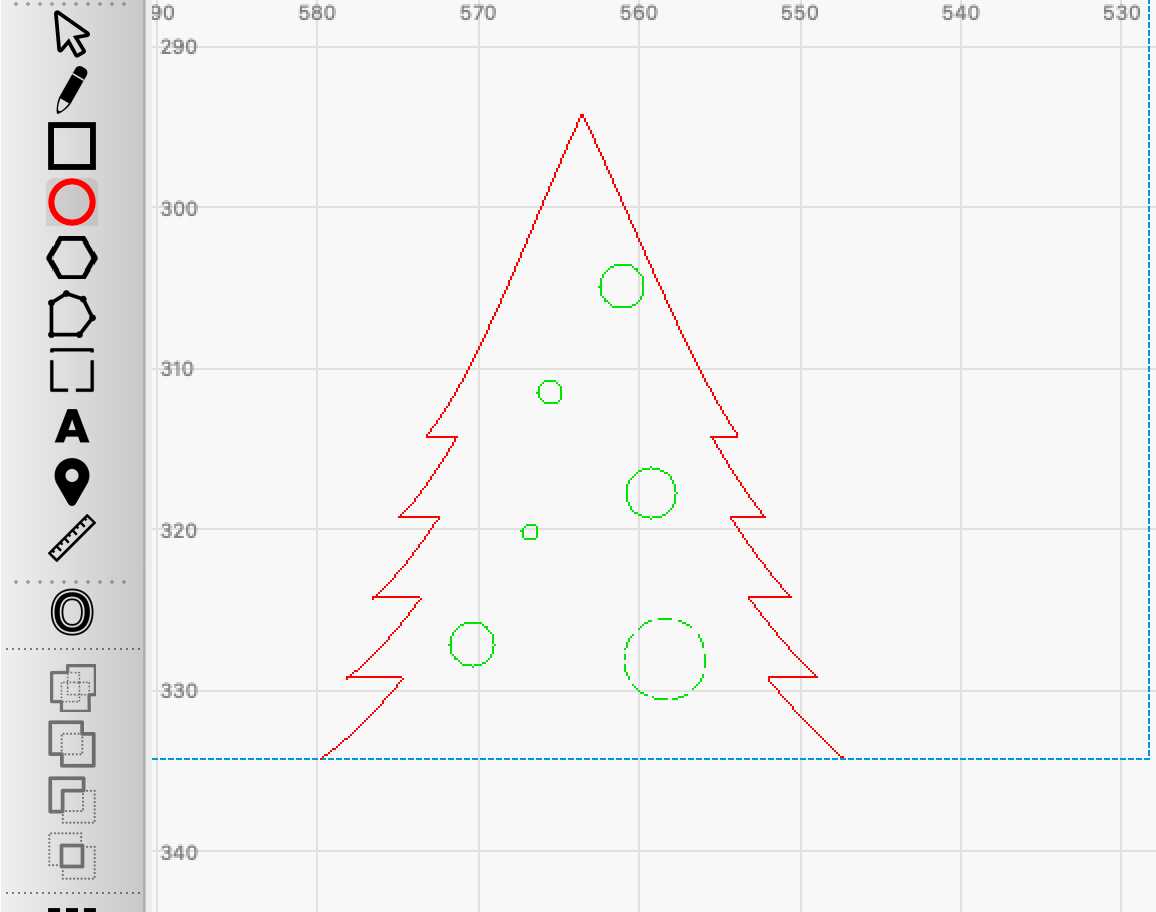
11. Christmas Tree
We've got some space left on this cracker, and we're going to use it to make a Christmas tree.
-
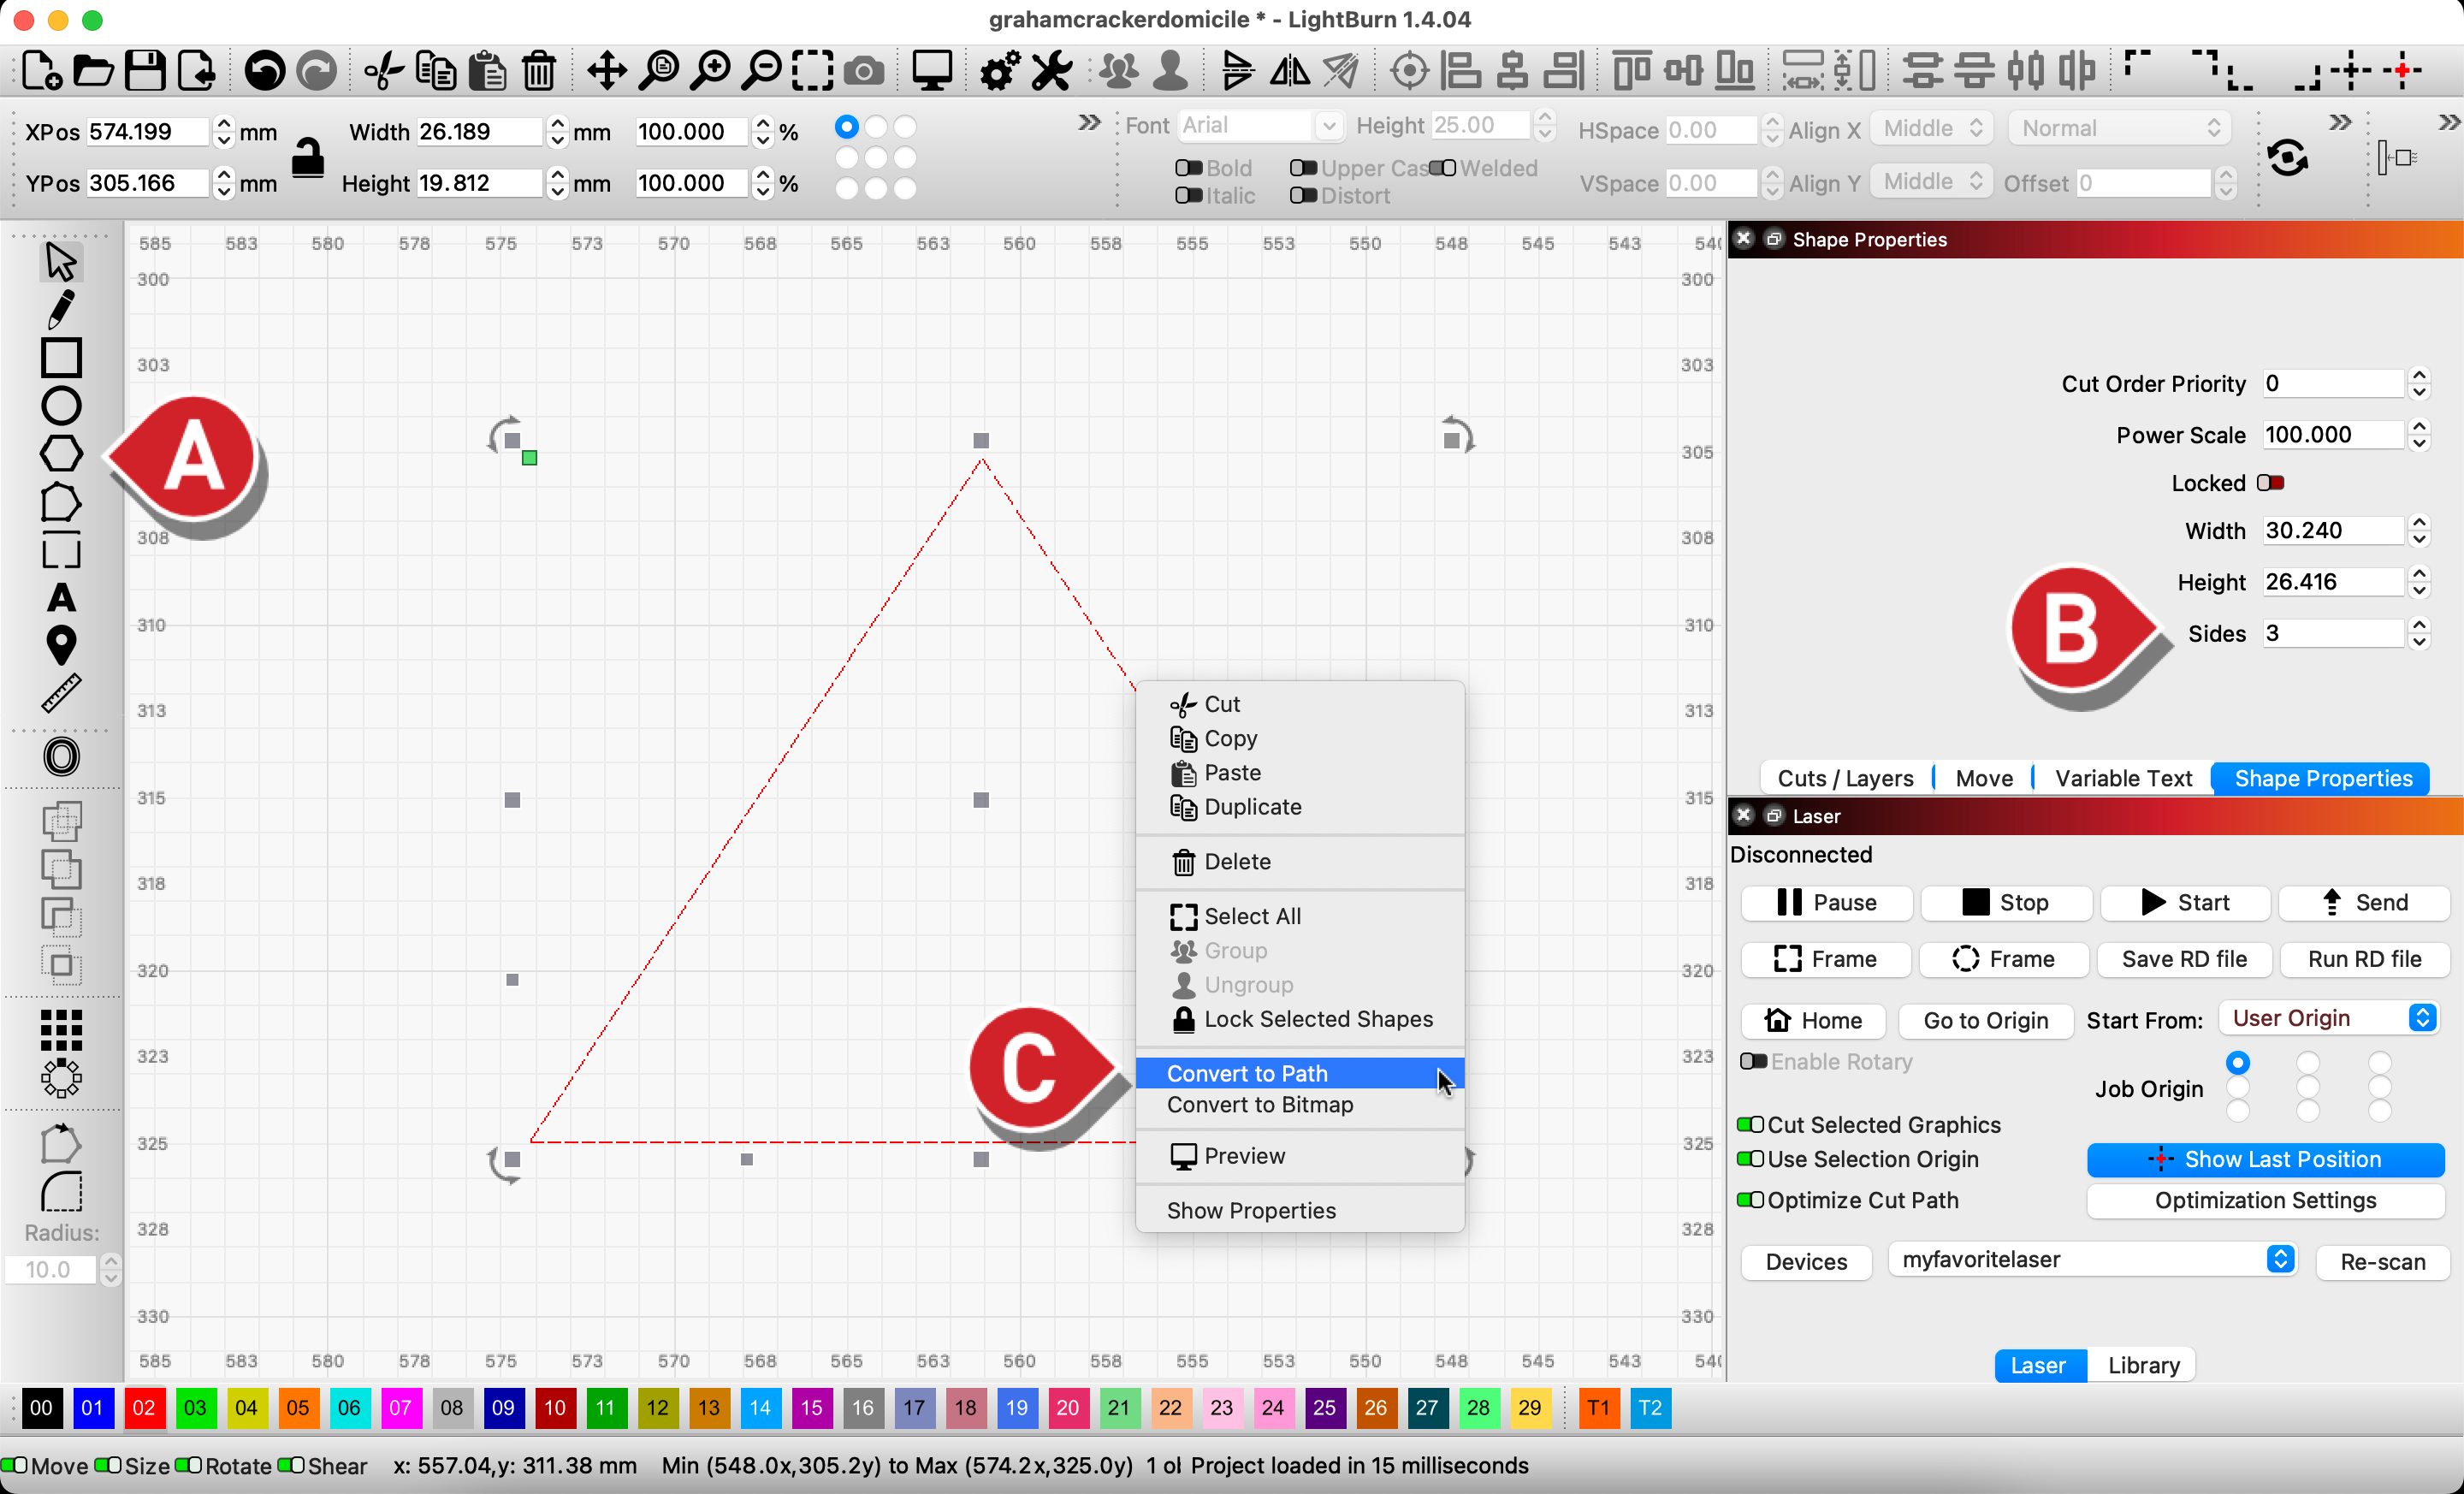
Select the Polygon tool then click and drag to create a six sided polygon.
-
Then, with the polygon still selected, go to the Shape Properties window and change the number of Sides to 3 to turn it into a triangle.
-
We're going to use the Edit Nodes tool on the triangle, so first we need to right-click it and select Convert to Path (Ctrl+Shift+C / Cmd+Shift+C ).
-
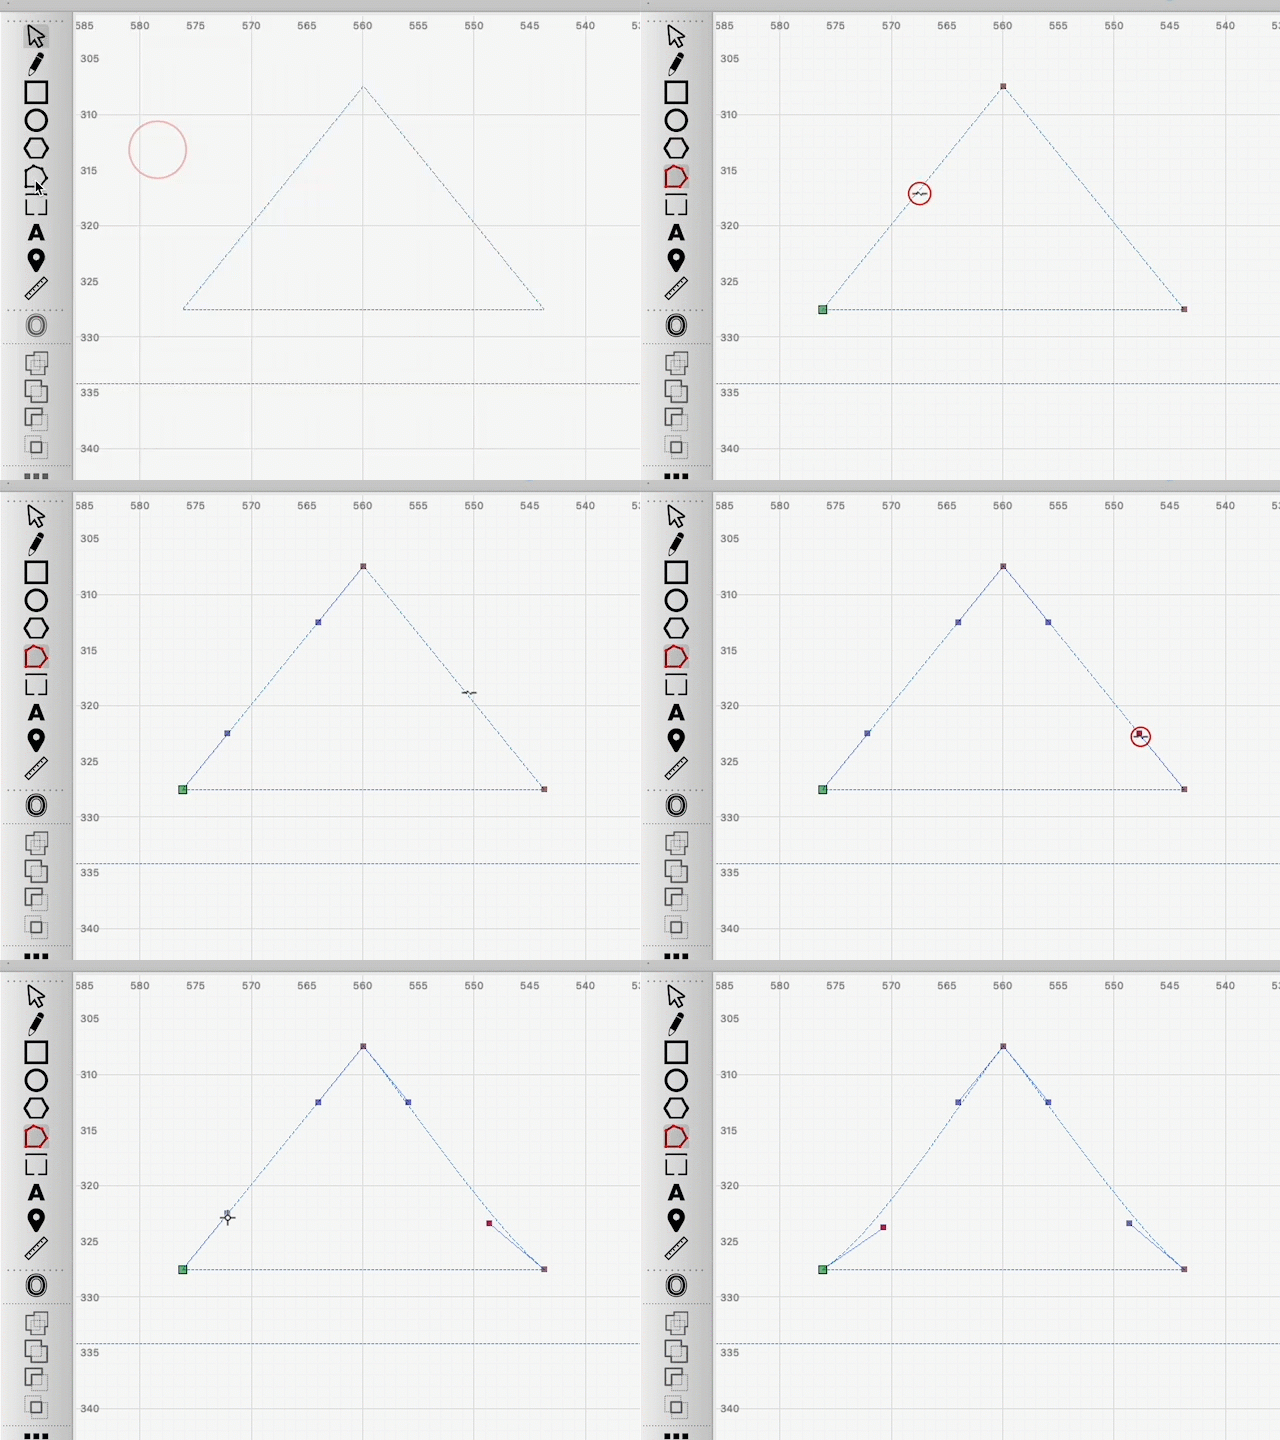
Then, select the Edit Nodes tool and the triangle. Hover over the lines on each side and press S to turn them into curves.
-
You'll see four handles appear on either side, pull the bottom one on each side down so the lines curve in a bit. They don't need to be perfectly symmetrical on each side.
-
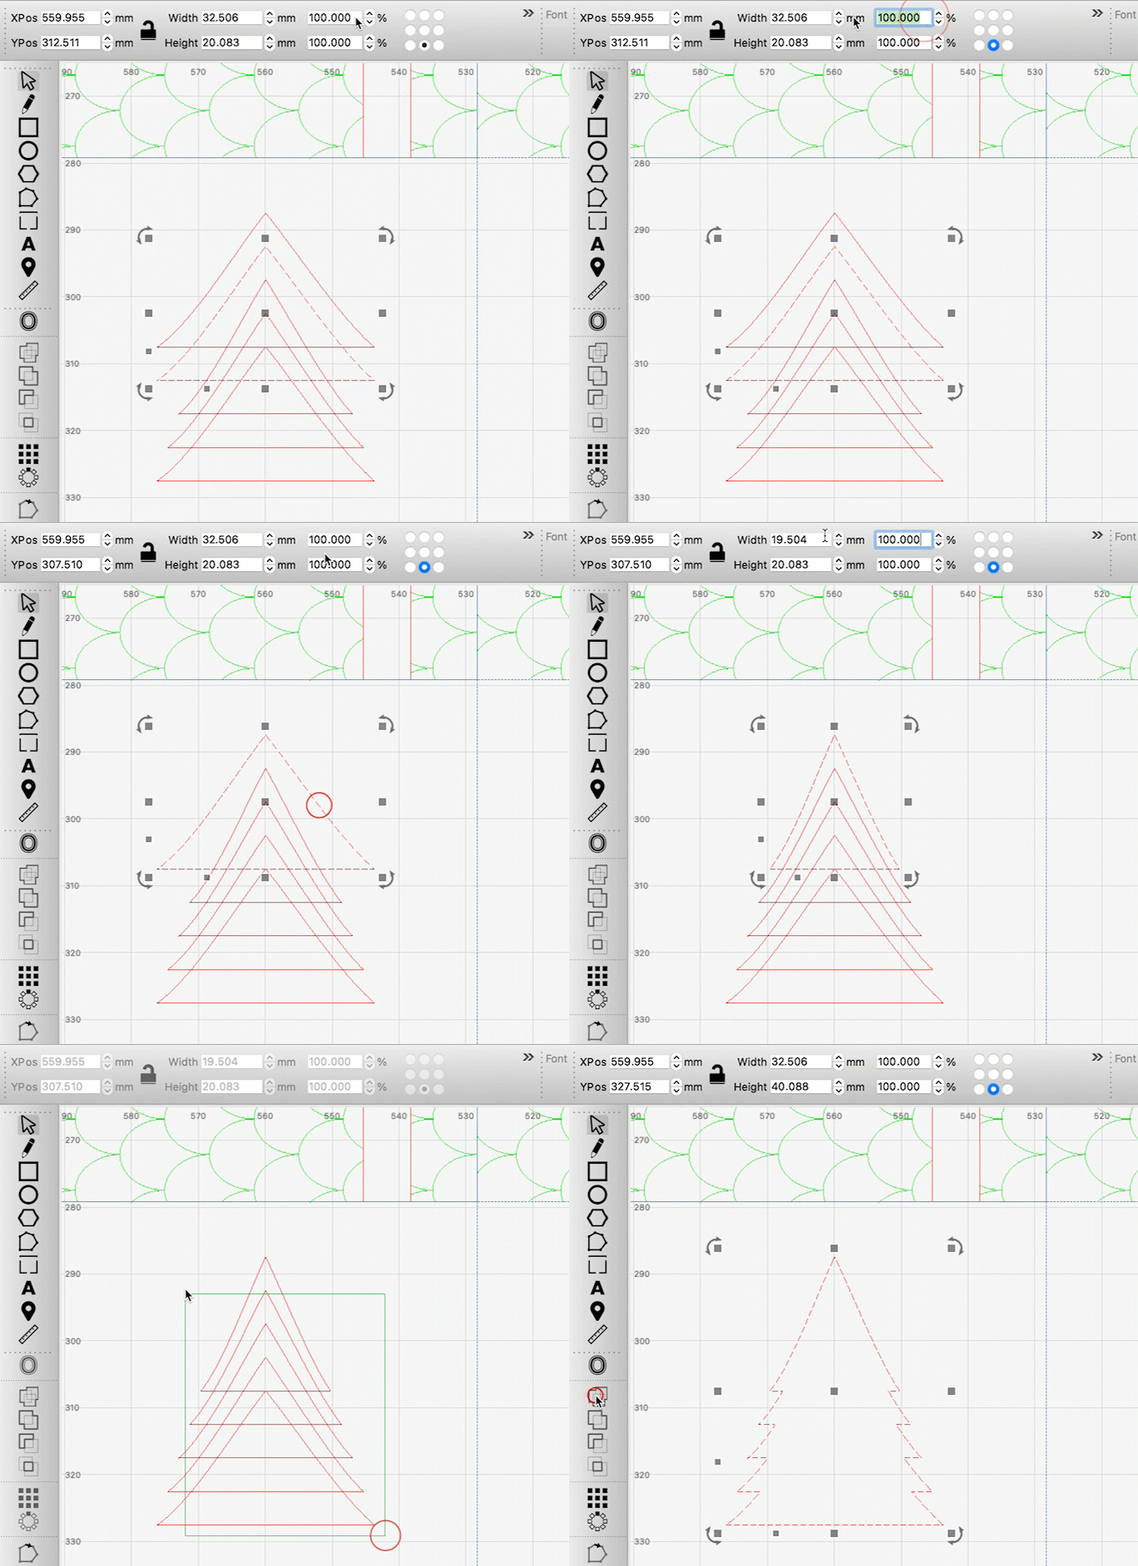
Duplicate the triangle, then nudge it up one step, then Duplicate the duplicate and nudge it up, and so on, until you have 5 triangles.
-
Select the second triangle from the bottom, and, in the Numeric Edits toolbar, shrink its width by 90%. Then select the next one up and shrink it by 80%, and so on until you've shrunk the last triangle.
-
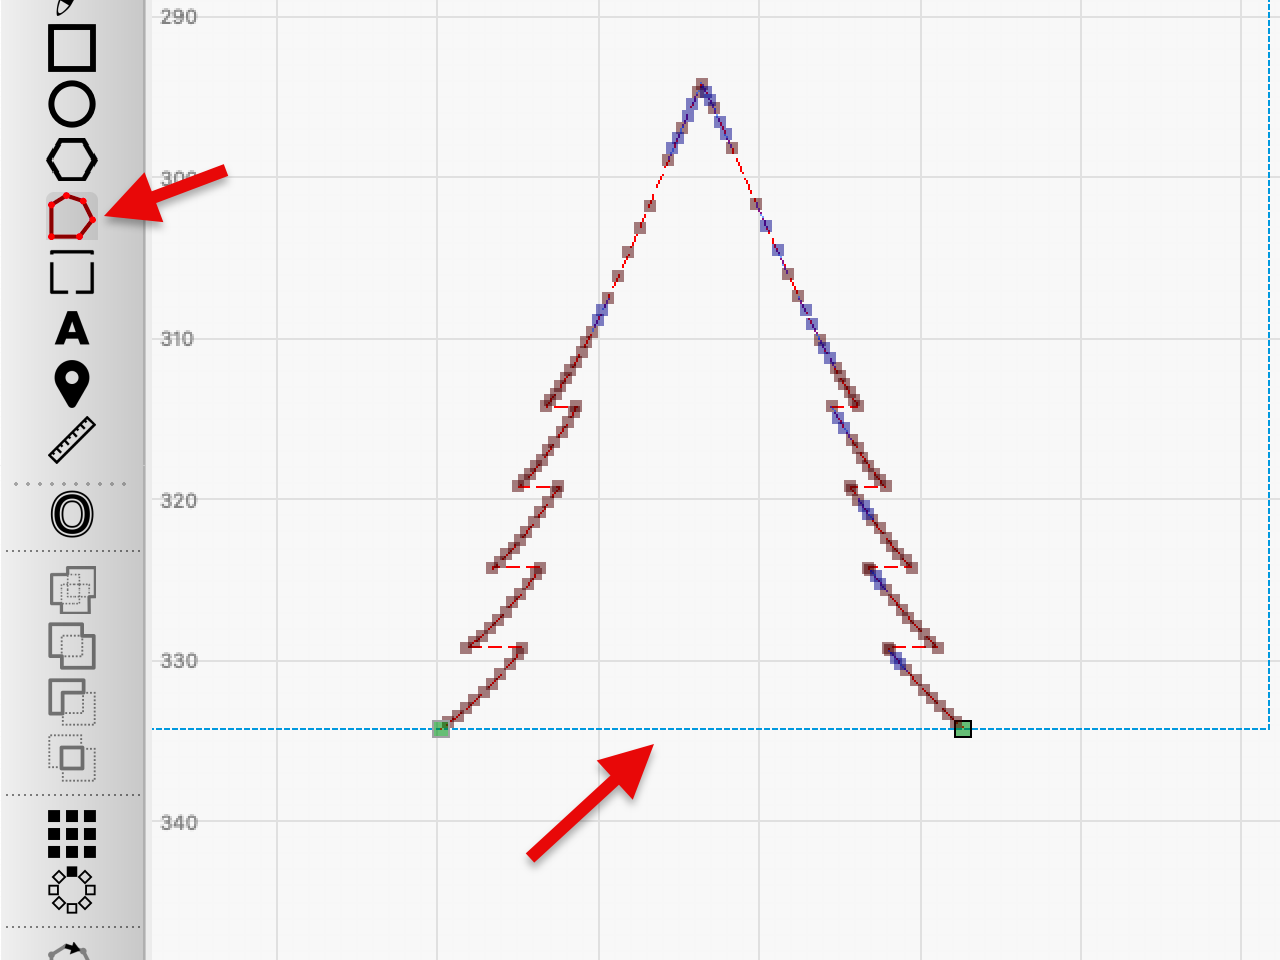
Select all of the triangles and Weld them together. Resize the finished tree using the size handles, according to your preference.
-
Snap the bottom of the tree to the bottom of the large rectangle and then select the Edit Nodes tool and hover over its bottom line and press D to delete that line. Since it's along the edge of the graham cracker, we don't need to cut that.
-
The last thing our tree needs is ornaments. Inside it, add a few circles set to an etch layer. Hold Shift while dragging to make perfect circles.
12. Add a Door and Windows
Now, we're going to add a few additional features — our graham cracker residents need a way in and out of their house, and a nice view of the neighborhood.
-
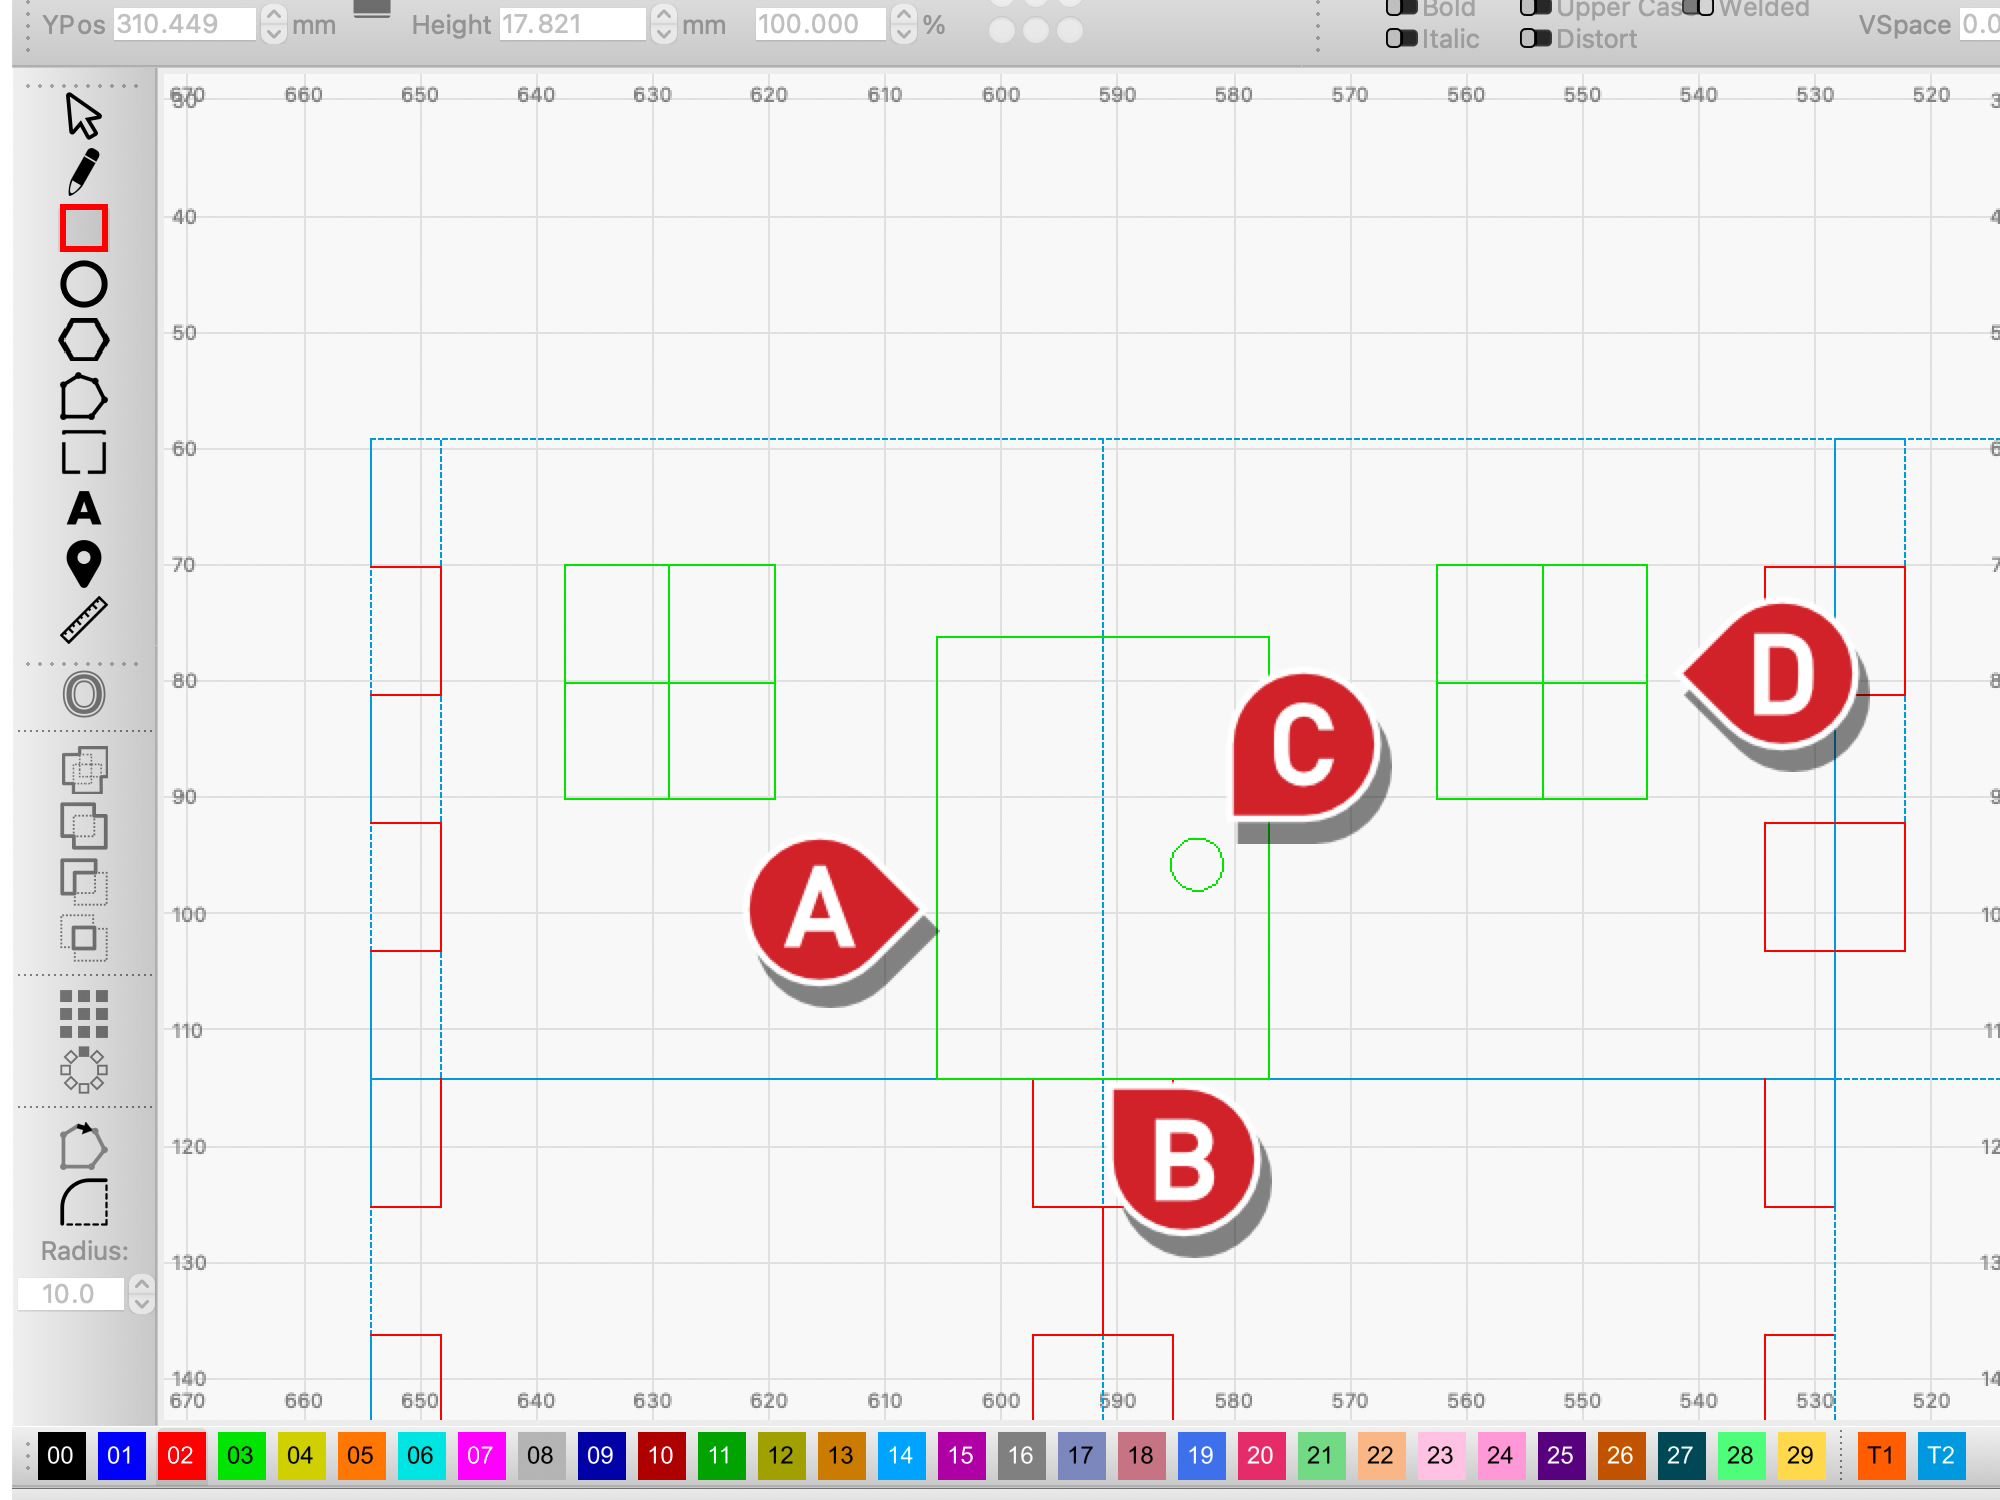
Head back to the front wall, select the etch layer, and create a new rectangle near the center of the large rectangle. It's meant to be a door — as this part is purely decorative, its size is up to you.
-
Positioning is up to personal preference as well, but you can use snapping to select the new rectangle from its bottom midpoint, and then drag it to snap to the bottom midpoint of the large rectangle, centering it in the whole design.
-
Use the Ellipse tool to create a small circle near the middle and off to the center of the new rectangle. We now have a door and door knob!
-
Create another rectangle to etch a window with. To make window panes, use the Draw Lines tool and snapping to draw a line from top-center to bottom-center, and right-center to left-center. Group and Duplicate the window and position one copy on each side of the door.
-
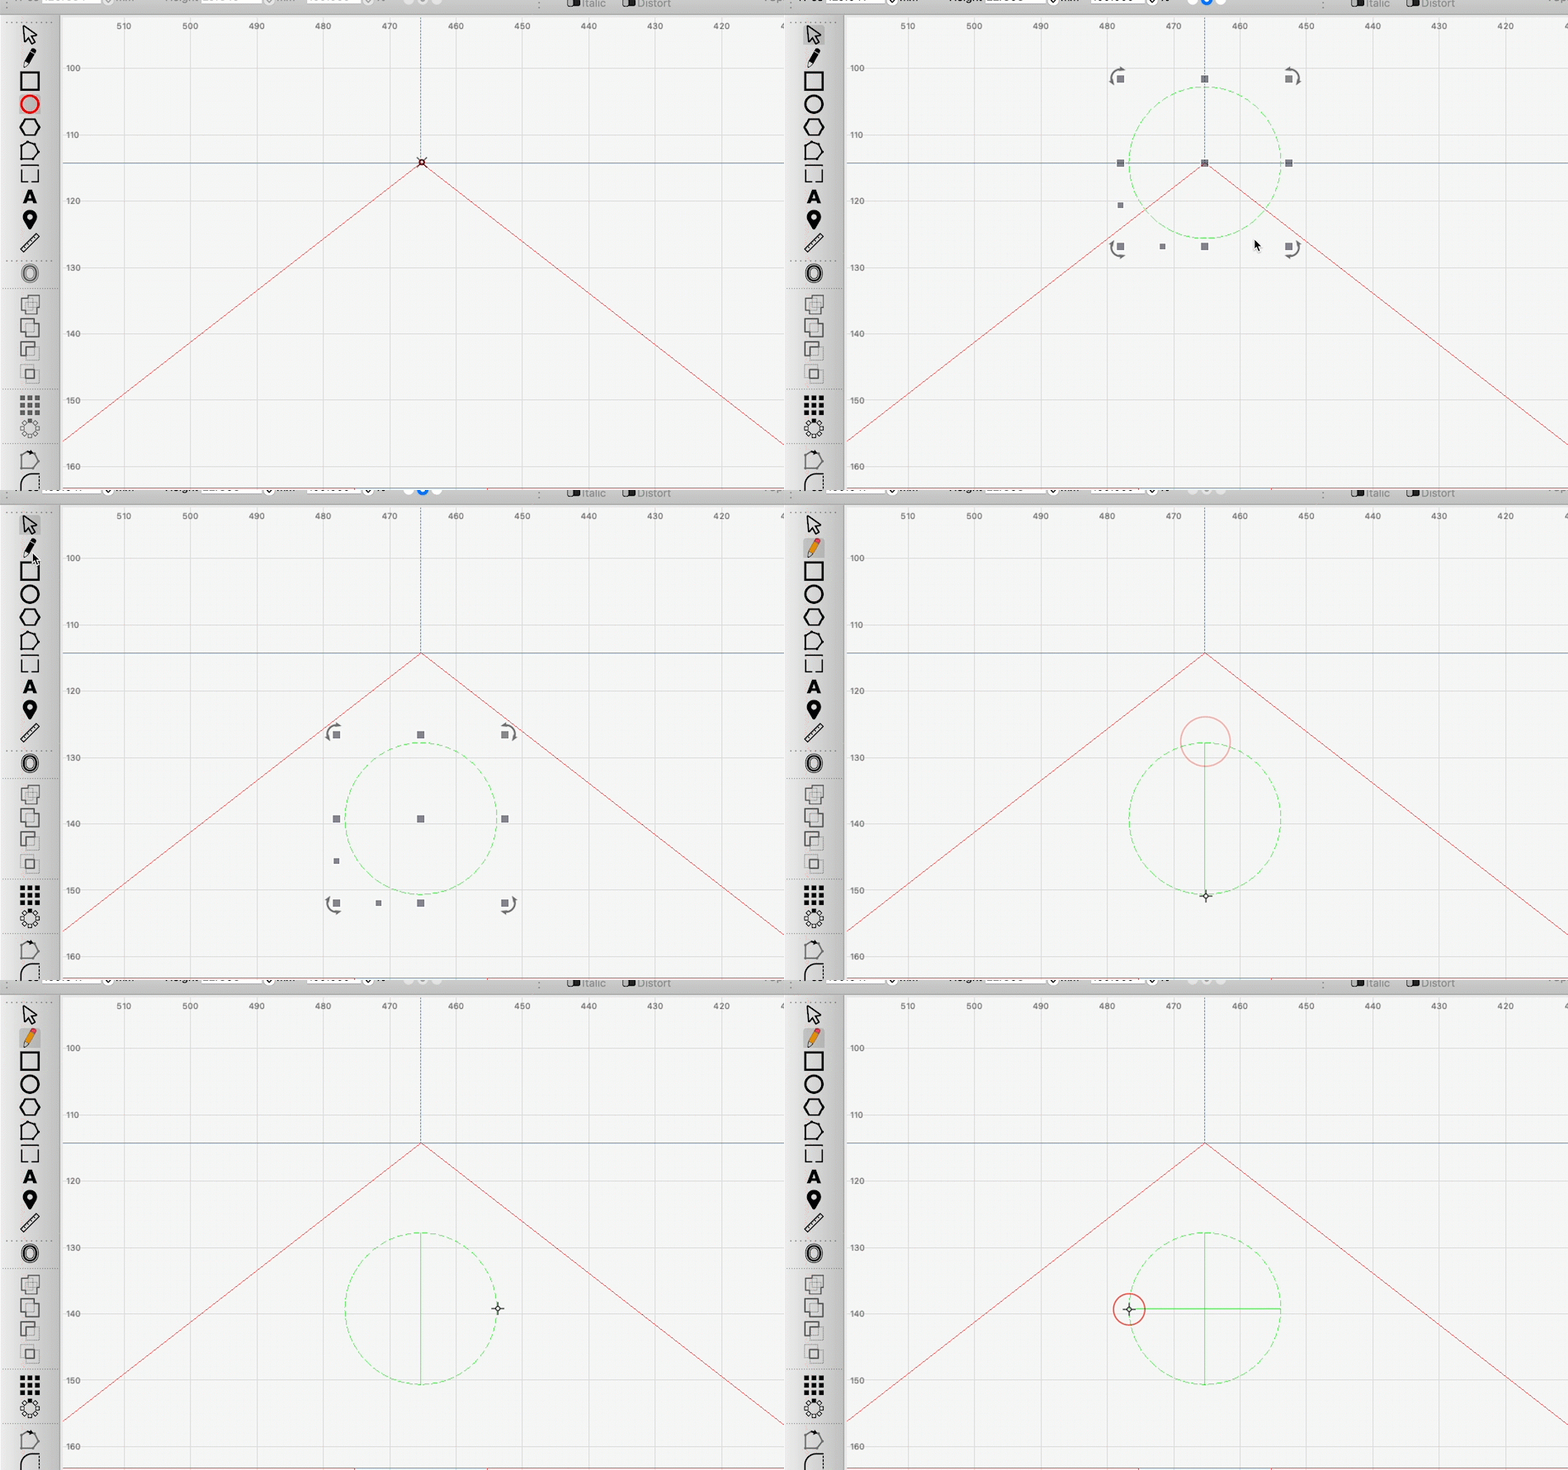
Now head over to one of the roof supports, and use the Ellipse tool while holding the Shift key to create a circle shaped window. To keep it centered, start it from the point at the top of the roofline while holding the Ctrl/Cmd key, then nudge it downward. Use the Draw Lines tool again to create panes down and across its center.
13. Make a Cardboard Jig
We're going to make a quick jig out of cardboard that we'll align our output to. This step is optional, but strongly recommended — it will make squaring up your graham crackers and aligning your laser to them much easier.
-
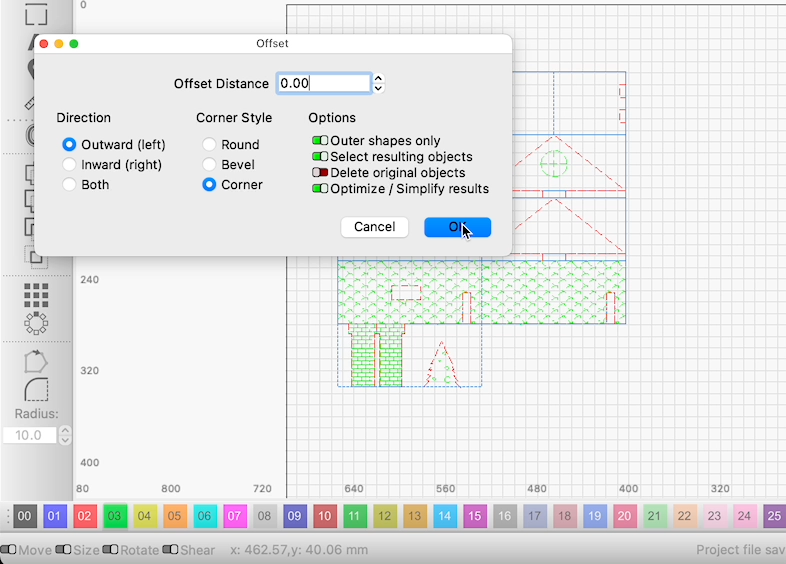
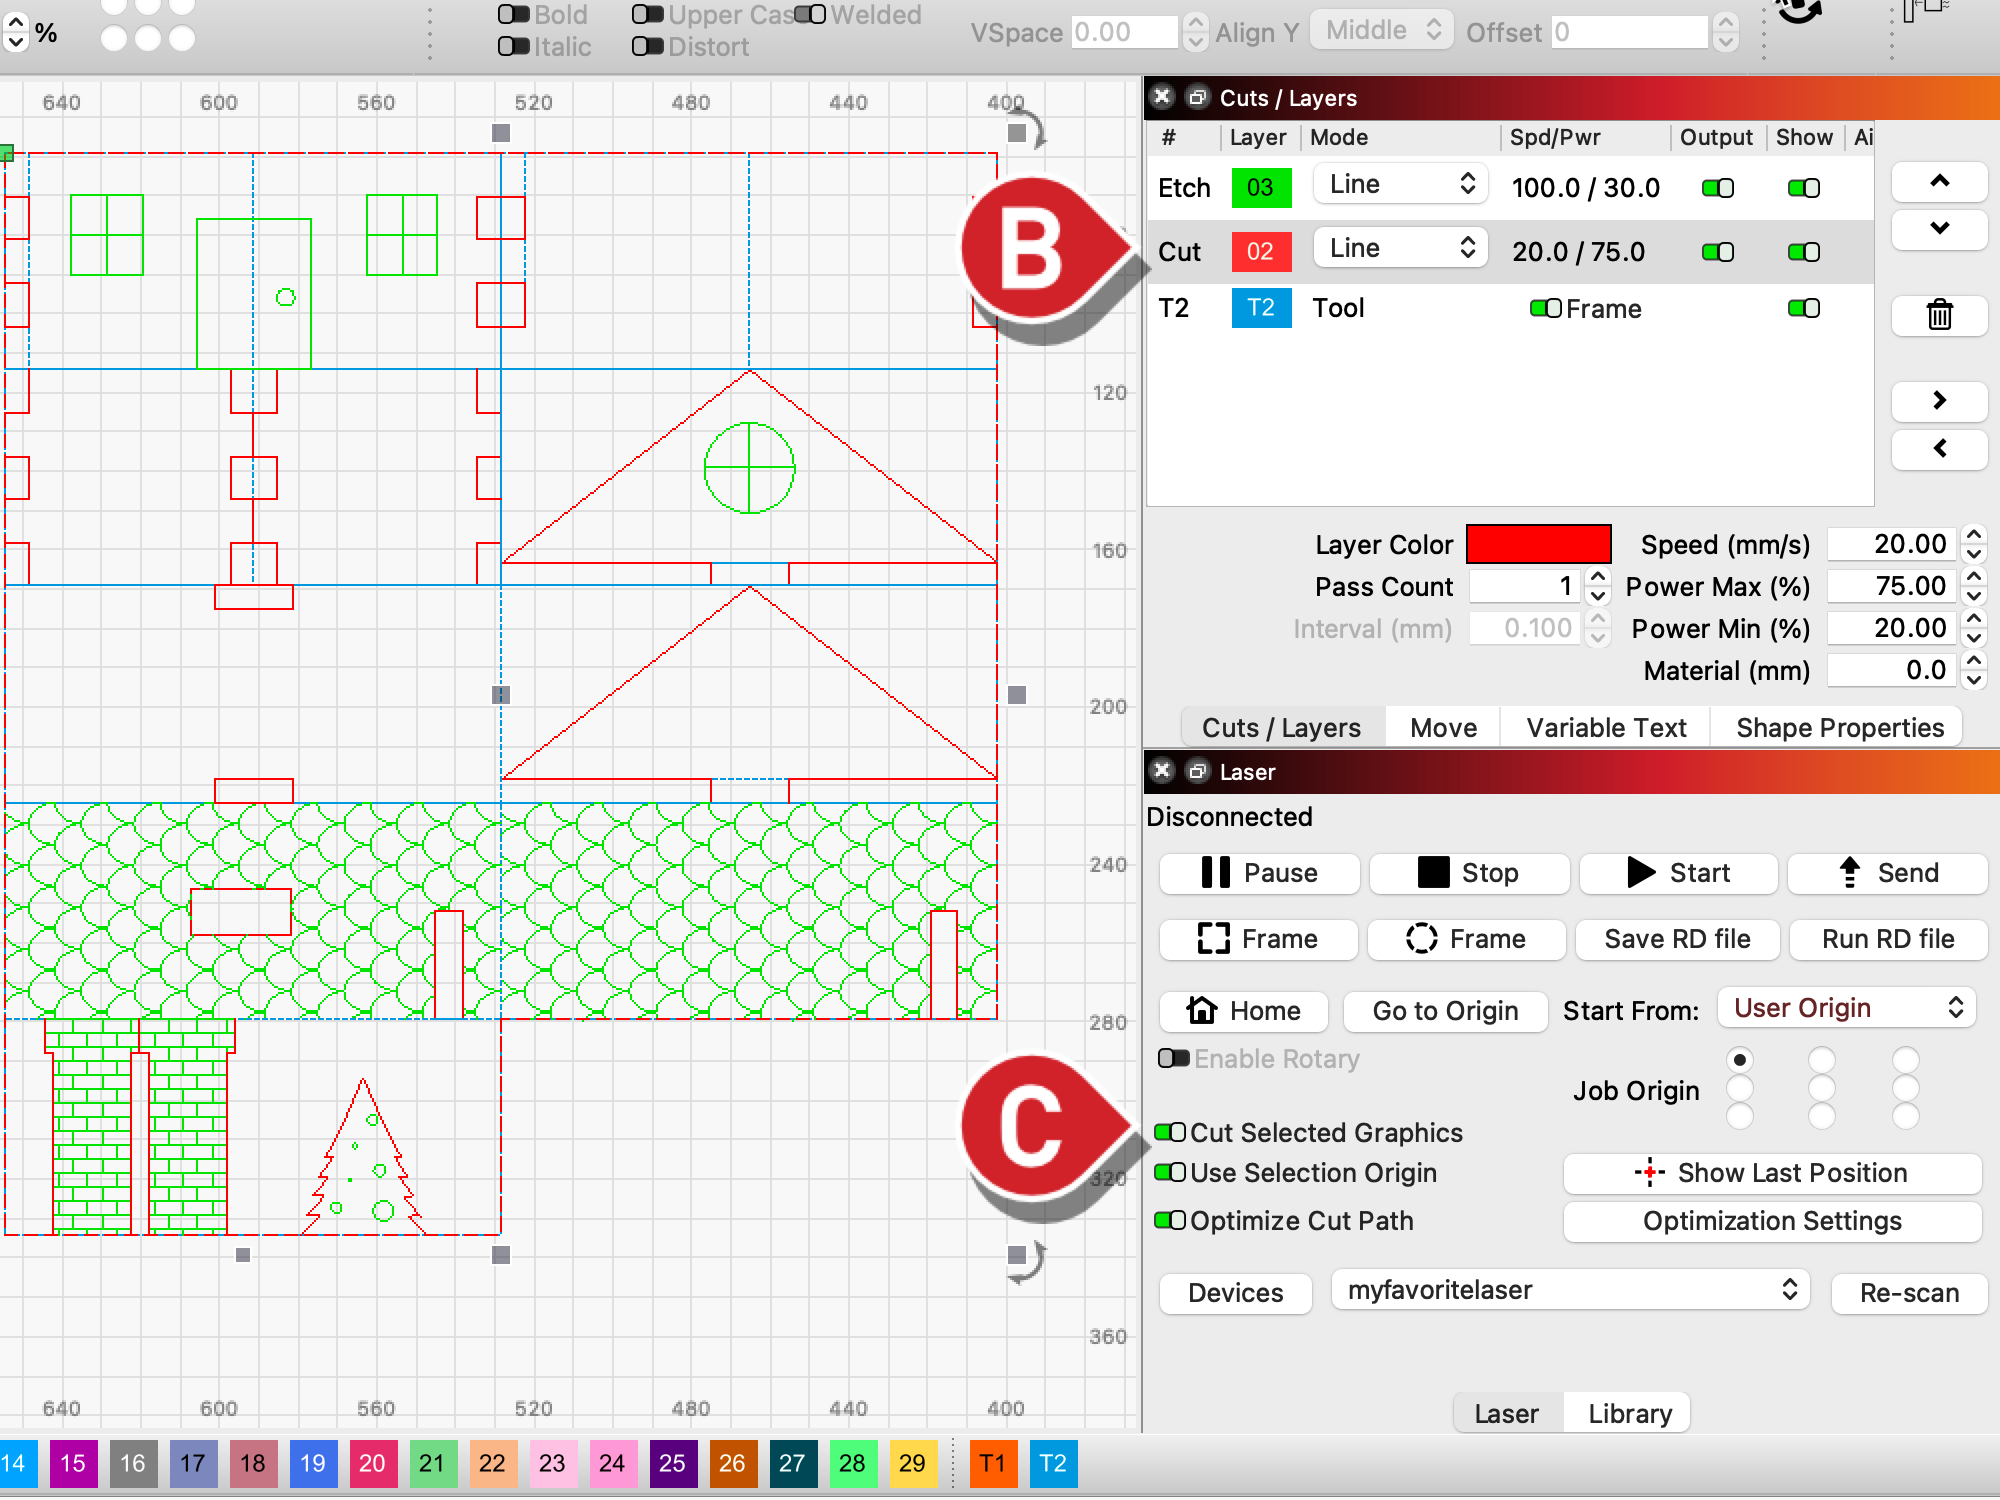
Select all of the templates and then the Offset tool (Alt+O/Option+O). Set the Offset Distance to 0, and make sure Outer shapes only is toggled on.
-
Place the resulting offset on a cut layer, with a speed and power setting sufficient for your laser to cut cardboard (or any other material you choose to use for your jig).
-
Enable Cut Selected Graphics and select the offset only.
-
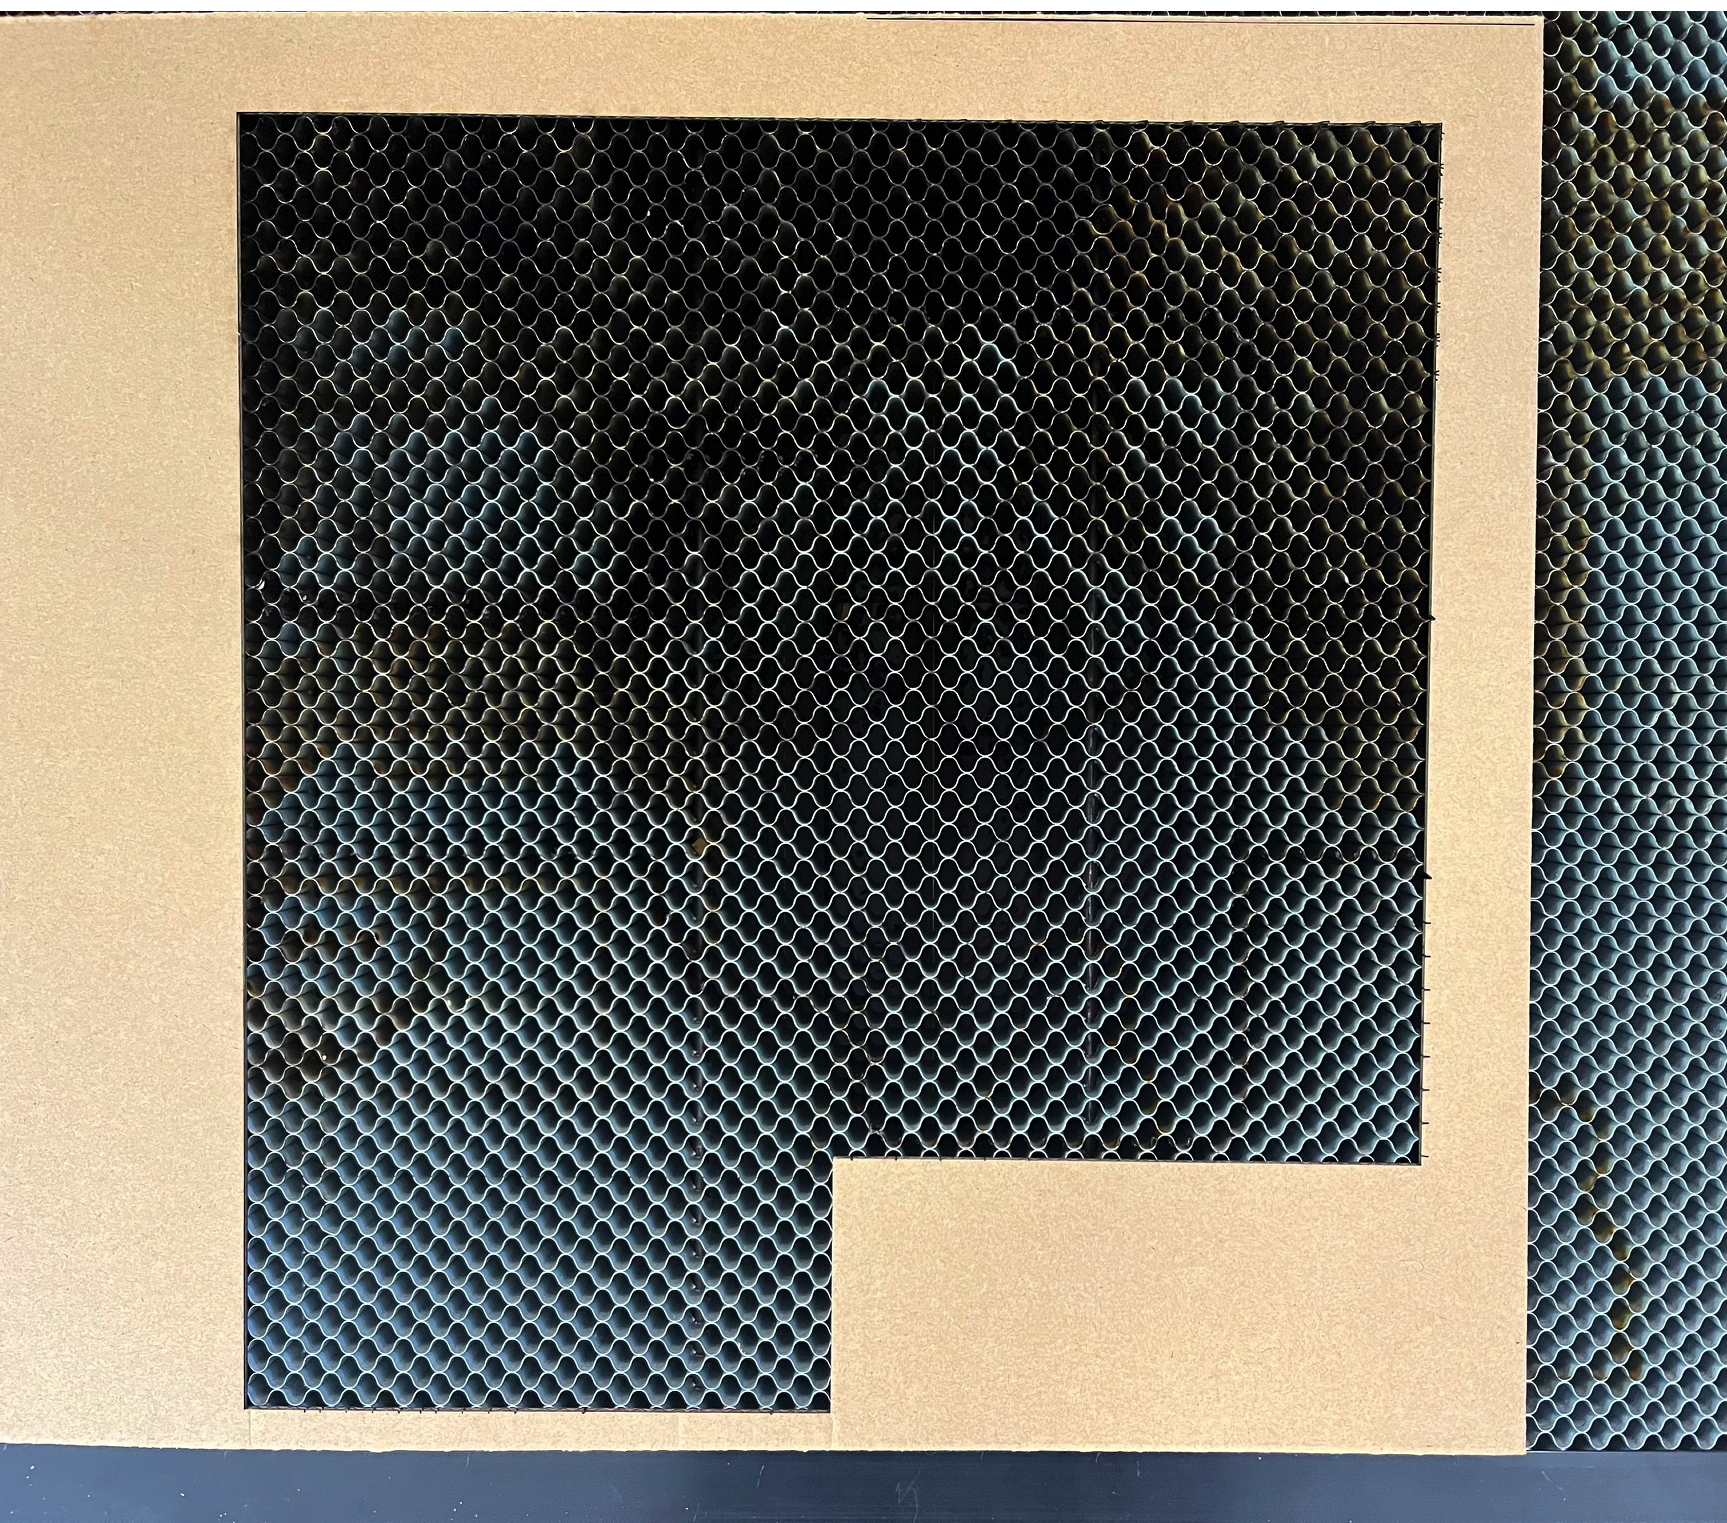
Use whatever Start From mode you prefer to align this part of the job. Use Preview (Alt+P/Option+P) to make sure you have only the offset selected, and Frame (Alt+R/Option+R) to double check your positioning. Run the job, then remove the cut out material, and leave the rest in your laser to serve as a jig.
-
Back in the LightBurn workspace, put the offset onto a Tool layer.
14. It's Time to Laser the Graham Crackers!
The big moment is here.
-
Make sure your cut layer is now set to an appropriate power and speed to cut through a graham cracker, and the etch layer is set to an appropriate power and speed to mark it, but not cut through. If you're not sure what to set, you can dedicate a spare graham cracker or two to run a Material Test on.
-
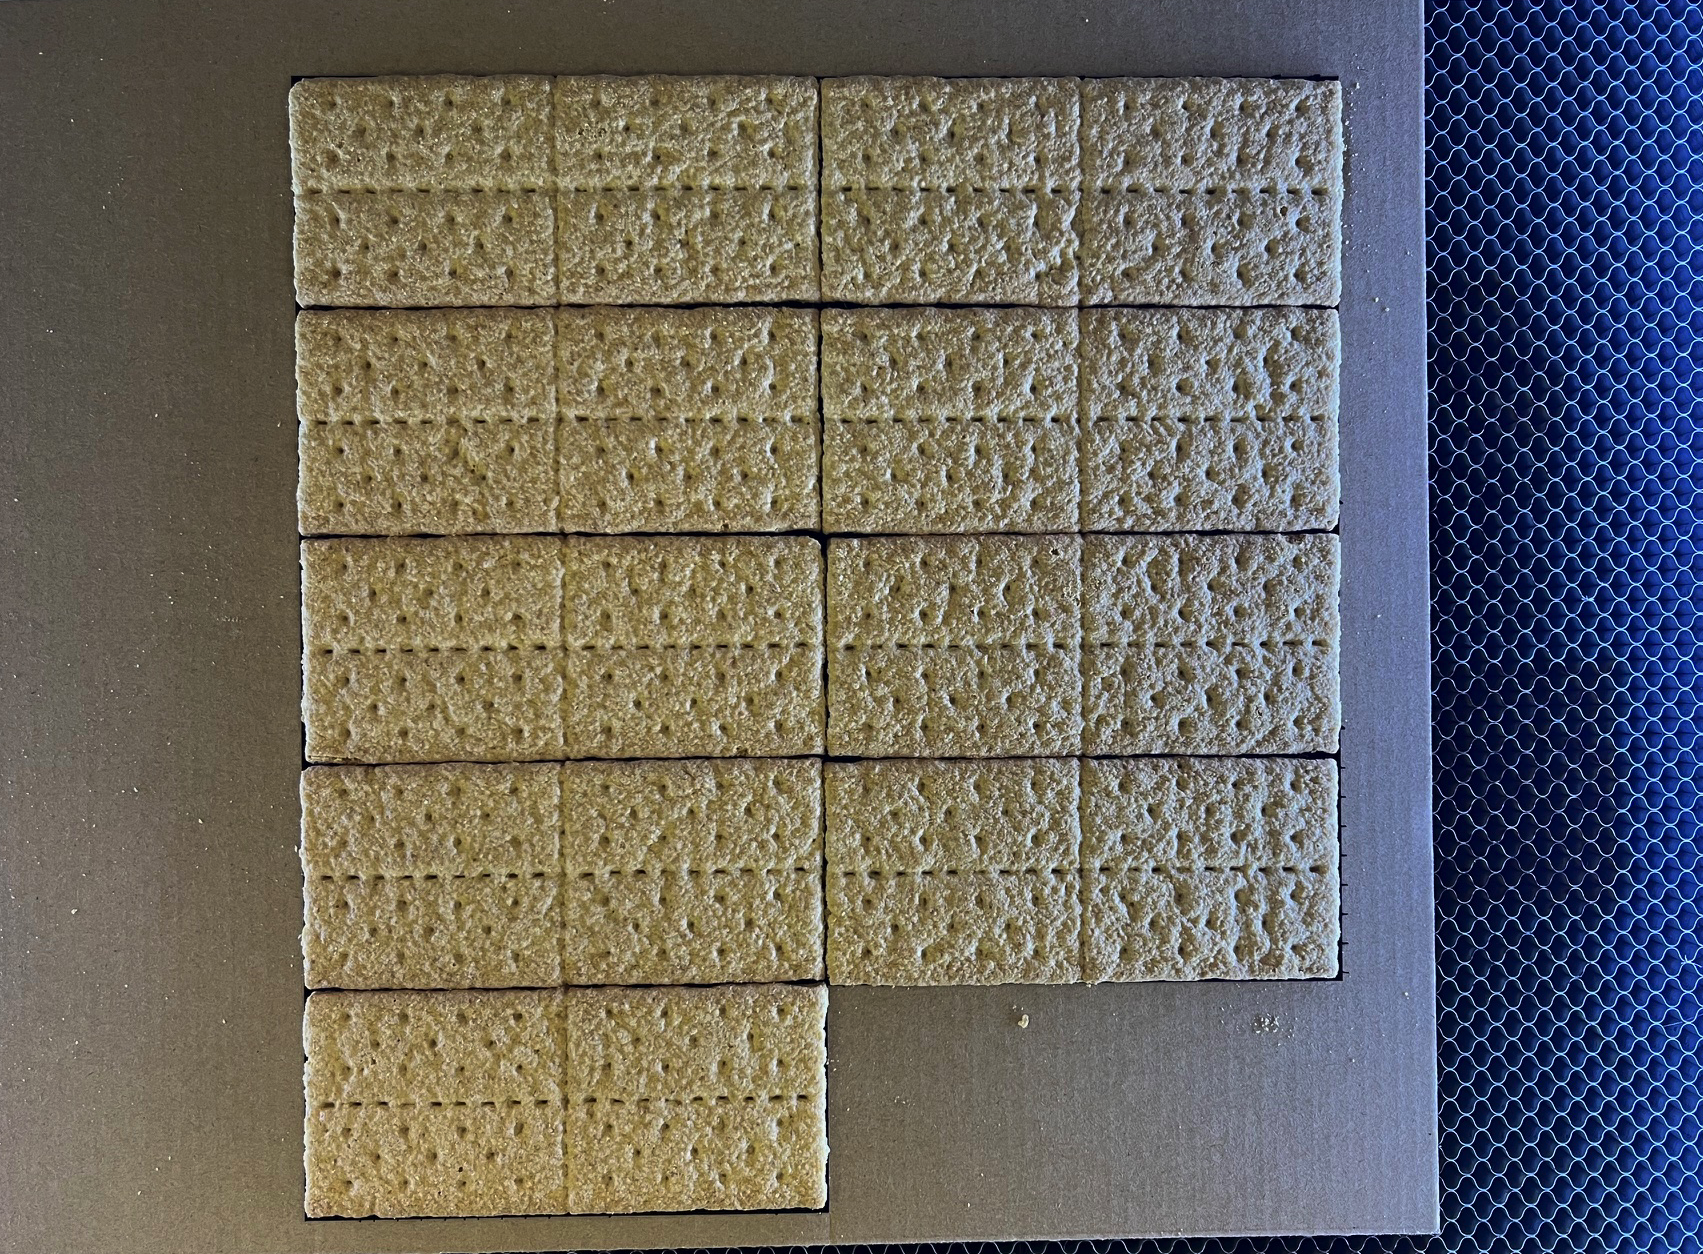
Square the jig up in your laser's workspace, then place 9 graham crackers inside it. Try to choose the most uniform graham crackers you can find, and eat the broken and crumbled ones.
-
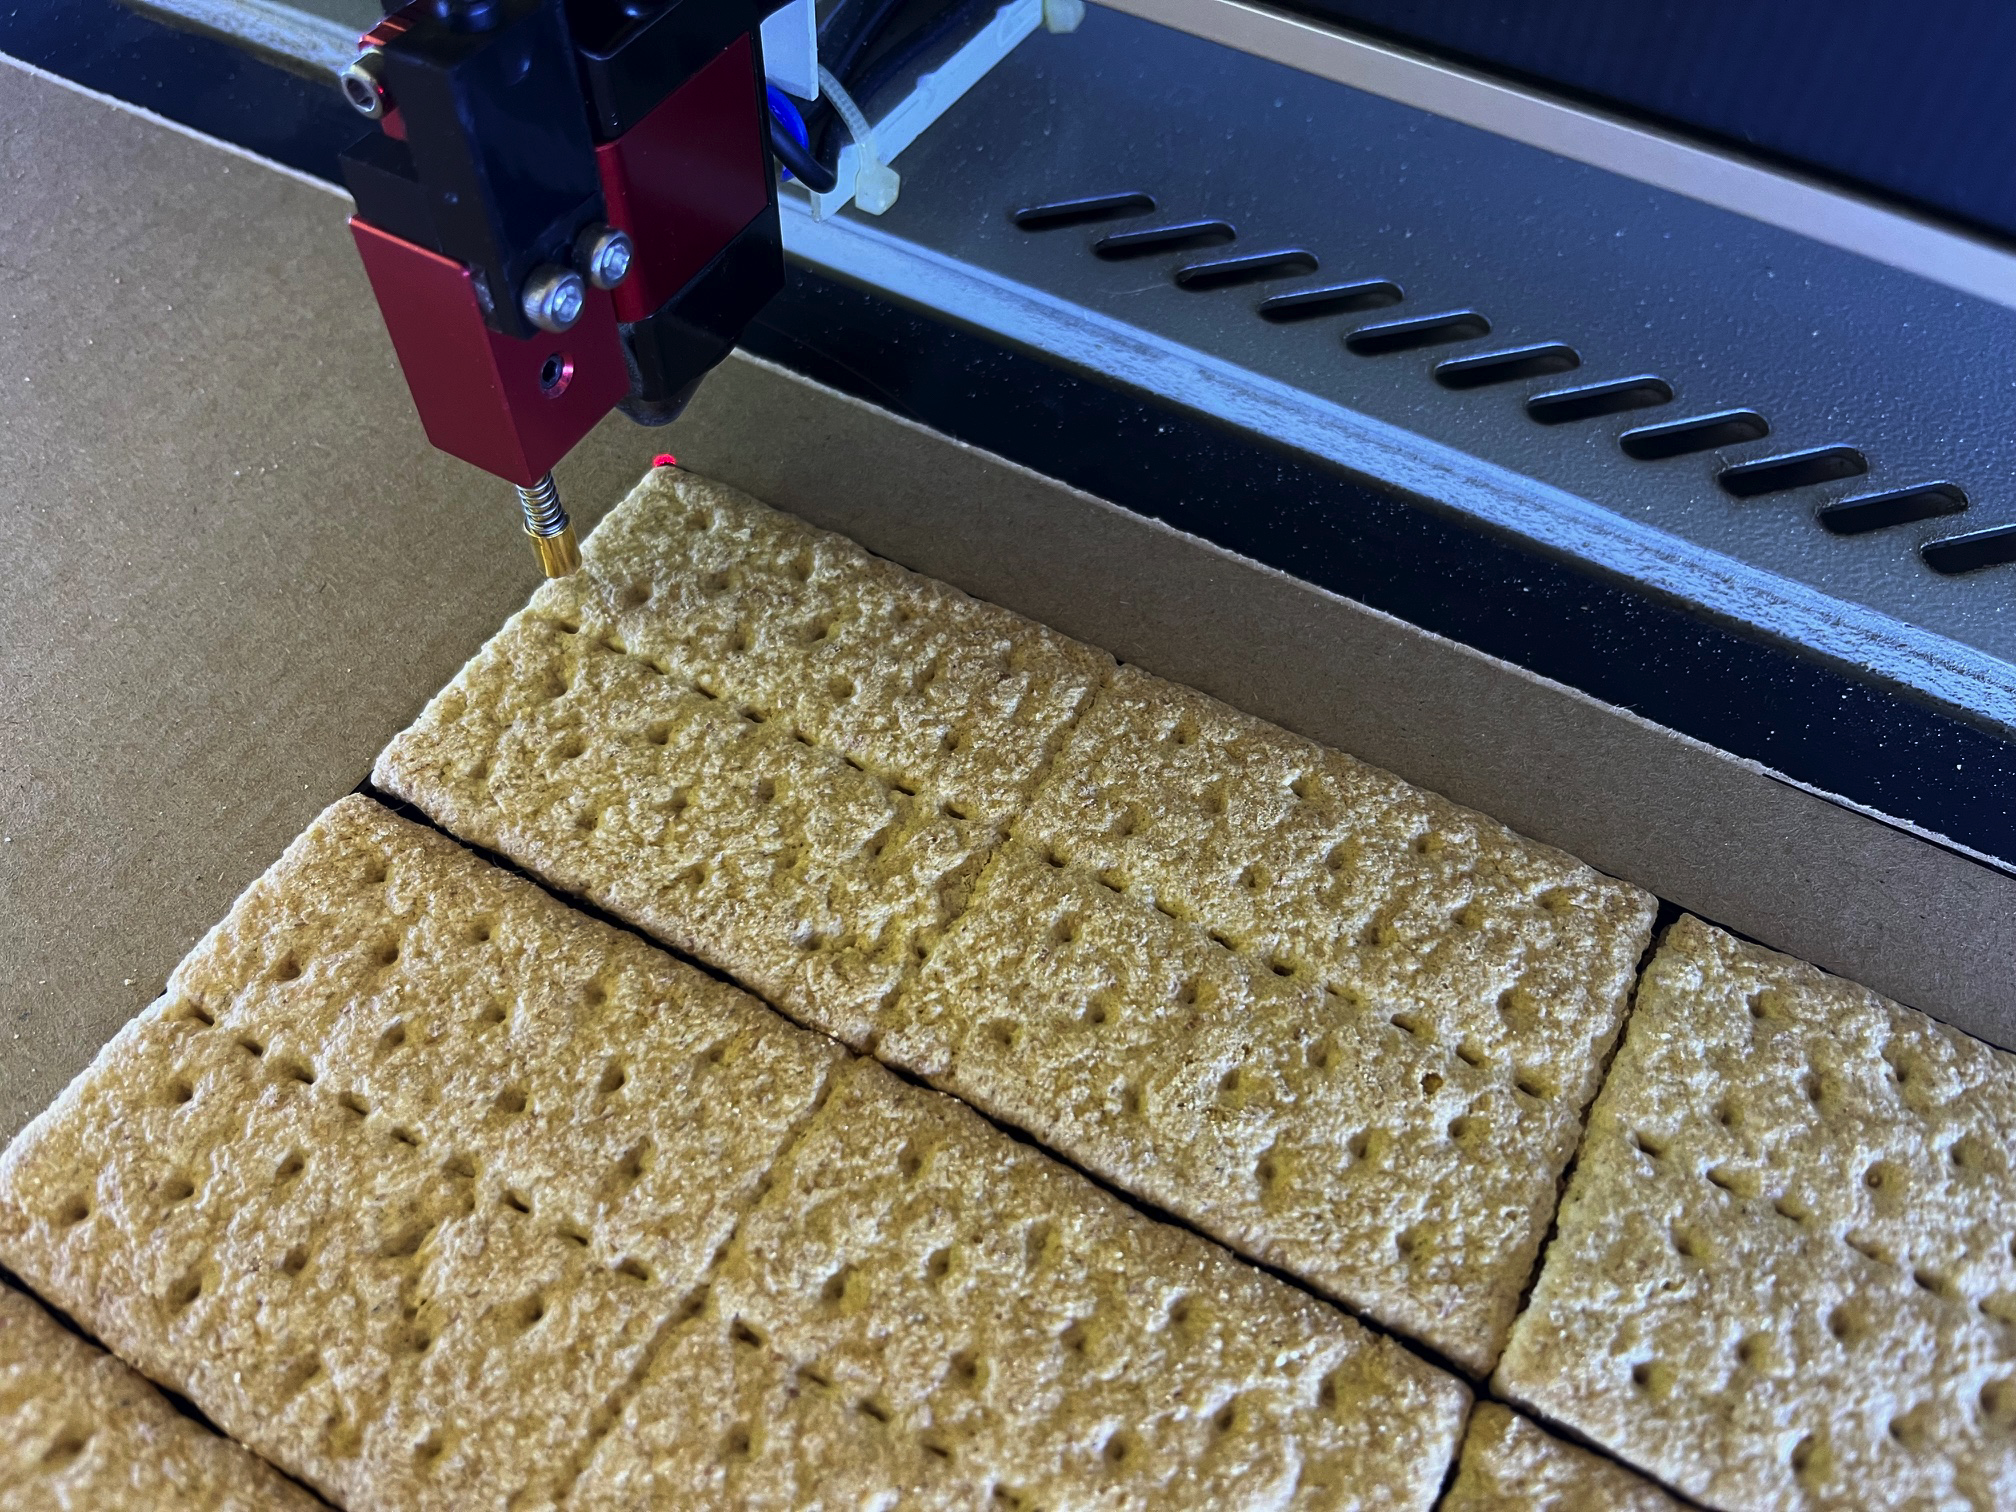
Align your laser to an inner corner of the jig: top left, top right, or bottom left. If you're using a diode laser, the Fire button can assist with alignment.
-
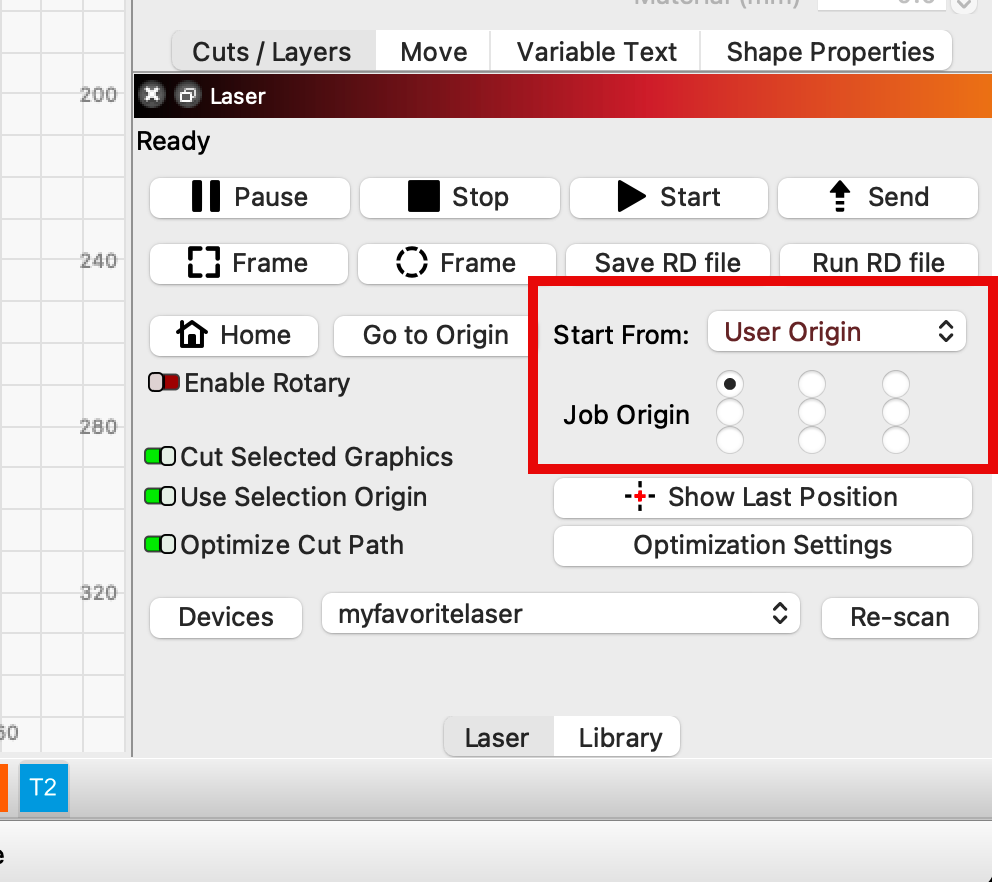
Set the Job Origin location to the same corner you've aligned your laser to on the jig, and set the Start From mode to User Origin or Current Position. If you select User Origin, make sure to set the origin in the Move window (if you're using a GCode-based laser) or through the control panel (if you're using a DSP laser).
-
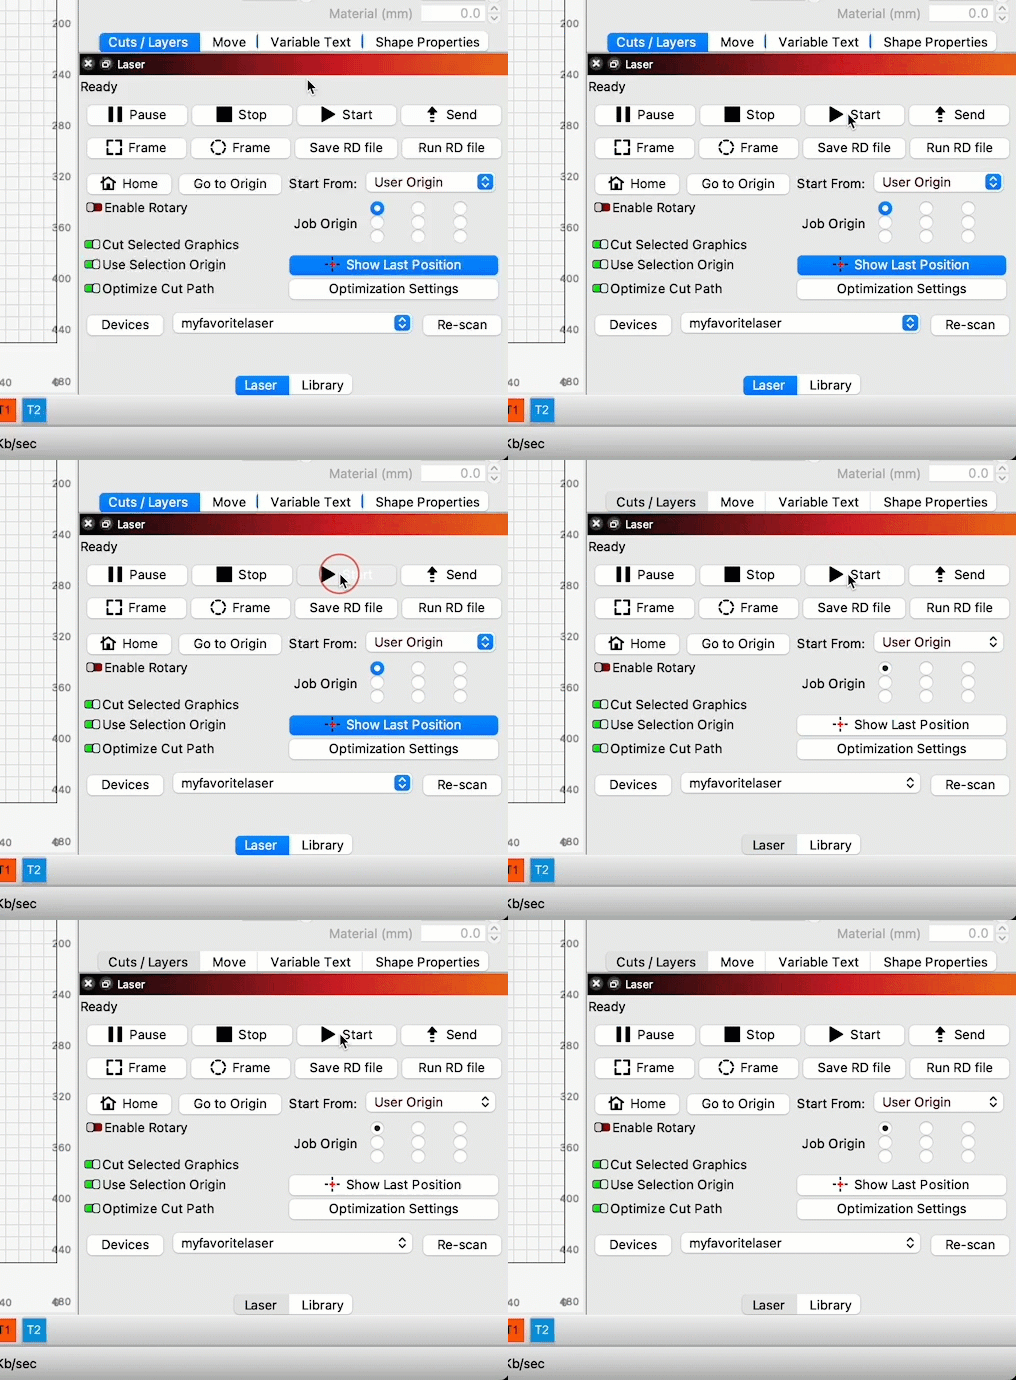
Select everything in your workspace and Frame the project to make sure you've got your Start From mode and Job Origin set correctly
-
This is it — run the job!
-
Remove he pieces from your laser and assemble the house. It will stay together without any help, but you can add frosting or melted chocolate along the joints to make it sturdier, and candy or any other decorations to make it merrier.
Once you've decided to decorate your house further or admire it as-is, it's time to sit back, enjoy the holiday season, and show all your friends and loved ones what you made. After that, think of s you can apply the above tools and principles to creating something a bit more permanent, and get to making it!
