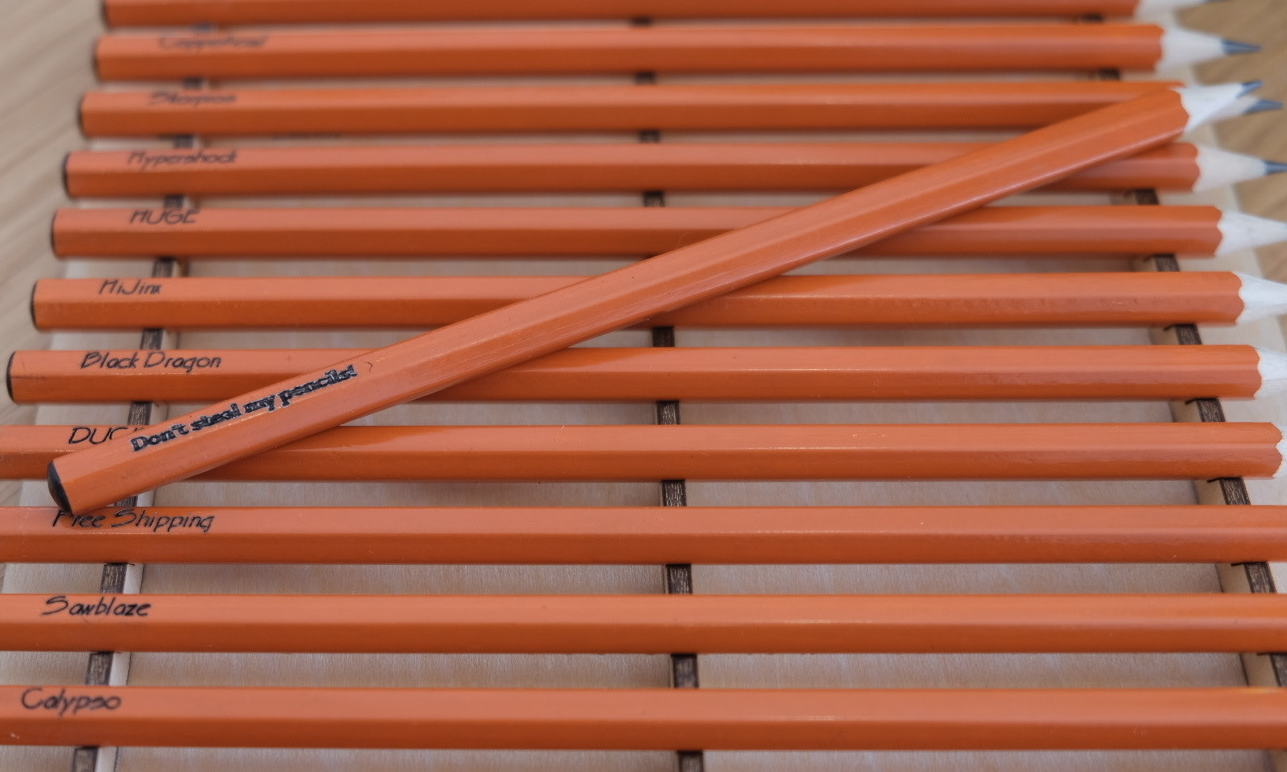
Laser Engraved Pencils
Custom engraved pencils can be a quick and easy way to make useful gifts, or alternatively, might help keep your pencils from vanishing. We've made these pencils as giveaways at events, and I've made class sets of them for teachers. If you want to make pencils like these, you can follow along with the project as it's written, or you can use the methods described here to branch off into customizing other items.
The trickiest part of engraving a pencil is that the flat space you have to work with on a typical pencil is only about 3 millimeters tall, so you need to be really precise in how you place your artwork onto the pencil. On a larger object, you can use the Camera Overlay to place your design on the material, or you can jog to the corner or center and use Current Position, like we did in the Image Engraving on Coasters project. But for this project, where being off by a millimeter just won't work, we'll take a look at how to use a template with a fixture to hold the pencils exactly where we want them.
What's a fixture? Isn't this a jig?
Short version: What you'll make in the first part of this project is often called a jig, and people will know what you mean if you call it that. Technically, though, it's a fixture.
Pedantic version: Jigs and fixtures aren't quite the same thing. A jig is used to hold a part in place and guide a tool. A fixture just holds the part in place. So this is a fixture, but regardless of what term you use, creating something to hold the items you want to engrave will make your life a lot easier.
What You'll Learn
- How to select a Start From mode in LightBurn and use a fixture to position things in your laser's workspace the same way every time.
- How to use tool layers to place your design in the right place relative to a template.
- How to use a Grid Array to repeat artwork.
- Optionally, how to use Variable Text to engrave something different on each pencil.
Materials
How much material do I need for the fixture?
The biggest single piece is 170 millimeters x 187.6 millimeters (just under 6 ¾ inches x 7 ⅜ inches), and the full design as provided is 170 millimeters x 226.6 millimeters (just under 6 ¾ inches by 9 inches). You can rearrange the rails to fit differently on your material with the baseplate or cut them from a separate piece of scrap material if you don't have enough space on a single piece.
This version of the fixture is designed to hold 12 pencils, since they're typically sold in multiples of 12, and uses 12.7 millimeter (½ inch) spacing so you can enter the Grid Array spacing easily regardless of your units. If you want a more compact version that fits comfortably on a single 200 millimeter square sheet of material, reach out and we can create alternate versions.
- Pencils. Our fixture is designed for standard hexagonal pencils, although you could modify it for other pencil styles. You could try this with round pencils, but the curve of the surface will make it hard to get a consistent engraving.
- Material to make the pencil fixture. Our example uses 3 millimeter plywood, and plywood sold as ⅛" is usually close enough to work fine without adjustments. If your material is thinner or thicker, you'll need to adjust the slot width. Don't worry, LightBurn's got the Resize Slots tool to make it quick and easy.
- Our pencil engraving template. The downloadable file is a LightBurn Template File. When you open the file, it creates a new project ready for you to save without accidentally overwriting the original template.
- A laser. This project is intended for use with a laser that can home and use Absolute Coords, although I'll describe a workaround in case your laser doesn't have this.
Steps
Part 1: Make the Pencil Fixture
We'll start off by making a fixture that holds pencils in place while you engrave them. Our template holds 12 pencils at a time, but we'll put out additional versions for people with larger machines.
1. Open the Template File
Open the pencil fixture template file you downloaded and take a look around. The pencil placeholders are grouped together, the three rails are grouped together, and the baseplate and cutouts are grouped together. When you move the template around the LightBurn workspace, make sure you select all the items you want to move so they stay together.
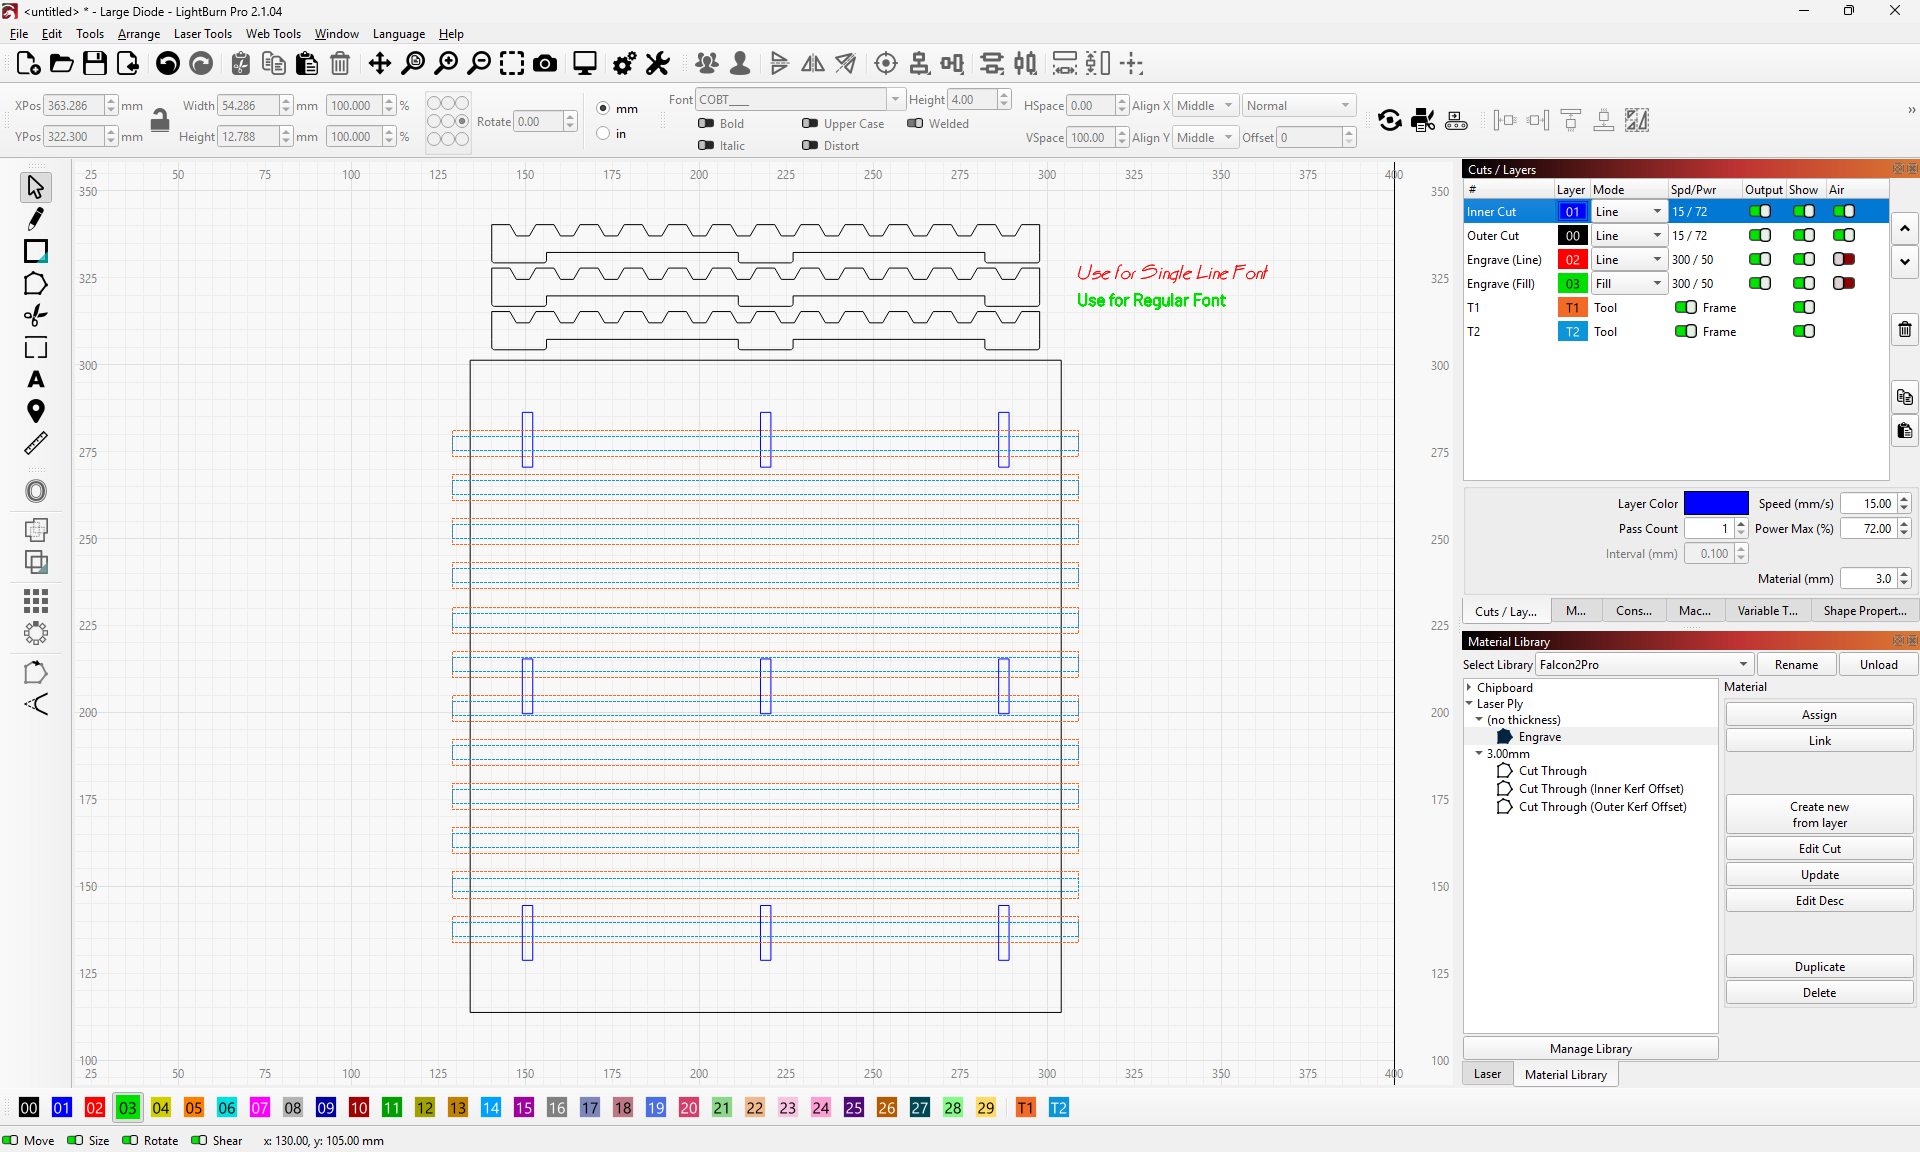
- The cut lines for the fixture are on Layer 00 and Layer 01 , and set to Line Mode. Layer 01 is only used for the inner cutouts where the rails will fit into the base plate.
- The orange and blue rectangles on the Tool layers are placeholders for the pencils. The orange rectangles on T1 represent the full width of the pencil, and the smaller blue rectangles on T2 show the engravable area on a typical pencil.
- Layer 02 and Layer 03 aren't visible when you first open the file, but Layer 02 is set up to engrave in Line Mode, and Layer 02 is set up to engrave in Fill Mode. When you add your text to one of these layers, the layer will show up with the name and settings I used.
2. Adjust the Slot Width
If your material is 3 millimeters thick, you can skip this step. If you're using material sold as ⅛" thick, it's likely close enough to work without changes.
The three rails that will hold the pencils are meant to slot into the rectangles that will be cut into the baseplate. Whenever you make parts that are meant to slot into each other like this, you need to account for the thickness of the material.
If your material is not 3 millimeters thick, you'll need to make the slots narrower or wider to match. This is easy to do using LightBurn's Resize Slots tool. You'll need to Ungroup the shapes involved before you can use the Slot and Tab Resizer.
- Click on a blue rectangle to select it. Because it's grouped with other shapes, you'll see a lot of shapes selected, with the dot-dot-dash pattern that LightBurn uses to show that the selection is grouped.
- Ungroup using Ctrl+U / Cmd+U or by right-clicking and choosing Ungroup. You'll need to do this multiple times, until the blue rectangles are ungrouped.
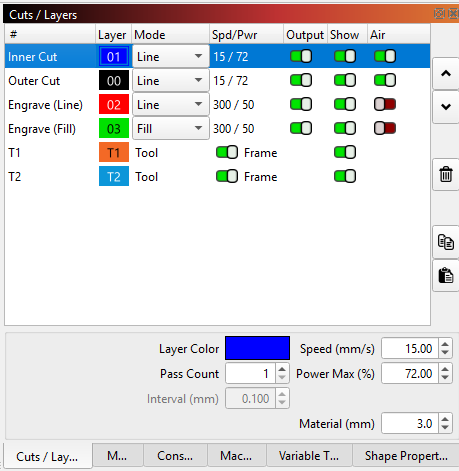
- Make sure that all the blue rectangles are selected, if they aren't already. You can shift-click on Layer 01 in the Cuts / Layers Window or drag a box around the blue rectangles to select them. It's okay if you have more than just the blue rectangles selected.
- Go to Tools → Resize Slots in Selection.
- Set Old Material Thickness to 3 mm.
- Set New Material Thickness to the thickness of your actual material.
- In the Adjust section, select Slot Width. You should see arrows showing the way your rectangles will be adjusted.
- Click OK to accept the changes.
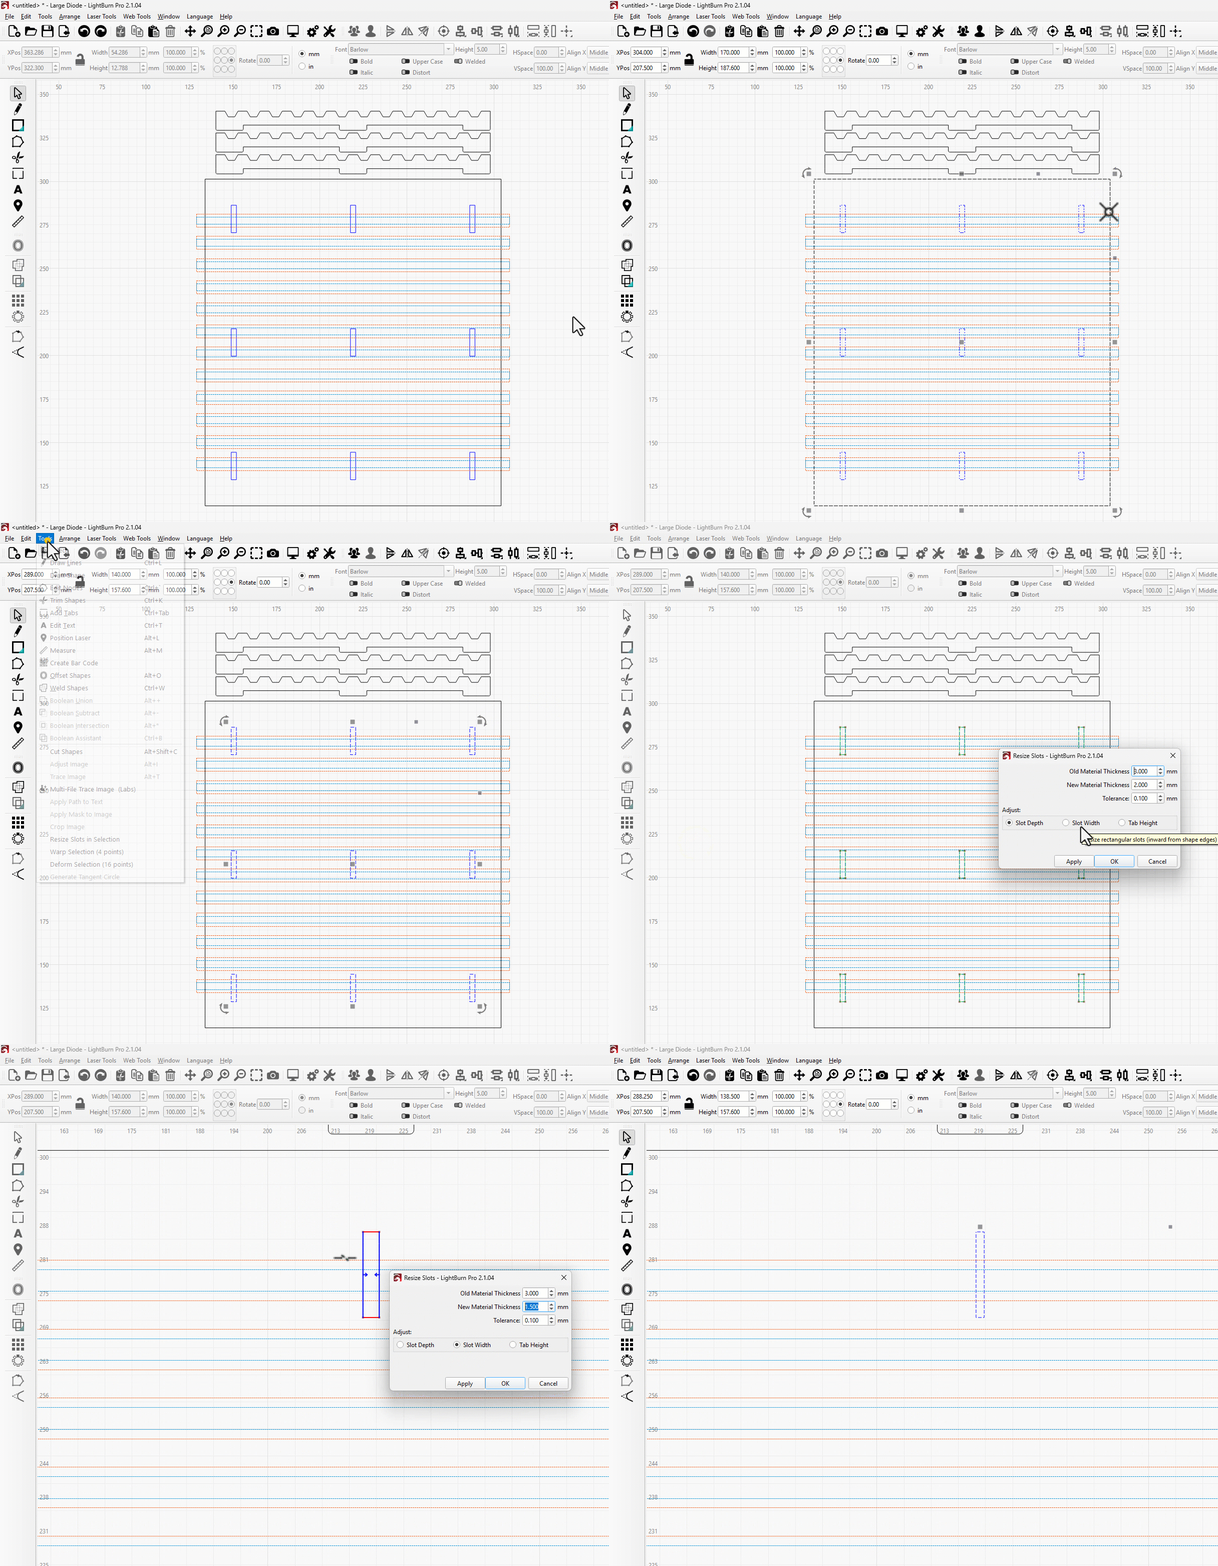
If the Resize Slots window has a message warning you that "Your selection contains the following unsupported items: Grouped Shapes", you'll need to go back and ungroup your objects before you can use this tool.
What About the Kerf?
If you want to really make this fit together nicely, check out the Kerf Offset setting, described in ourKerf Offset Test guide and our Laser Cut Dinosaur project. This will let you account for the thickness of the laser beam and the extra material that will be removed.
For this project, though, making the slot width match the thickness of the material will give a close enough fit on most materials and lasers. If you want to really dial in your settings, or if you're having trouble getting your pieces to fit together, come back and take a look at the links here.
3. Cut the Fixture
It's time to start cutting! I'm assuming this isn't your first time using your laser, so I won't be going into a lot of detail here.
- Set your cut layers (Layer 01 and Layer 02) to appropriate settings for your laser and the material you're using.
- Load the material into your laser and focus the laser
- Send the job to the laser and run it however you usually would.
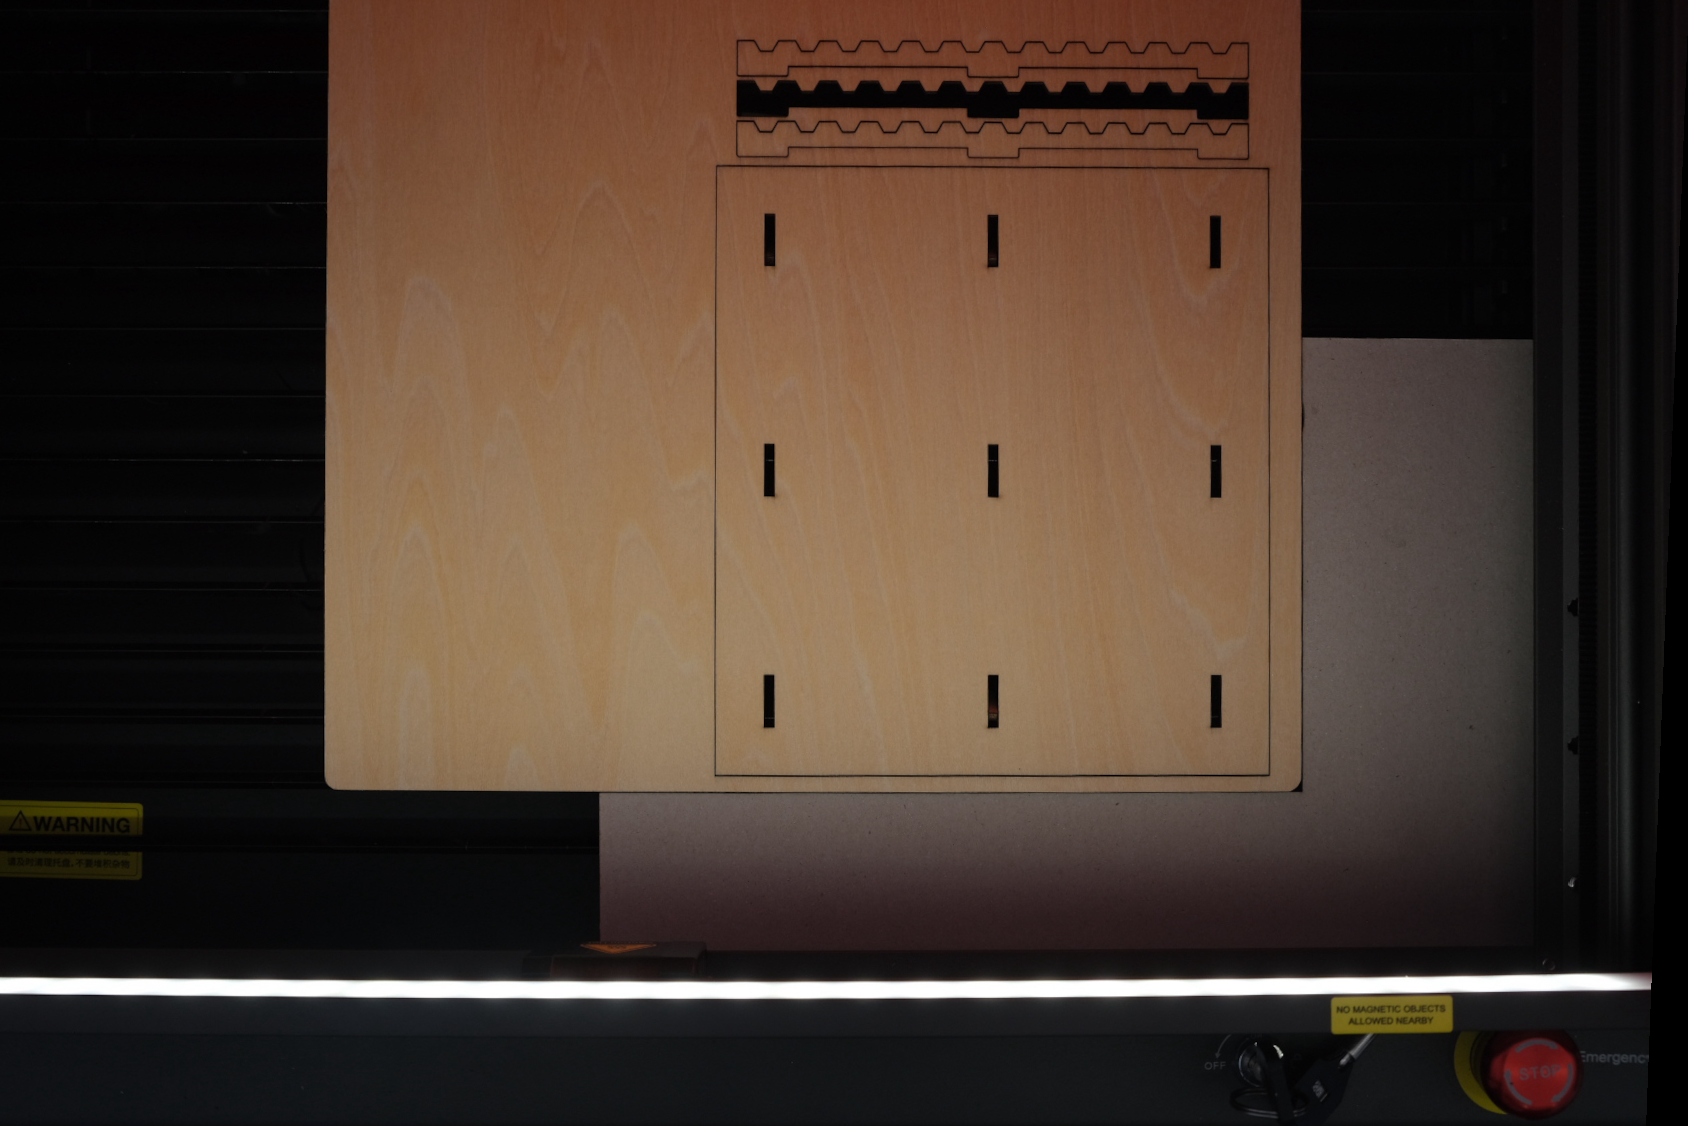
4. Assemble the Fixture
Insert the rails into the baseplate, using a bit of glue to hold them securely in place. You don't need a ton of strength here, so just about any glue (within reason) will work. PVA glue (like Elmer's) and superglue will both work fine for plywood and similar materials.
5. Test the Fixture
Try loading up some pencils and make sure everything fits.
Ready? Let's go to Part 2!
Part 2: Engrave Your Pencils
Now that you've got your fixture, let's engrave some pencils!
1. Place the Pencil Fixture in Your Laser
Place the physical fixture in a corner of your laser and load pencils into it. You can use any corner that's convenient, as long as it matches up with a corner of your workspace in LightBurn. We're going to use a corner because it's an easy way to match the physical location of your fixture with its positioning in LightBurn.
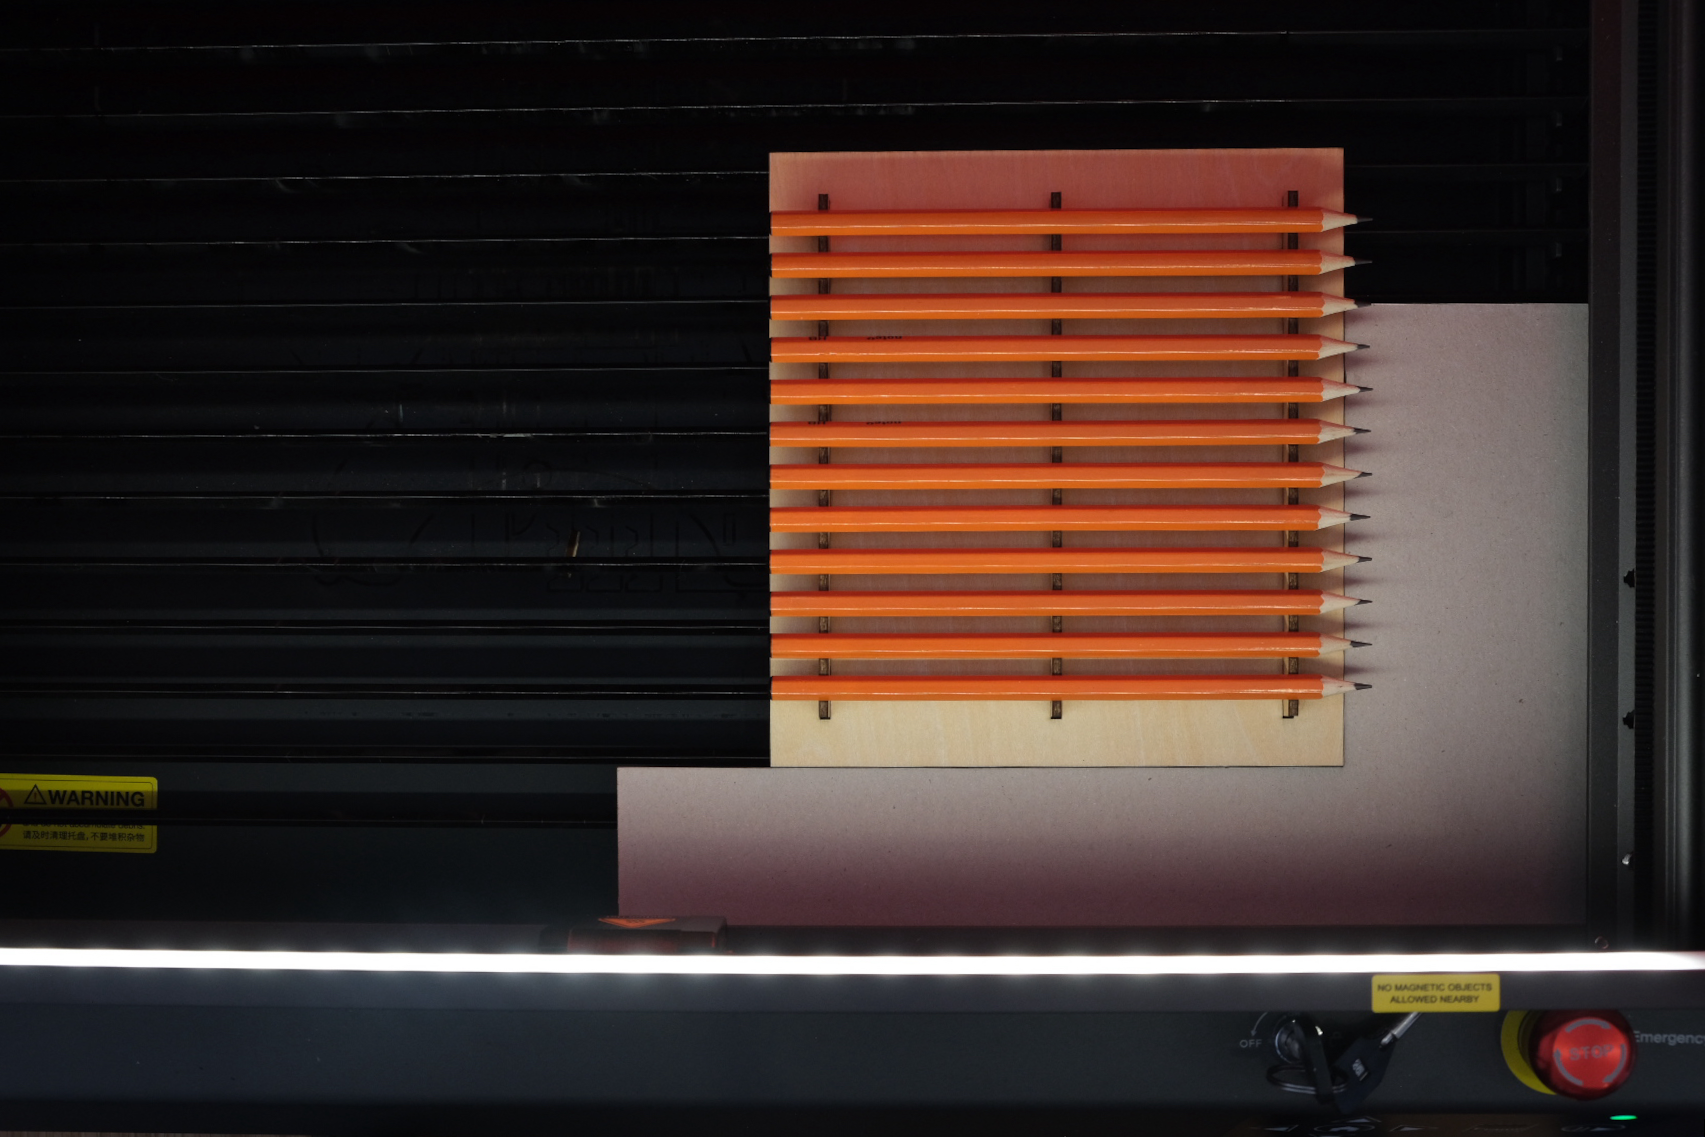
The edges of my laser's bed don't match up with the workspace
For some lasers, there isn't a convenient edge that lines up with the total travel area of the laser. The laser I'm using for this project, for example, has a bed that's significantly larger than the area the laser can travel, and if I put the fixture in a corner, the laser won't be able to reach where I want my pencils engraved. I created a spacer that aligns my material with the corner of my laser's bed to fix this.
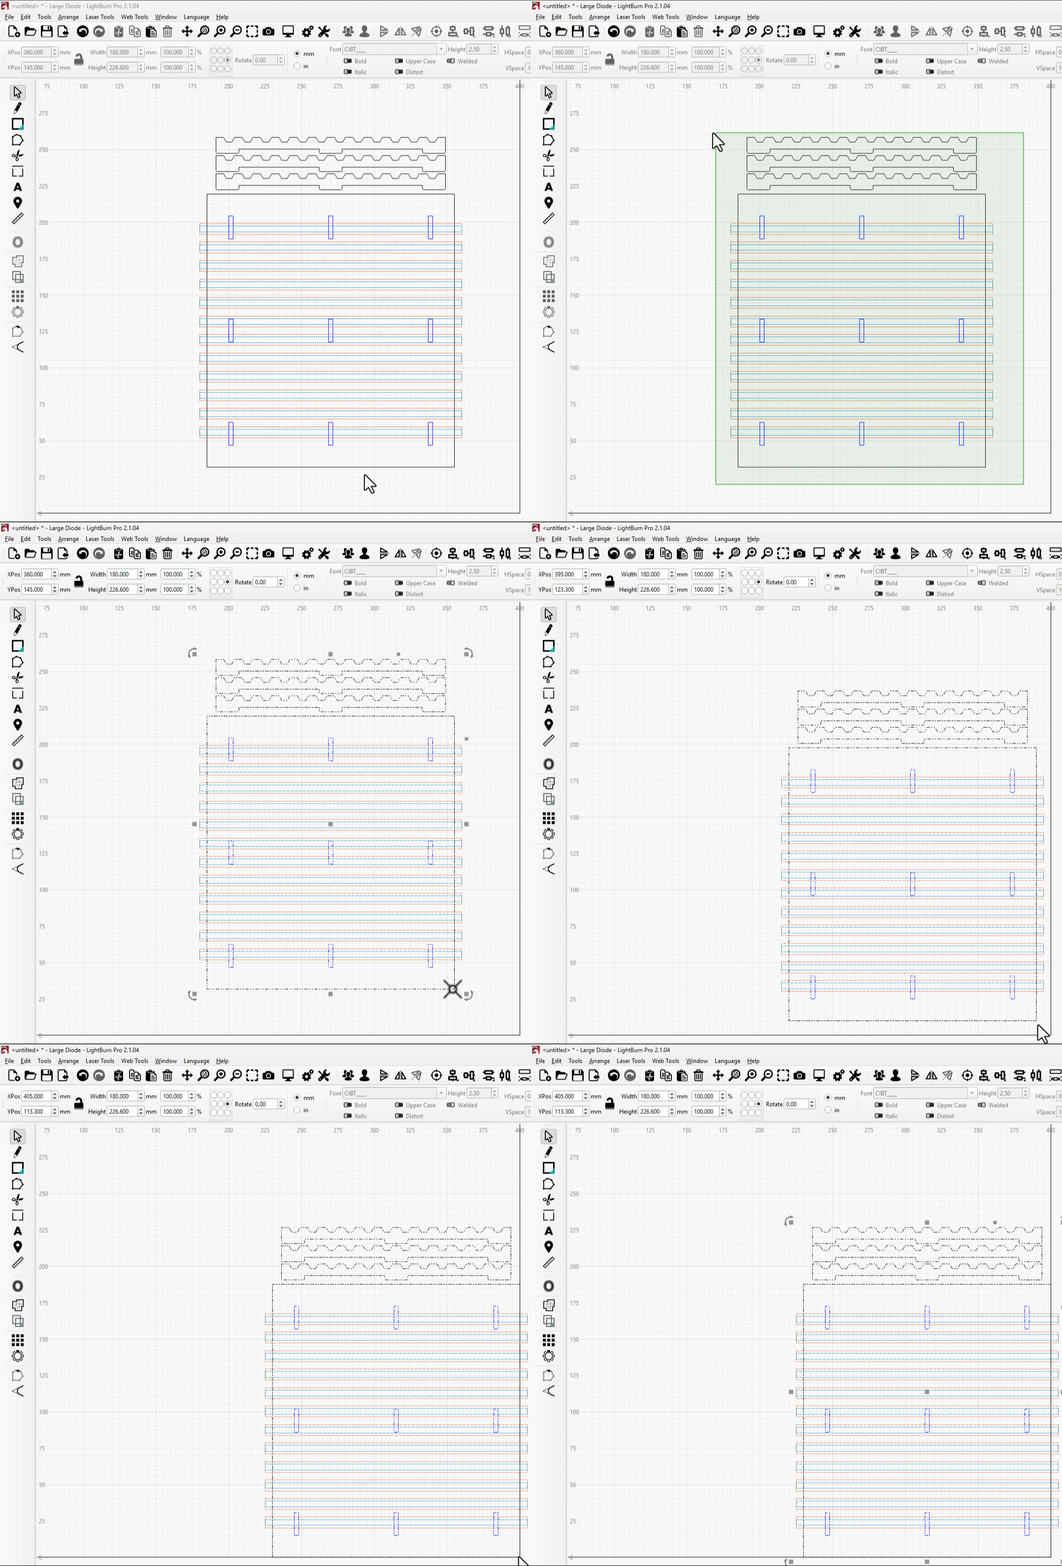
2. Place the Template in the Matching Corner in LightBurn
Move the template into the same corner of the workspace you placed the fixture in. You can use Snap to Grid or the Numeric Edits Toolbar to move it.
4. Add Your Design
I'll be using text in my example, but you can use anything you want - just keep in mind that really complex designs won't necessarily show up well when they're this small.
Have you tried single line fonts?
If you haven't already tried using single line fonts, this would be a great chance to try them! When you use a single line font with Line Mode, you can get crisper results very quickly. If you'd rather stick with standard fonts, that's fine too! You can use Fill Mode to fill in your text.
To use single line fonts, you'll need to download some SHX fonts and set your SHX font directory.
Looking for single line fonts? Find them in the "Zip Files" section
-
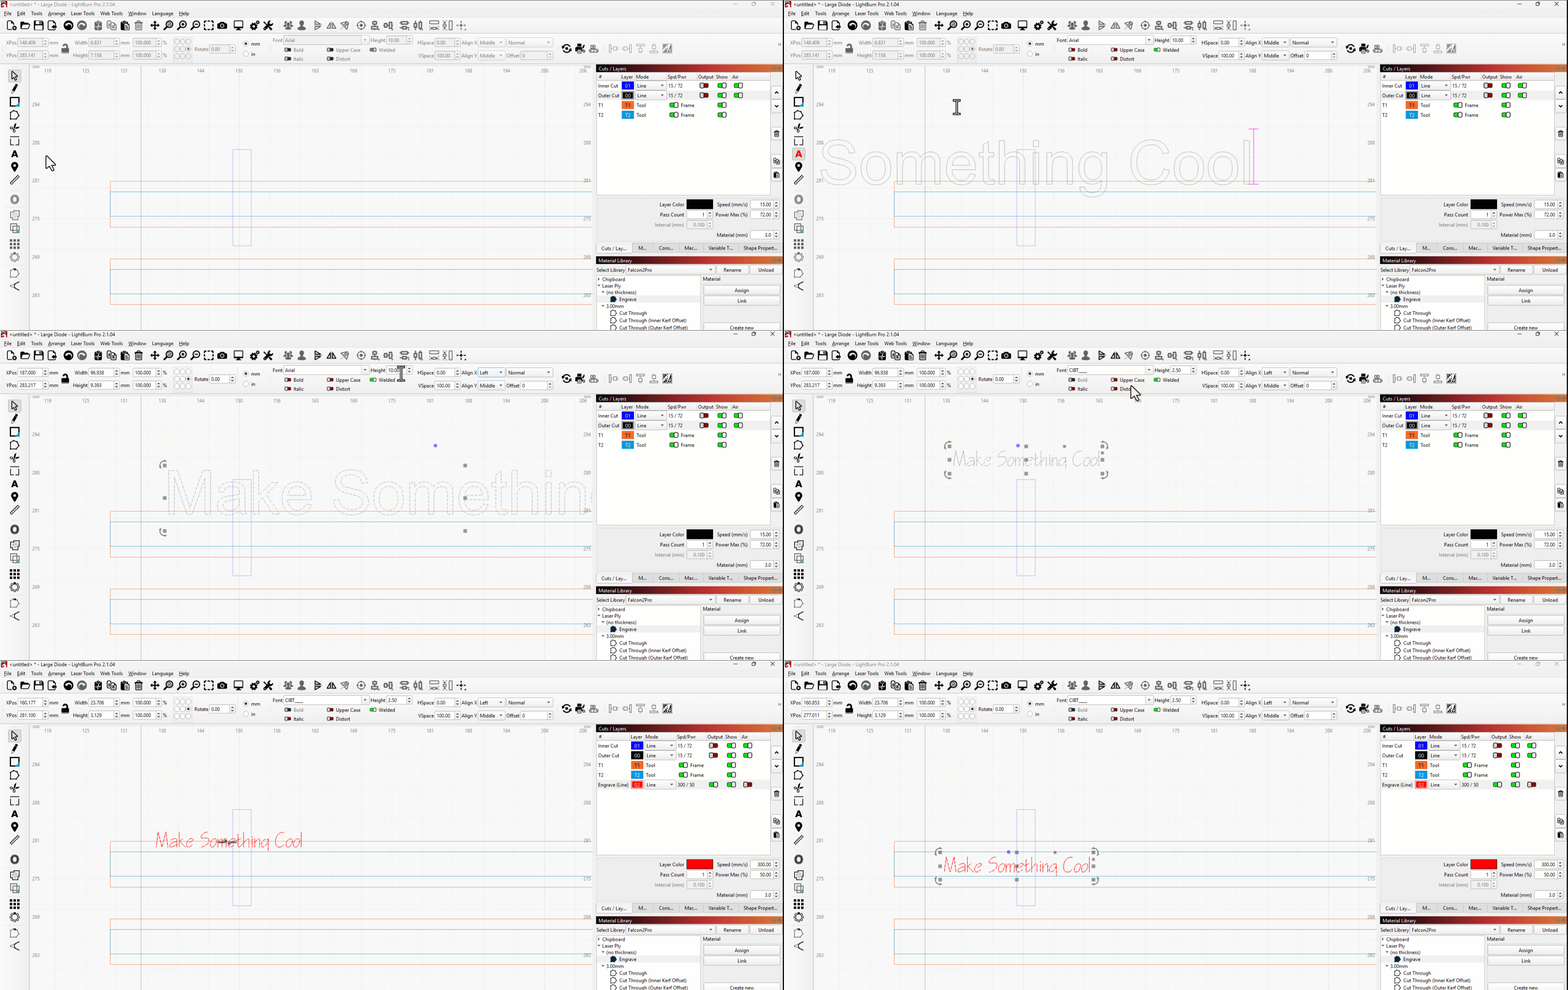
Open the Text Tool by clicking on it in the sidebar or using Ctrl+T / Cmd+T. Click to start typing. Choose a font you like, and then set the size of the text with the Height setting. A height of about 2.5mm (a little less than ⅛ inch) is generally good. Write your message, press Esc to go back to the Select tool, and then move your text to place it in the pencil placeholder wherever you want to engrave your design.
-
With your text selected, move it to a new layer by clicking on an unused layer number in the Color Palette at the bottom of the window. If you're working with our template, Layers 02 and 03 are already set up for engraving. Set the layer/layer mode according to the style of engraving you want:
- If you're using a single line font, select Layer 02 or set the layer you chose to Line Mode. Line Mode is mostly used for cutting, but by increasing the speed and reducing the power, you'll get a crisp, clean engraving that's perfect for something this small.
- If you're using a regular font or other artwork, select Layer 03 or set the layer you chose to Fill Mode to do a raster engraving.
-
Let's be honest - I don't want to write the text 12 times, and you probably don't either. We could just use Duplicate and move the copies, but let's do something a little cooler with a Grid Array.
Using variable text
If you've got a list of different things you want to engrave on the pencils, such as a class list of names (or a list of some of your favorite BattleBots), you can use Variable Text in Merge/CSV mode to run through a list of names. If you want to give it a try, we have an alternate version of this step here that uses Variable Text.
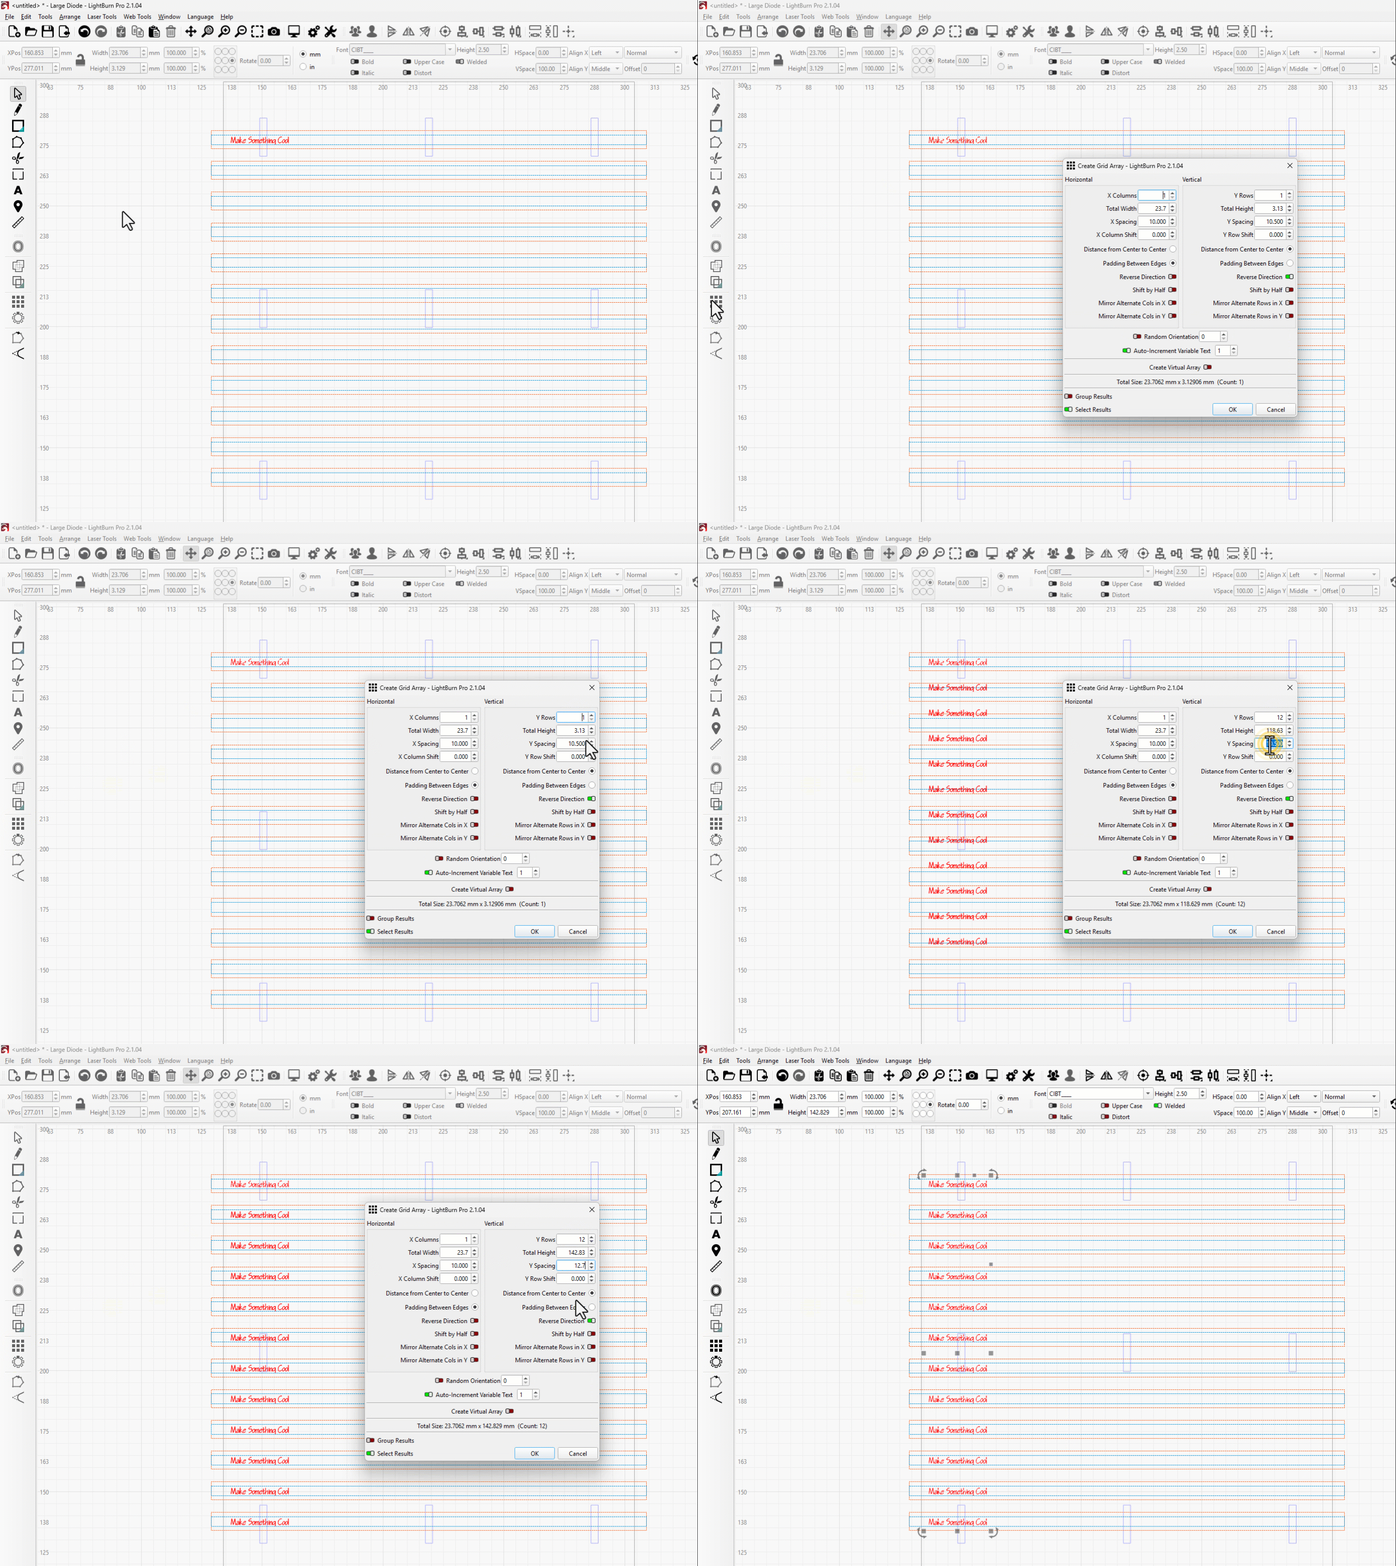
- With your text selected, click the Grid Array button in the sidebar or go to Arrange → Grid Array.
- Adjust your settings as follows. You can use the mouse wheel to zoom and pan while the Array window is open, if you need to see more of the workspace:
- Y Rows: 12
- Y Spacing: 12.7 mm (0.5 inches)
- Turn on Distance from Center to Center as the distance type
- Enable Reverse Direction if needed
- Click "OK" to accept settings.
-
If you want to edit the text on individual pencils, you can ungroup the array object ( Ctrl+U / Cmd+U ) and edit individual text objects. You may want to change the Align X setting to either Left or Right so they stay aligned with each other on the pencils.
5. Adjust Cut Settings
-
Adjust the cut settings for your engraving layer — particularly speed and power — to something suitable for engraving with your laser. Typically, I've done well with settings similar to what I use for engraving on wood. You'll probably want to set a few pencils aside for testing these settings before you do the finished pencils.
-
In the Cuts / Layers Window, you may want to turn off the Output toggle for the layers you aren't engraving. They'll display slightly dimmed, and won't run when you send your design to the laser.
6. Get Ready to Engrave
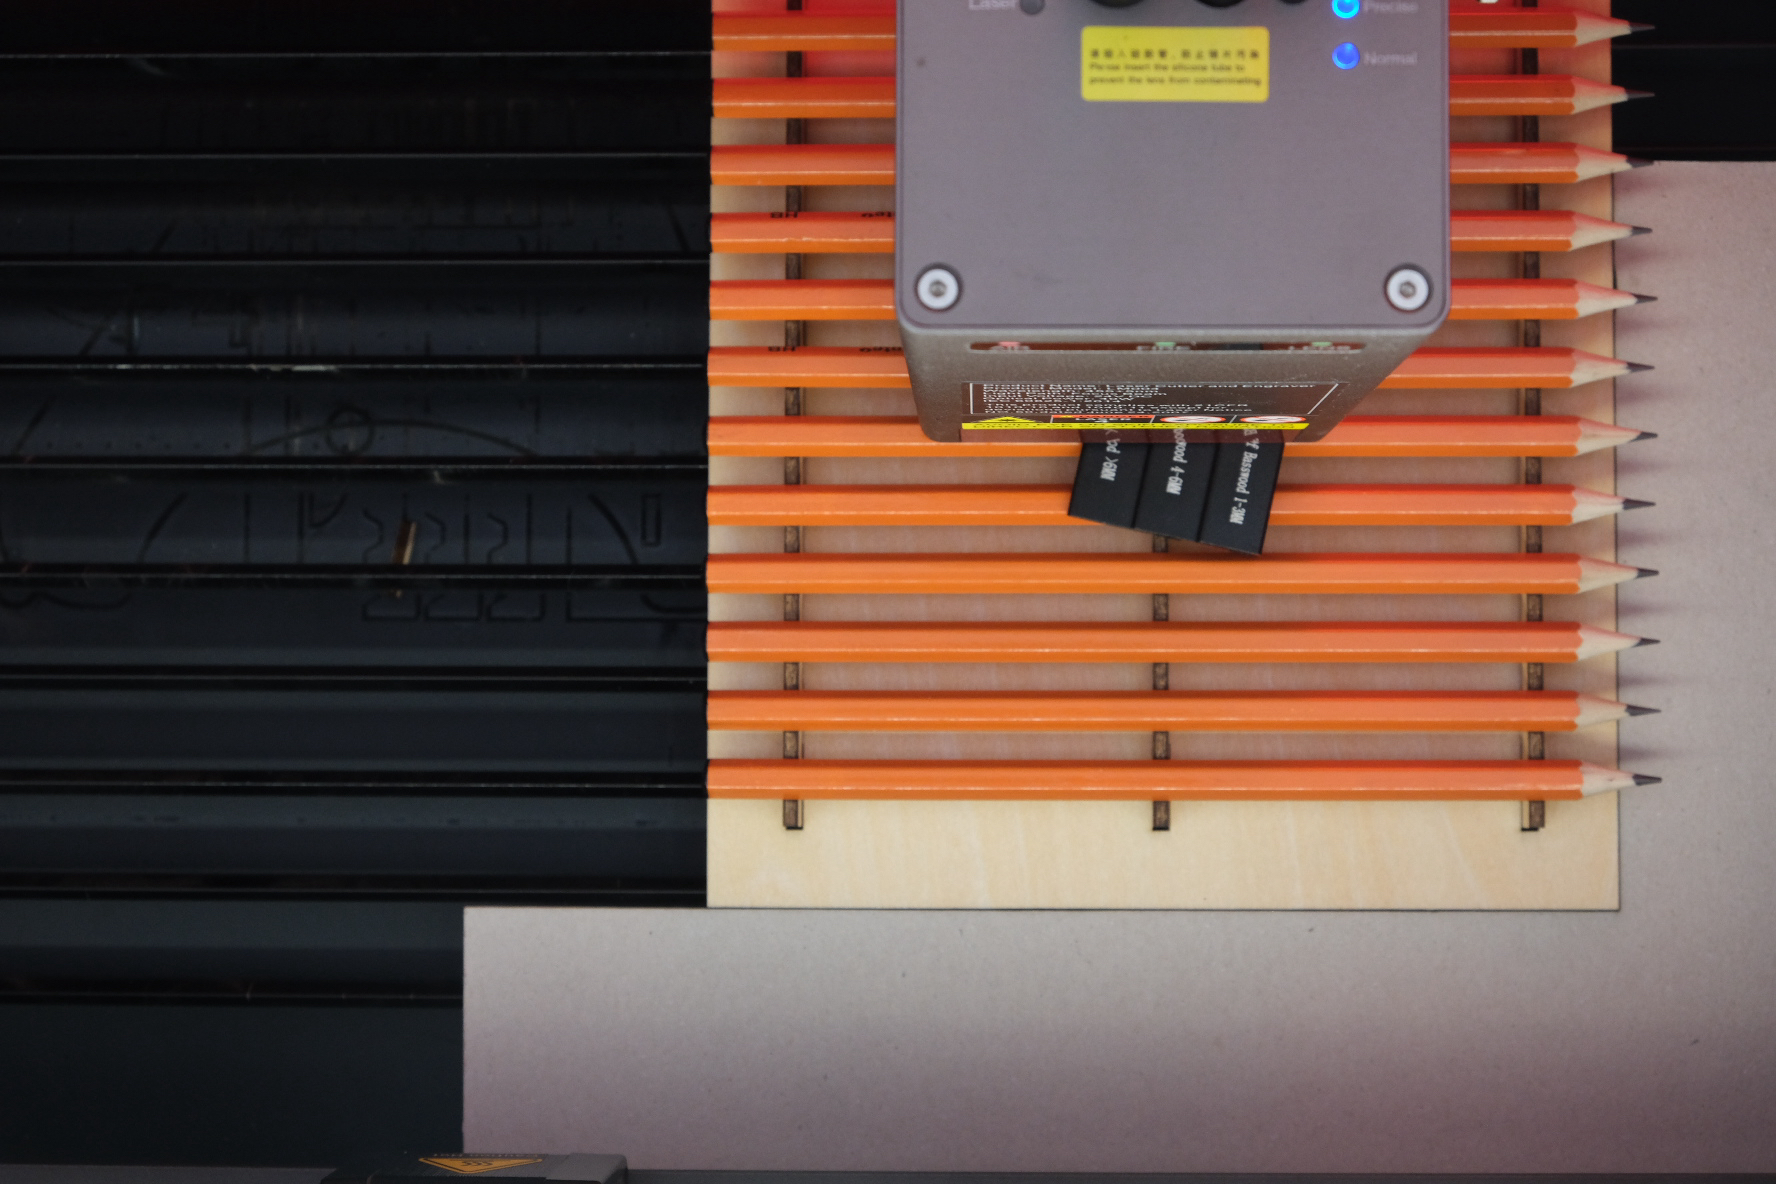
- Focus your laser to the top surface of the pencils. If you need a larger flat surface to focus to, lay a thin sheet of material such as a business card across the top of the pencils.
-
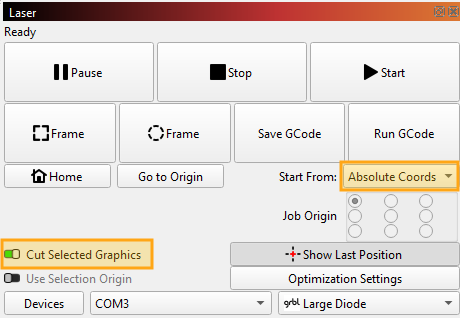
Go to the Laser Window to adjust settings.
- Set the Start From mode to Absolute Coords. Other Start From modes have their uses, but this is the mode you want if you want to set the engraving location based on where your artwork is placed in LightBurn.
- Enable Cut Selected Graphics. This isn't strictly necessary, but it does make things a lot easier - only the pencils you select will be engraved. The rest of the directions will assume this setting is enabled.
-
Home your laser if needed.
What if my laser can't home?
It's not ideal, but if your laser doesn't have homing switches, you can move the laser to its origin by hand before turning it on. Framing will be extra important for you to make sure the laser's positioning is right.
-
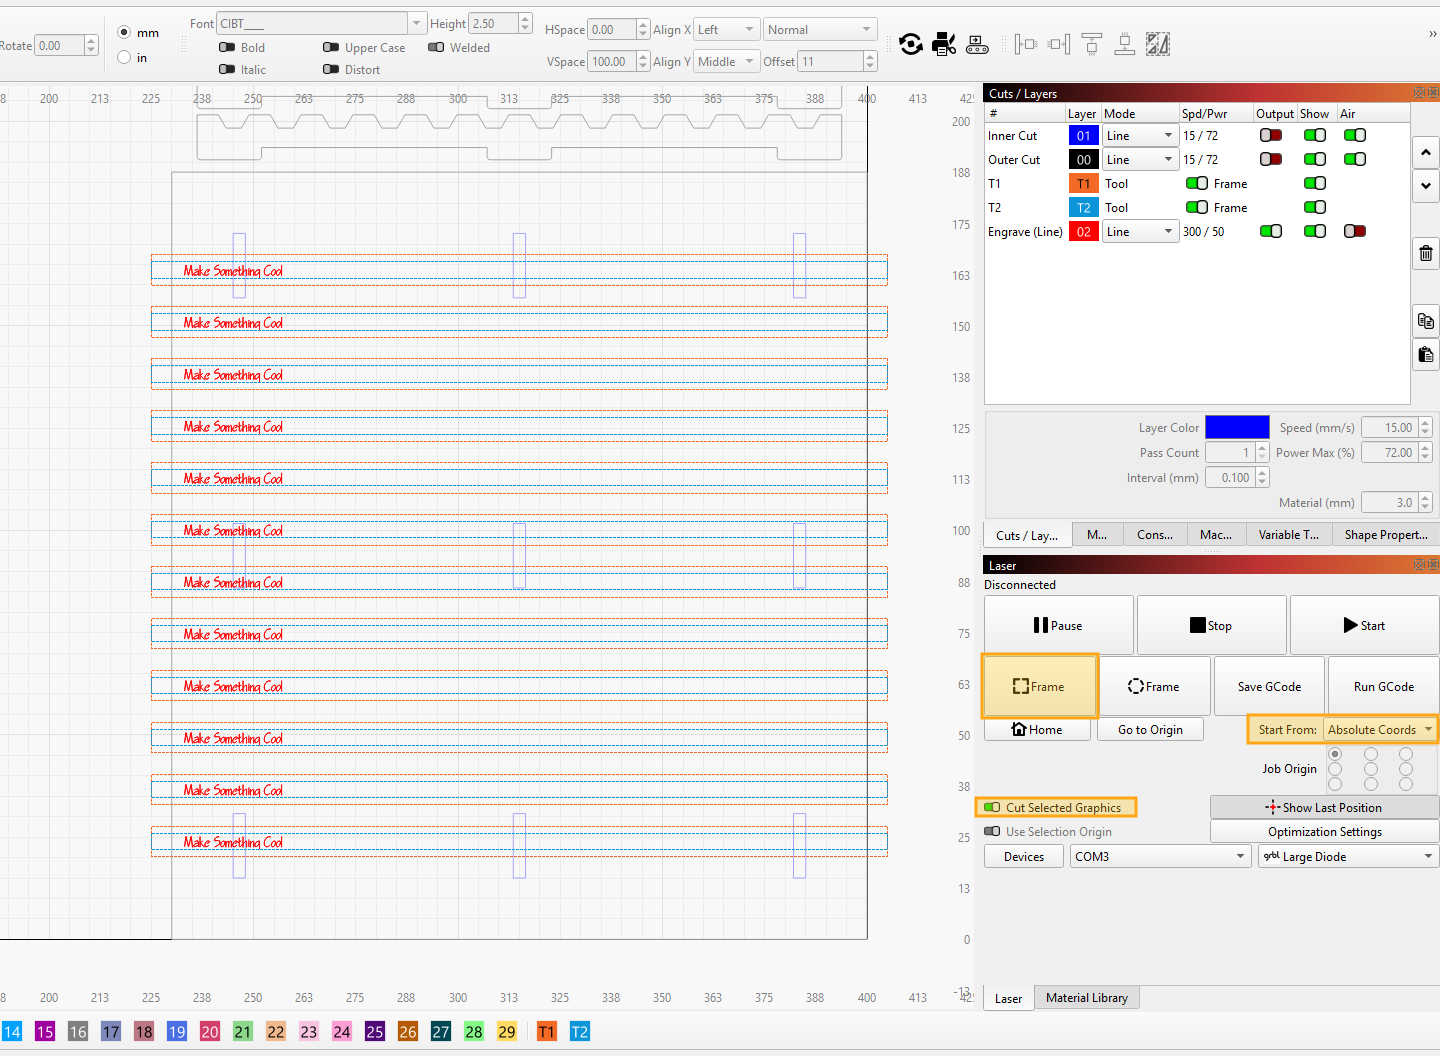
Select the artwork for the pencils you want to engrave, and click Frame to show where the engraving will be located. If the placement is wrong, you can adjust the position of the pencils, the fixture, or the template to match. When I engraved my pencils, I had to shift the artwork up by about half a millimeter.
- When you've confirmed the position is correct, run the job! You can make more at any time just by loading up the template, updating the artwork to whatever you want to engrave, and putting the fixture back in the same corner.
Success!
You've got custom engraved pencils!
Finishing tip
Depending on whether the pencils are painted and what paint is used, you may find that the engraving isn't quite as dark or consistently colored as you'd like. The pencils I used for this project didn't engrave as nicely as some of the other pencils I used.
If this happens to you, there's an easy fix! I grabbed a bit of acrylic paint, brushed it over the engraved area, and wiped it off the surface of the pencils. The wet paint wipes off the glossy surface quickly and easily, but stays behind in the engraving.
Using Variable Text
With LightBurn's Variable Text feature, you can type out a list in a separate file and automatically insert the contents into your LightBurn project. That's not all Variable Text can do, but it's the most relevant use for it here.
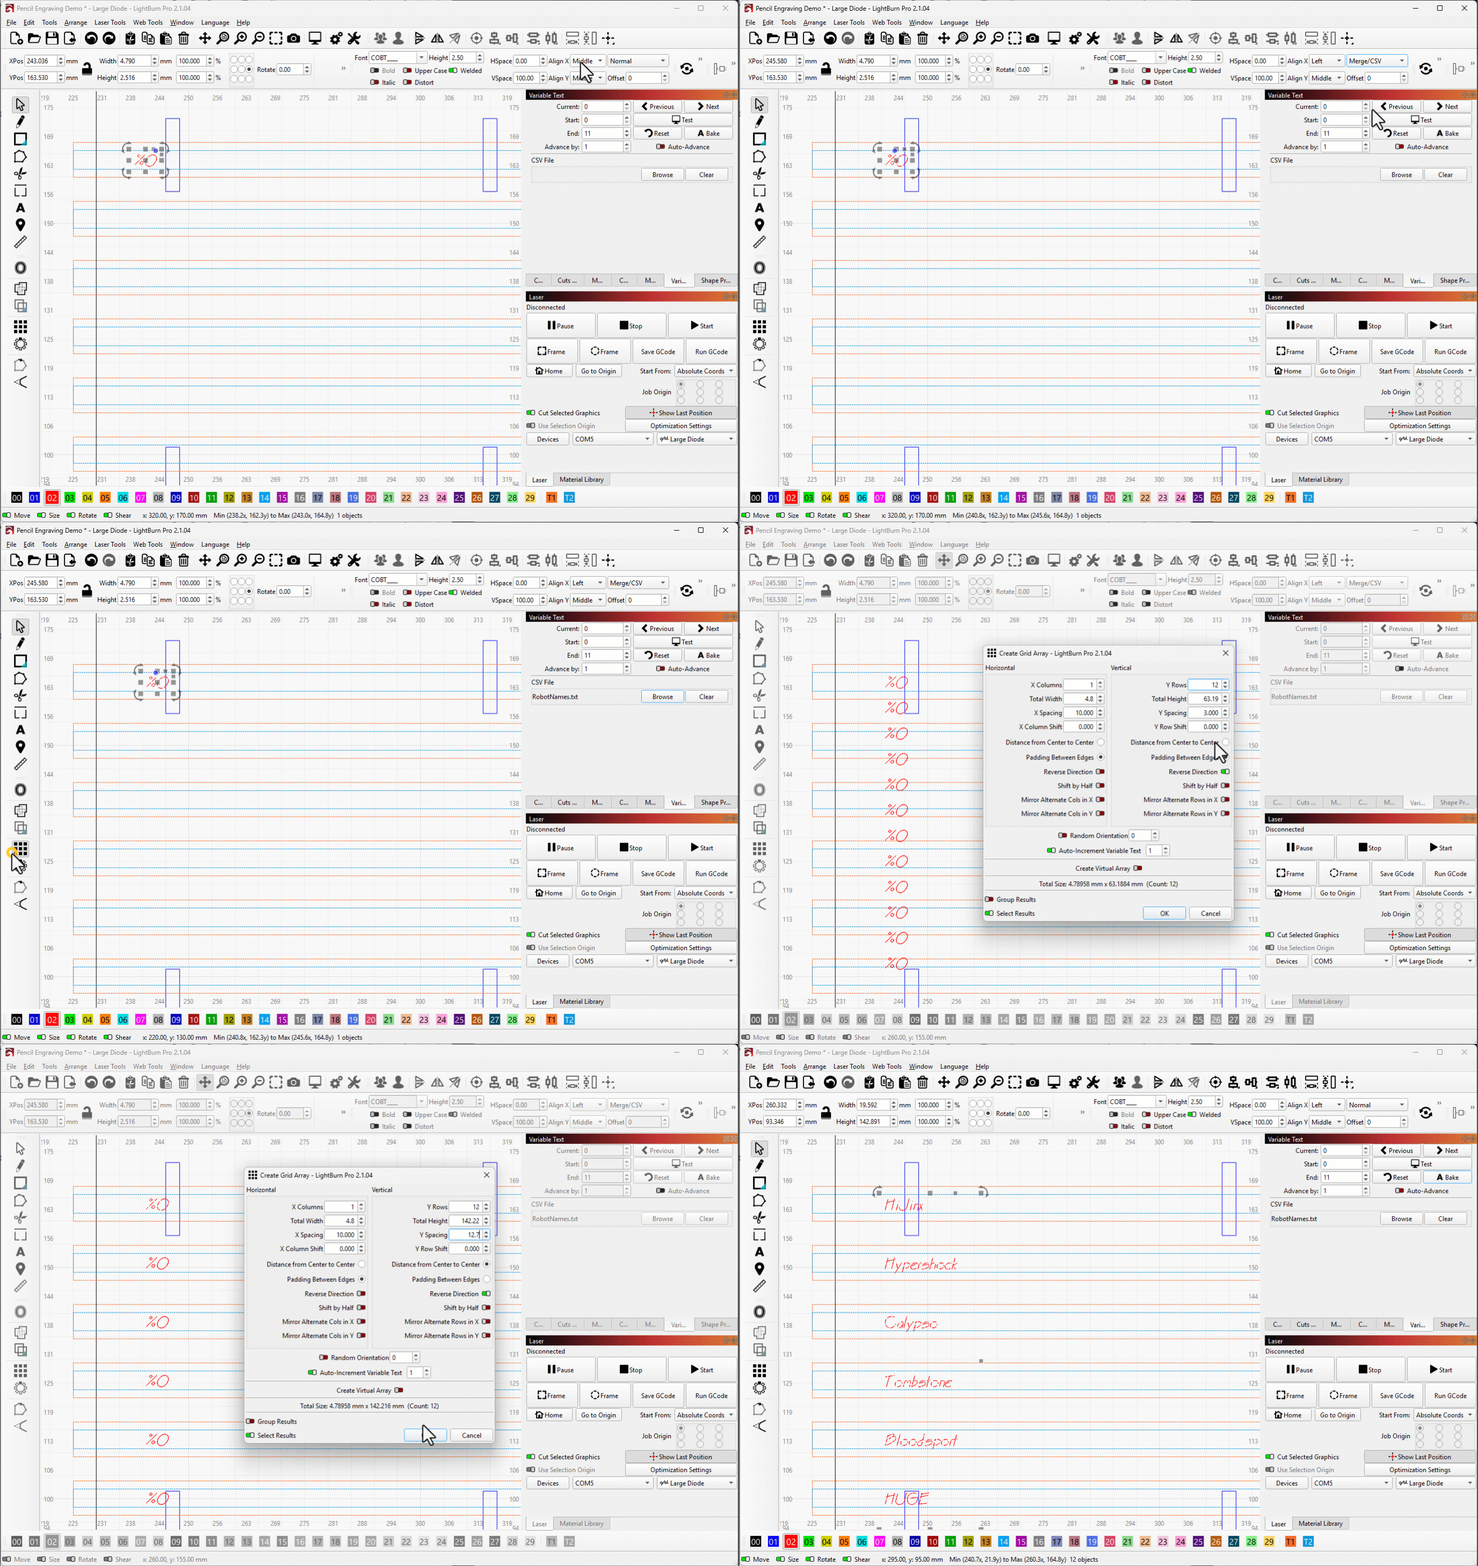
This is going to be pretty similar to making the Grid Array in Step 4: Add Your Design, but with just a few extra steps.
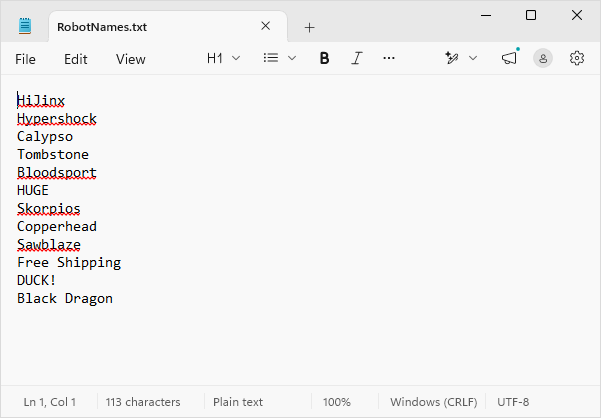
1. Prepare the List
LightBurn's Variable Text tool can load CSV or text files to use with Merge/CSV mode. If that's something you're already comfortable, great! Make yourself a CSV file or a plain text file with the text to insert for each pencil on a separate line and skip ahead to Adjusting the Text Settings.
If I lost you for a moment there, don't worry. Here's the process:
- Open a text editor. For Windows, you can use Notepad and for macOS you can use TextEdit.
- Type in the text you want for the first pencil, press Enter / Enter to start a new line, and continue until you have your full list.
- Save the file as a text file (
.txtextension) somewhere you can find it.
2. Adjust the Text Settings
Now that you've got a list, let's prepare the text in LightBurn.
- With your text selected, find the dropdown in the Text Options Toolbar for the text mode and change it to Merge/CSV. By default, it's set to Normal.
- You'll probably want to change Align X. The default is Middle, but you can change it to Left or Right so that as the text changes, it stays aligned at the left or right sides of the text boxes.

3. Load the List
Open the Variable Text window. It's not shown by default, so you'll likely have to go to Window → Variable Text to open it.
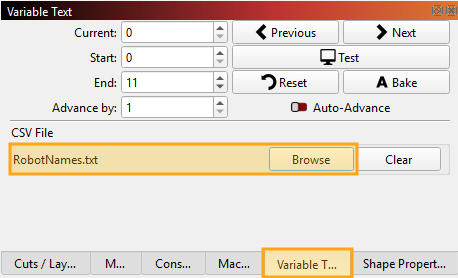
Click the Browse button, find the list you made earlier, and click Open to load it. You'll see the file name under CSV File like in the screenshot below.
4. Variable Text Formatting
Variable Text uses special formatting so LightBurn knows what text you want inserted into your design. The formatting for the Merge/CSV mode is pretty simple.
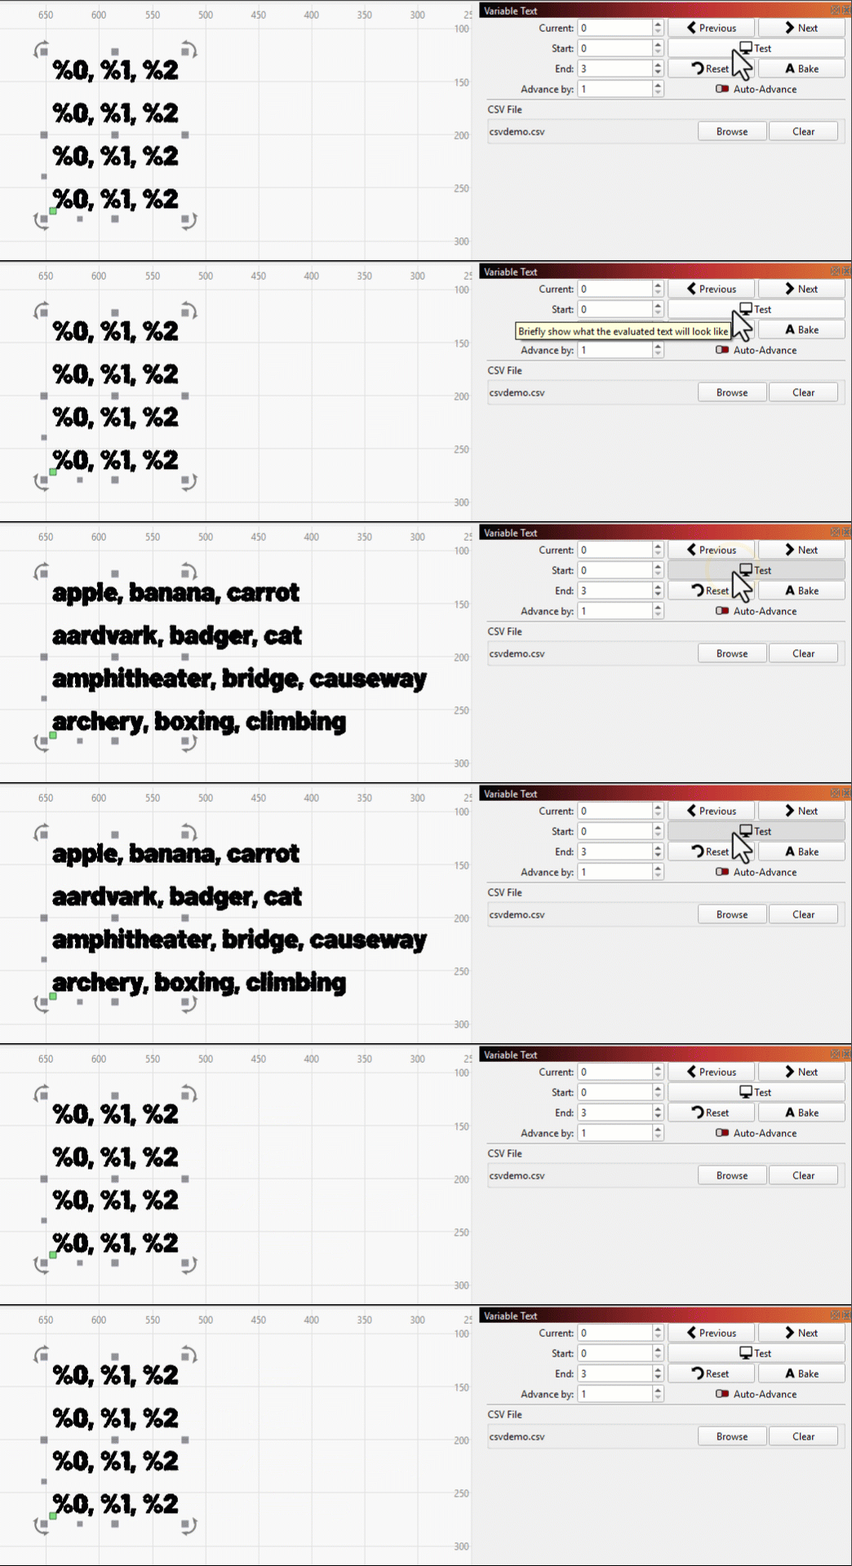
With your text file loaded and the Variable Text mode set to Merge/CSV, %0 will automatically be replaced with each list item in order. You can include %0 as part of a line of text, and only %0 will be replaced, like in the example below. Clicking the Test button in the Variable Text window will temporarily show your text with the Variable Text inserted. You can also see the Variable Text in Preview, or freeze it with the Bake button.
More With Merge/CSV
I've simplified a bit here to keep things easier for people who are new to using Variable Text, but there's a little more to Merge/CSV than just %0. Keep reading if you want to know more.
CSV stands for Comma-Separated Values, and it's a format for creating tables/spreadsheets in plain text. You can put more than one item of text on each line, with commas in between, and insert them using %0, %1, %2, and so on. The first item in the row is always %0, not %1. You can see an example below, along with the text that was loaded as a CSV file.
5. Create the Grid Array
Just like in the version without Variable Text, we'll use a Grid Array to repeat the text — but now each item in your grid array will show different text when you engrave it!
- With your text selected, click the Grid Array button in the sidebar or go to Arrange → Grid Array.
- Adjust your settings as follows. You can use the mouse wheel to zoom and pan while the Array window is open, if you need to see more of the workspace:
- Y Rows: 12
- Y Spacing: 12.7 mm (0.5 inches)
- Turn on Distance from Center to Center as the distance type
- Enable Reverse Direction if needed
- Make sure Auto-Increment Variable Text is enabled and set to 1.
- Click "OK" to accept settings.
6. Test the Variable Text
Click the Test button in the Variable Text window to make sure the text displays as expected.

If it doesn't display correctly, check the following:
- Make sure your text mode is set to Merge/CSV. See directions.
- Make sure you loaded your text file. See directions.
- Make sure you have Auto-Increment Variable Text enabled. See Directions
If it's still not working, email support or visit our forum.
7. Continue With the Rest of the Project
You can continue on with Adjusting Cut Settings.
Other Things to Try
- Try Using Variable Text to create a set of pencils from a list of names or messages.
- Our template is designed for pencils, but there's no reason you couldn't design your own fixture for other objects you engrave repeatedly. For something flat like a dogtag, you can engrave a pocket in a sheet of material without bothering with the interlocking pieces to hold the pencils like we have here.