Material Test
About the Material Test Generator
LightBurn has a built-in test pattern generator to help you find the best settings for your laser and any material you're working with. To open the Material Test Generator, go to the Laser Tools menu and select Material Test.
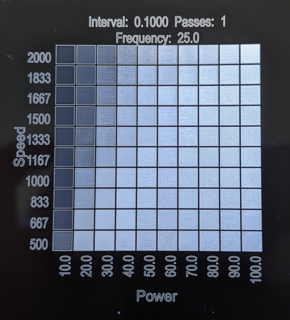
On the left side of the example below, each row is labeled with the engraving speed. Along the bottom, columns are labeled with the power level used. At the top, the sample shows additional universal settings — in this case, Interval, Passes, and Frequency — that are used for each box in the grid.
Using The Material Test Generator
After opening the Material Test Generator, you'll be able to configure your test pattern. By default, the Material Test Generator will create a 10x10 grid of boxes with varying Power and Speed. Use the Param dropdown to select different parameters to test.
Positioning
The output location of the test grid is determined by the Start From mode you select before opening the Material Test Generator. Current Position and User Origin work exactly as they do for all other output, while Absolute Coords location is controlled by the X/Y Center options in the Material Test configuration.
Test Configuration
Use the settings below to configure your test grid. The parameters tested can be Power, Speed, Interval, or Passes. Frequency and Q-Pulse width can also be tested, if your laser supports those settings.
| Test Grid Settings | Explanation |
|---|---|
| Count | How many rectangles are in each row/column |
| Param | The setting being tested along this axis |
| Min | The lowest value to be used for this setting |
| Max | The highest value to be used for this setting |
| Height/Width | The height/width of each rectangle in the test grid |
| Y Center/X Center | The position of the center of the test grid (if using Absolute Coords) |
Cut Settings
The three buttons at the bottom of the dialog box open the Cut Settings Editor, where you can adjust the settings to use in your test. There are two switches to enable or disable the text labels and border.
| Button | Explanation |
|---|---|
| Edit Material Setting | Base settings for the test — the two settings chosen in Param will be varied in the grid, but all other settings applied here will apply to every test box |
| Edit Text Setting | Settings to use for the text labels |
| Enable Text | This switch controls whether text labels are output |
| Edit Border Setting | Settings to use for the border around the test grid — available in LightBurn 1.5 and higher |
| Enable Border | This switch controls whether the border around the test grid is output |
Running the Test
The buttons on the right side allow you to Preview the test grid, Frame to check output location, run the laser, and more.
| Laser Controls | Explanation |
|---|---|
| Preview | Generate a preview of the test grid |
| Frame | Frame the test grid to see its position on the material |
| Start | Start running the material test |
| Pause | Pause the material test |
| Stop | Stop running the material test |
| Save RD File/Save GCode | Device-dependent — if available, saves the test grid in RD or GCode format |
Presets
The Presets section in the top left corner of the window allows you to select, save, delete, export, and import Material Test presets. Presets are useful for tests you run often, such as a smaller test pattern for metal tags or testing engraving on different woods.
Using Presets
Use the dropdown box to select an existing preset. Starting in LightBurn 1.7, built-in presets for users with Diode or CO2 lasers are included.
After selecting a preset as a starting point, adjust the Material Test settings as needed.
Saving and Exporting
To the right of the dropdown, there are buttons allowing you to Save, Delete, Export, and Import presets. There is also a dropdown allowing you to select a saved preset.
- Save - Saves the current settings as a User Preset.
- Delete - Removes the current user preset from the dropdown list.
- Export - Opens a window to select user presets to export as a
.lbmtfile. You may also be interested in User Bundles. - Import - Opens a window to import user presets from a
.lbmtfile. You may also be interested in User Bundles
To locate the presets saved on your computer, go to File → Open Prefs Folder. You'll find the material_test_presets.lbmt file inside the presets folder.


