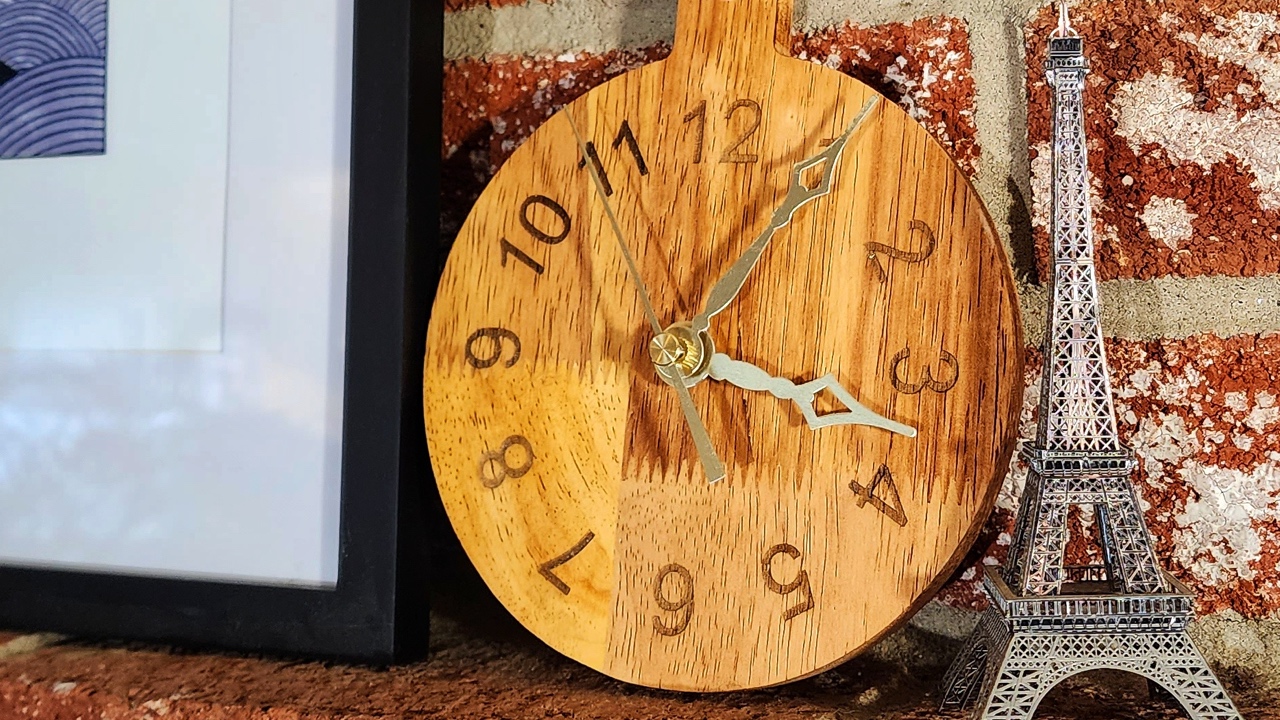
Laser Etched Clock
Clocks and the ability to track time are among the most important inventions in the history of mankind. Not only do they help us keep on schedule, for nearly 400 years they have also been crucial to navigation, from ship chronometers to GPS. While we have plenty of digital clocks around us nowadays, it doesn't mean that we can't still appreciate the aesthetics of analog clocks for decoration.
In this guide, we will explain how to create a good looking analog clock out of easy to find materials using LightBurn and even a low power laser.
What You'll Learn
This project will teach you how to:
- Use Tool layers as guidelines
- Precisely align graphics using the Alignment Tools
- Transform specially formatted characters into clock numbers using Variable Text
- Evenly space the clock numbers using Circular Array
- Position output to your laser using Current Position as your Start From mode
Materials
- A chosen material to engrave a clock face onto.
- We aren't going to cut this clock out on our laser, instead we are going to find a good item to modify and turn into our clock. Anything that can fit in your laser's workspace will do.
- We selected a set of nice looking mini cutting boards that worked perfectly, but you can select a material of any size or shape that you think will make a nice clock — it doesn't have to be round.
- A battery powered analog clock module.
- These are relatively inexpensive and are available at craft stores or can be ordered online.
- A power drill and drill bit bit that is the same size as the post of your clock module.
Steps
1. Outline the Clock Face
Before opening LightBurn, measure the width of the object you have chosen to use for your clock. Be sure to measure at the space where you want your design to be centered so you get the proper width.
-
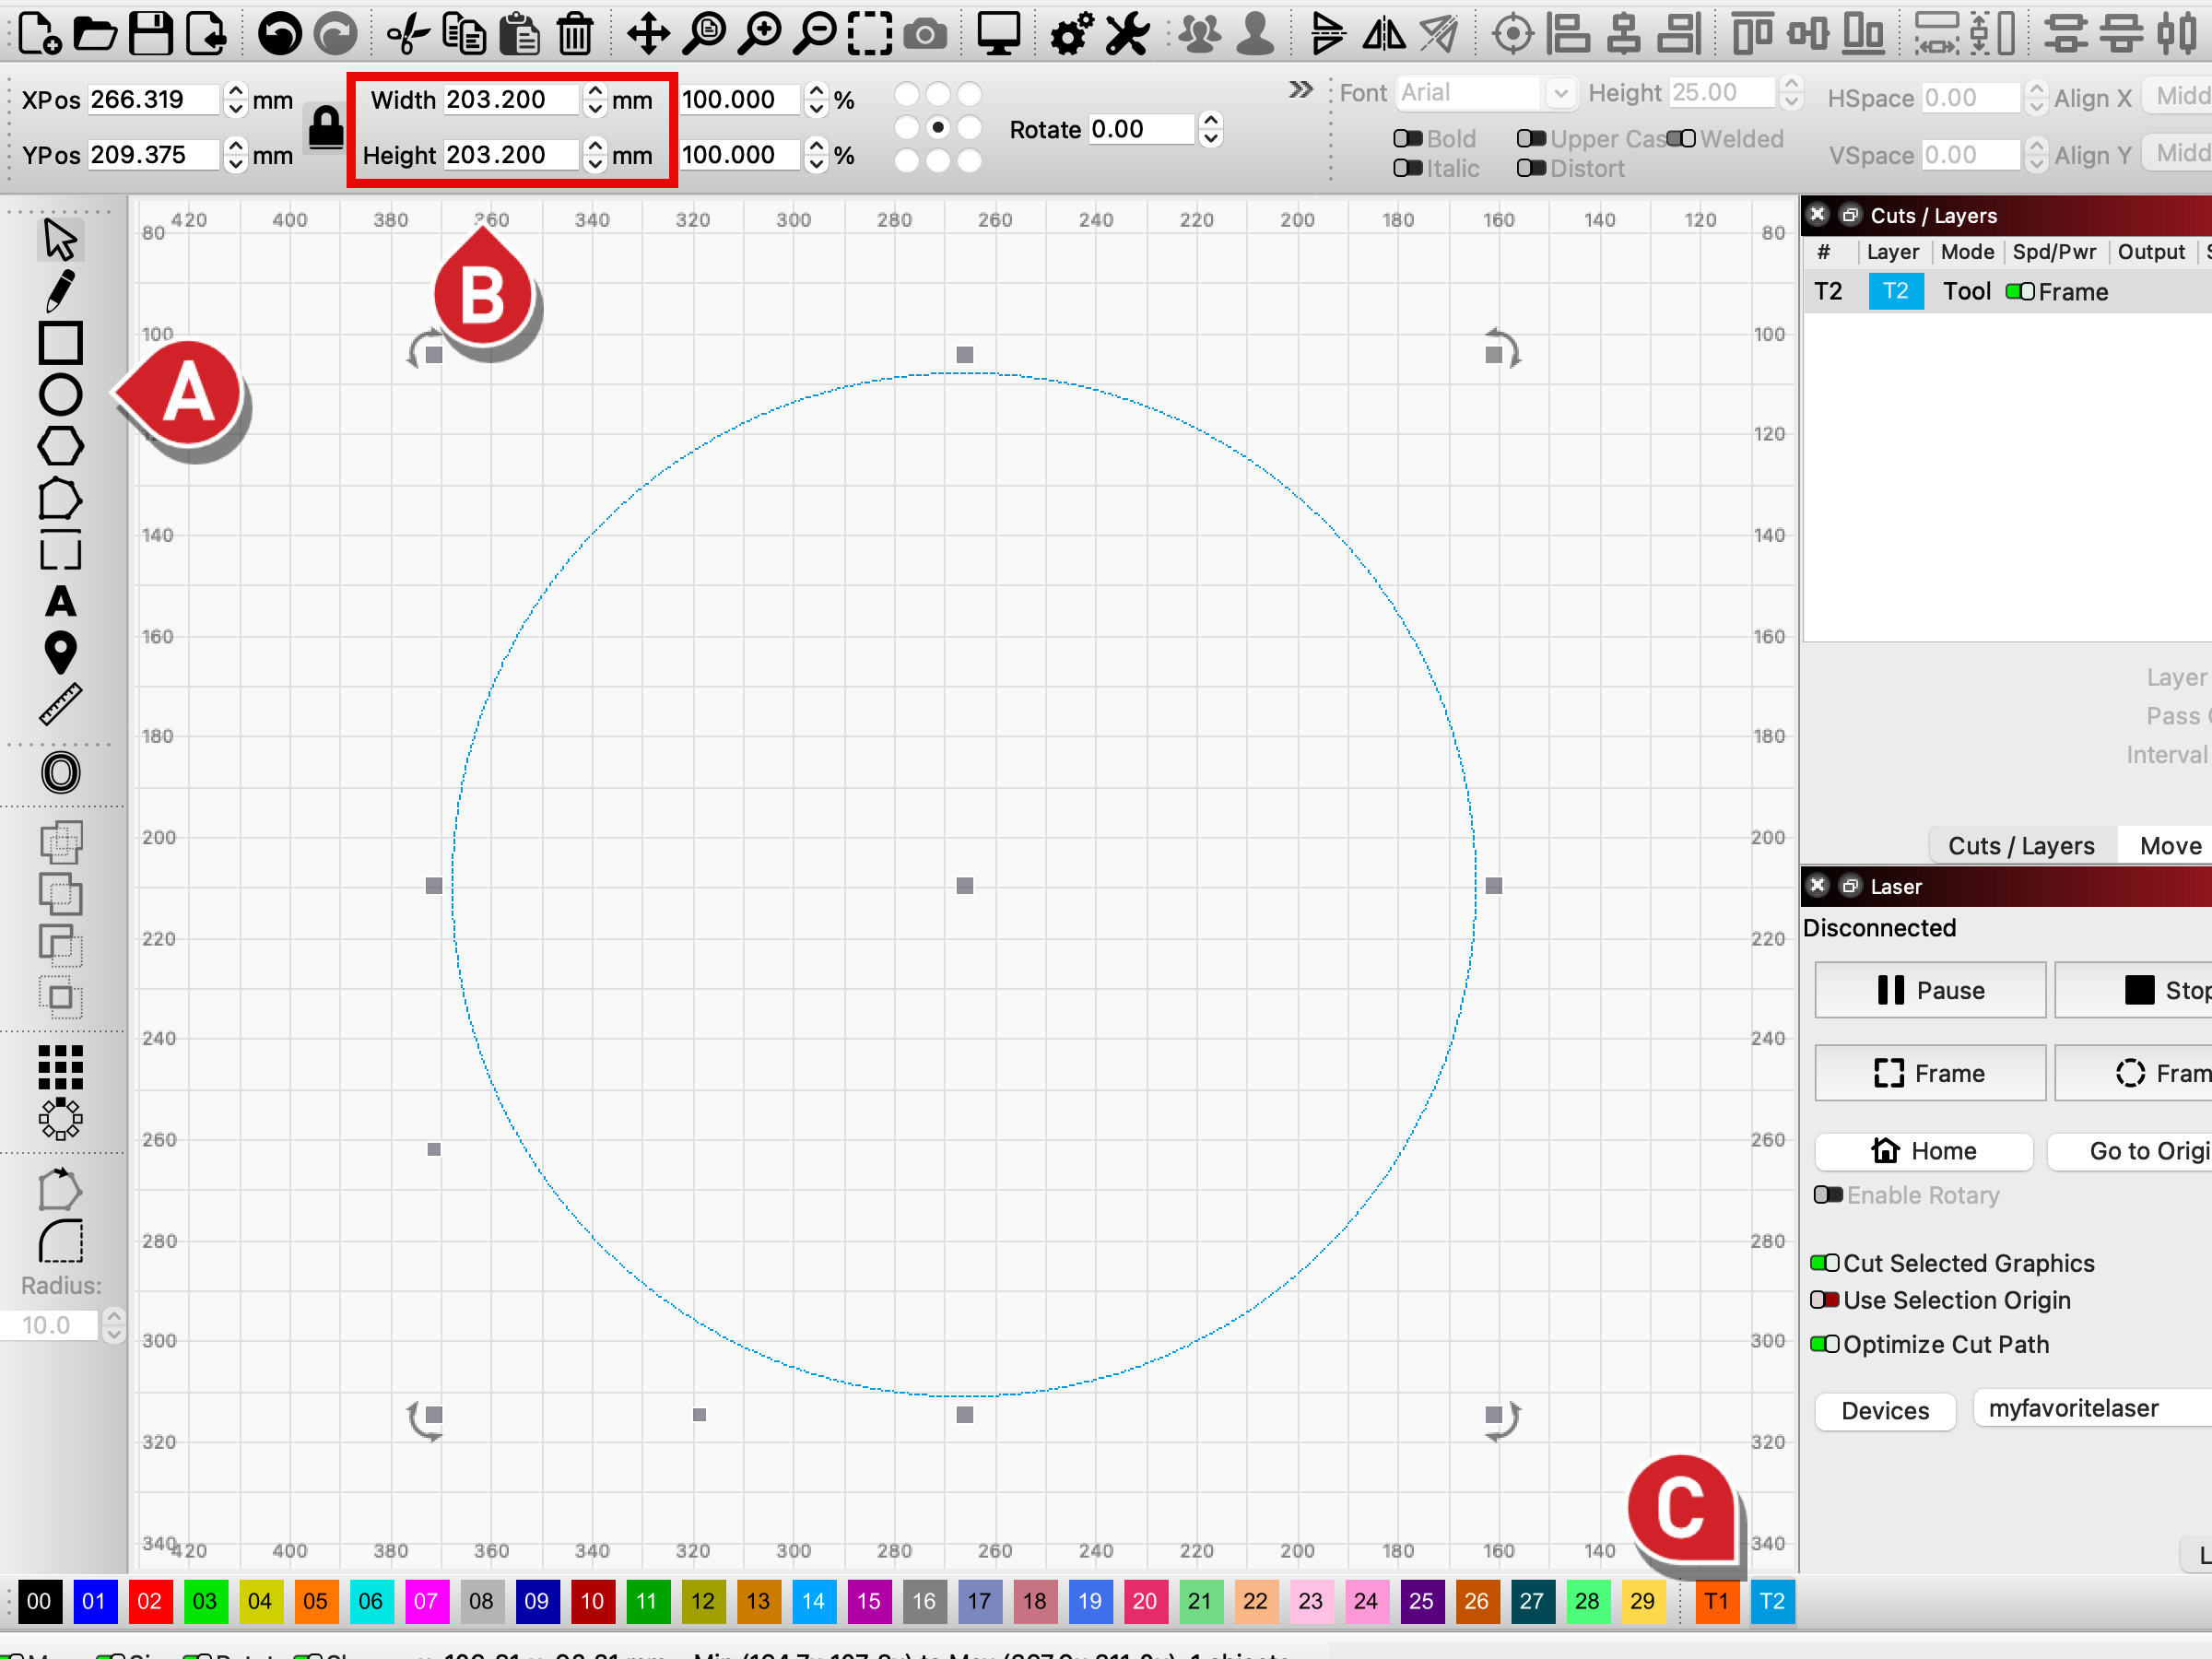
In LightBurn, use the Ellipse tool to create a circle. Holding the Shift key while dragging will make it a perfect circle.
-
In the Numeric Edits Toolbar, set its Width and Height to match the material you selected to make your clock out of. If you made a perfect circle in Step A, you only need to adjust one dimension, as long as the lock icon in the toolbar is locked.
-
Set it to a Tool layer. Tool layers are never output to your laser, so this will just be used for visual reference and alignment.
-
Create another circle.
-
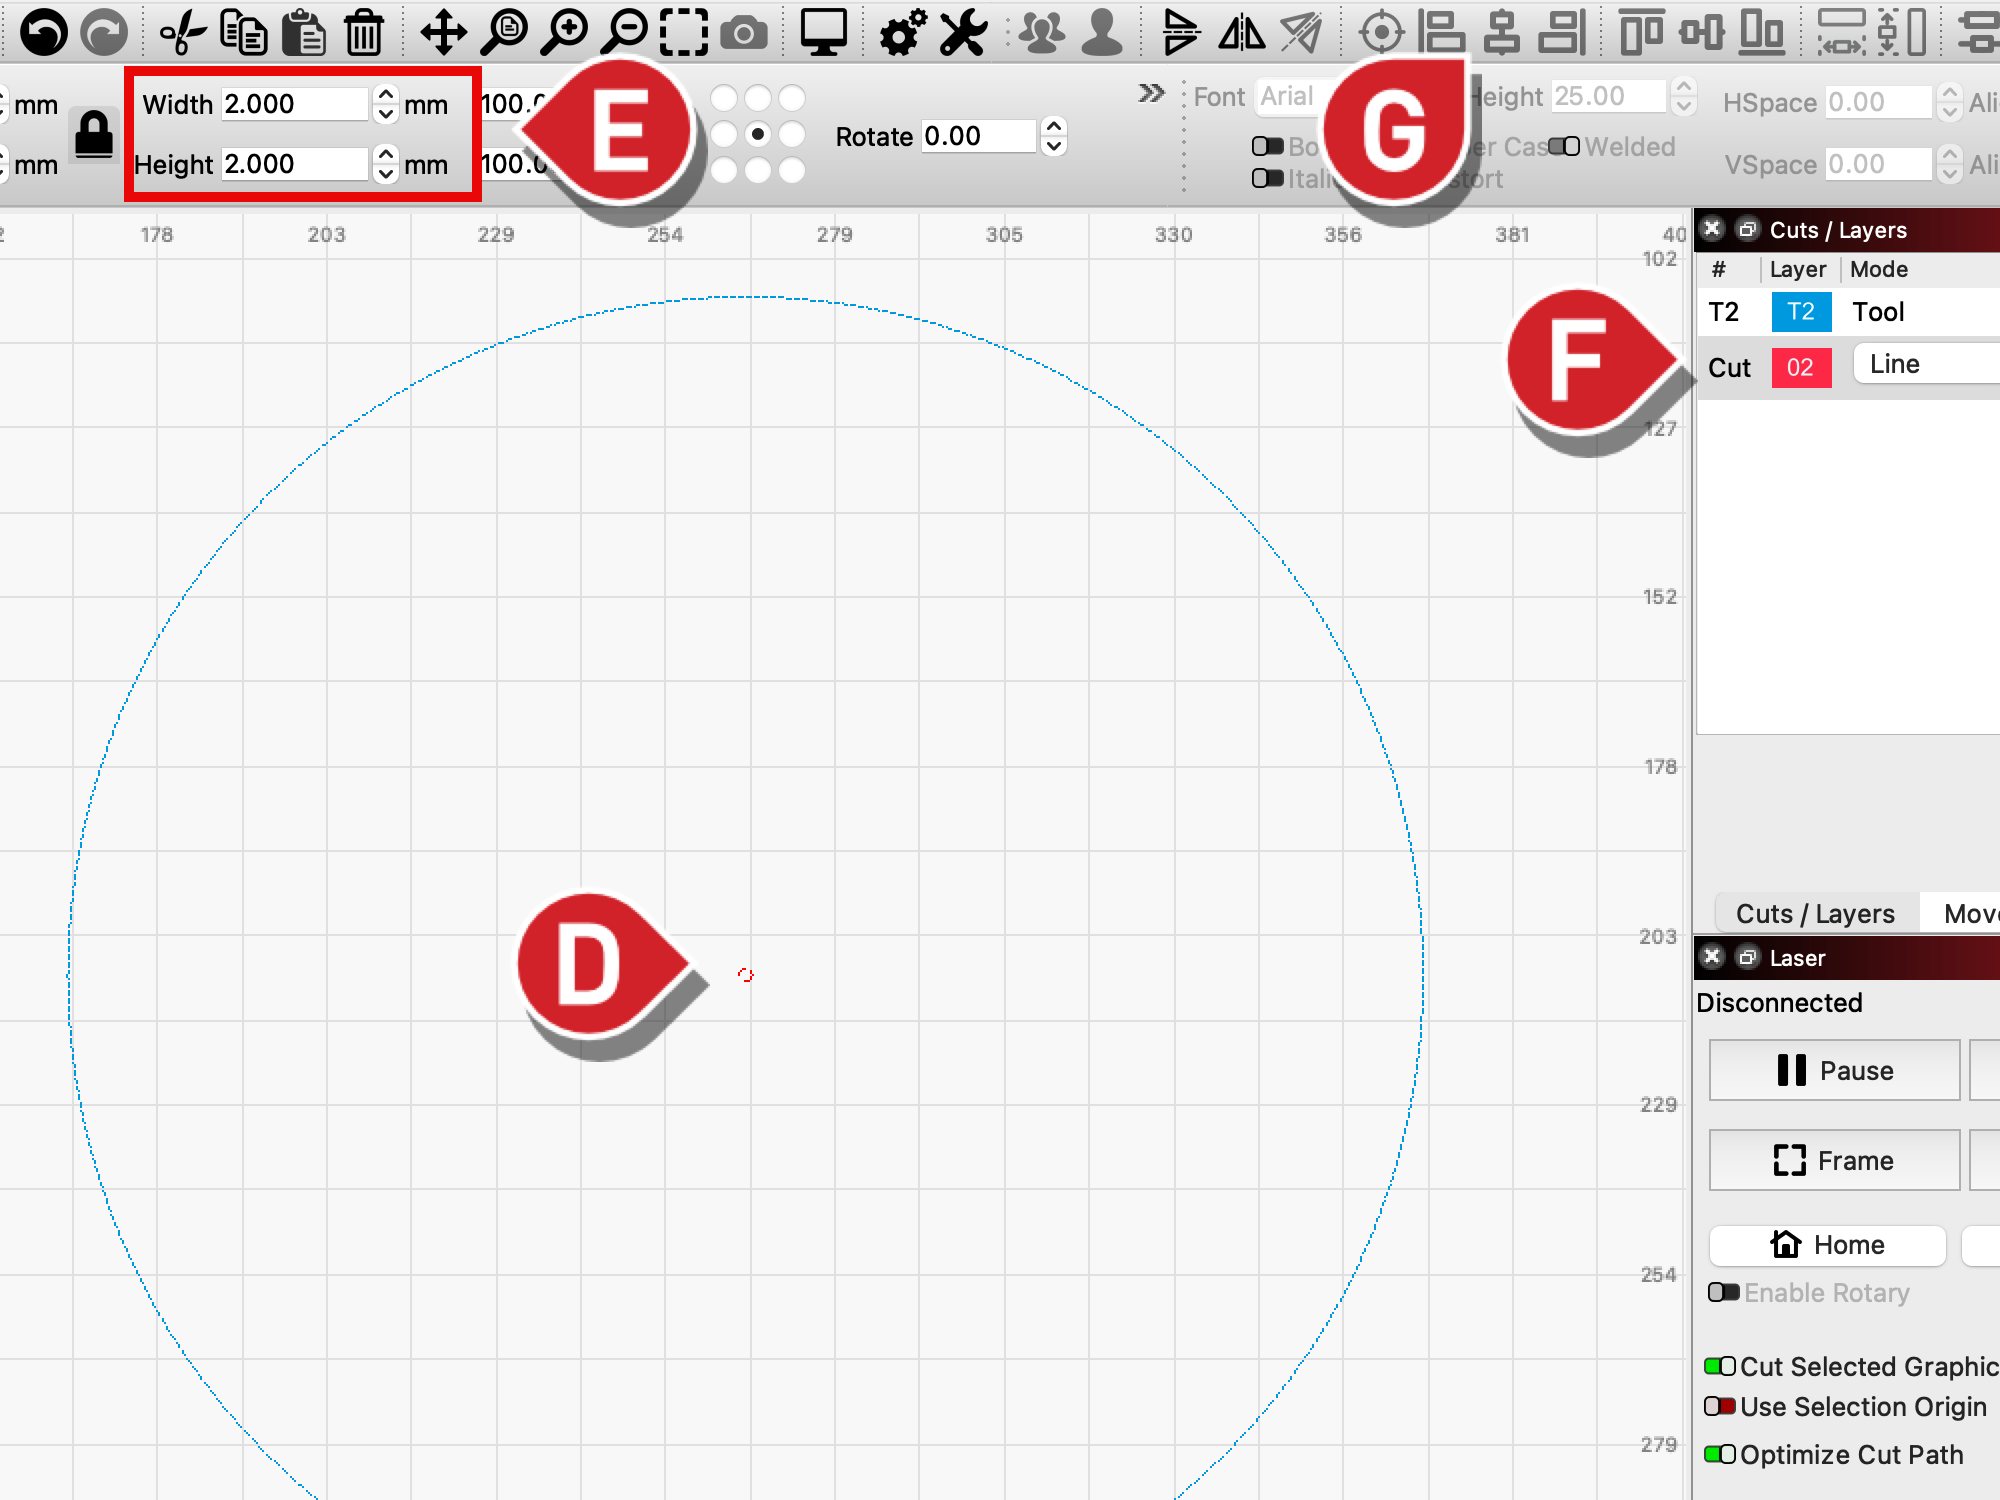
Set its Width and Height to 2mm or .08". This small circle will make it easy for you to align the point of your drill bit later.
-
Set it to a Line layer.
-
Select both circles and use the Align Centers tool to make sure the small circle is perfectly centered in the large circle.
2. Set Up the First Clock Number
Now we’ll position and size the first clock number for our clock face, while using Variable Text formatting that will allow us to quickly create the rest of the numbers.
-
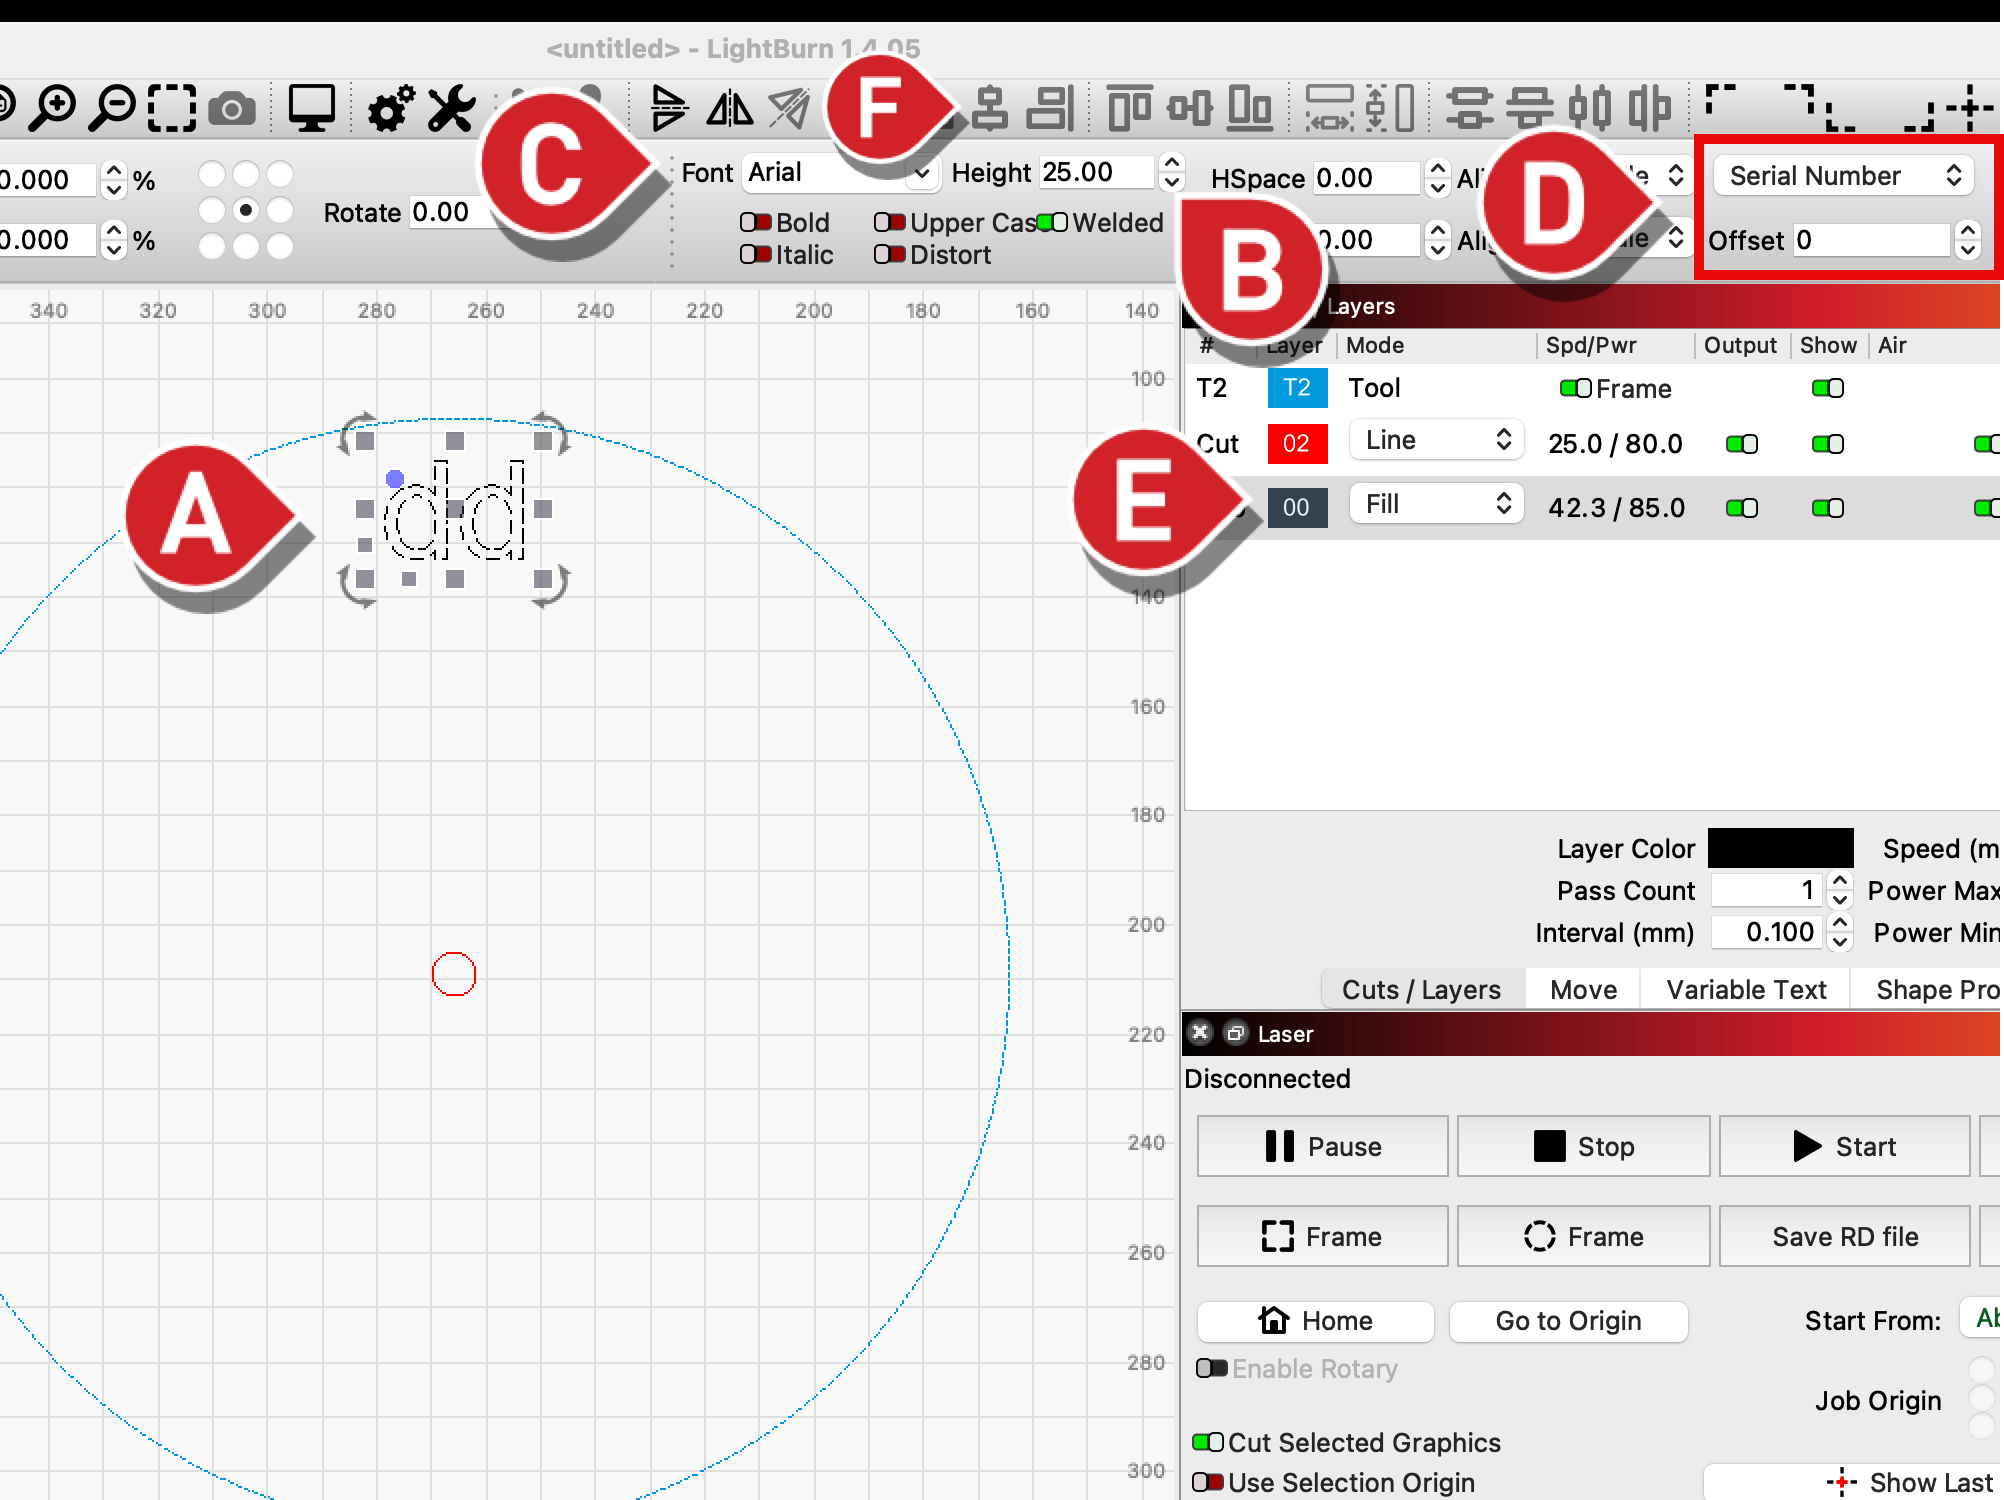
Use the Create Text tool and enter the letters “dd” inside the larger circle. Place it near the top center, and set in from the outer circle according to your visual preference.
-
In the Text Options Toolbar, set the Height of the letters. They can be as large or small as you like, as long as you’re able to fit 12 numbers around the clock face.
-
Choose whichever Font you’d like to use.
-
Set the text type to Serial Number and make sure the Offset is set to 0. With this formatting, the "dd" text will be swapped for a number when we Preview or send the job to the laser.
-
Set the text to a Fill layer.
-
Select the text, then both circles, and use Align Vertical Centers to align the text's center with the circles'.
3. Array the Variable Text Around the Clock Face
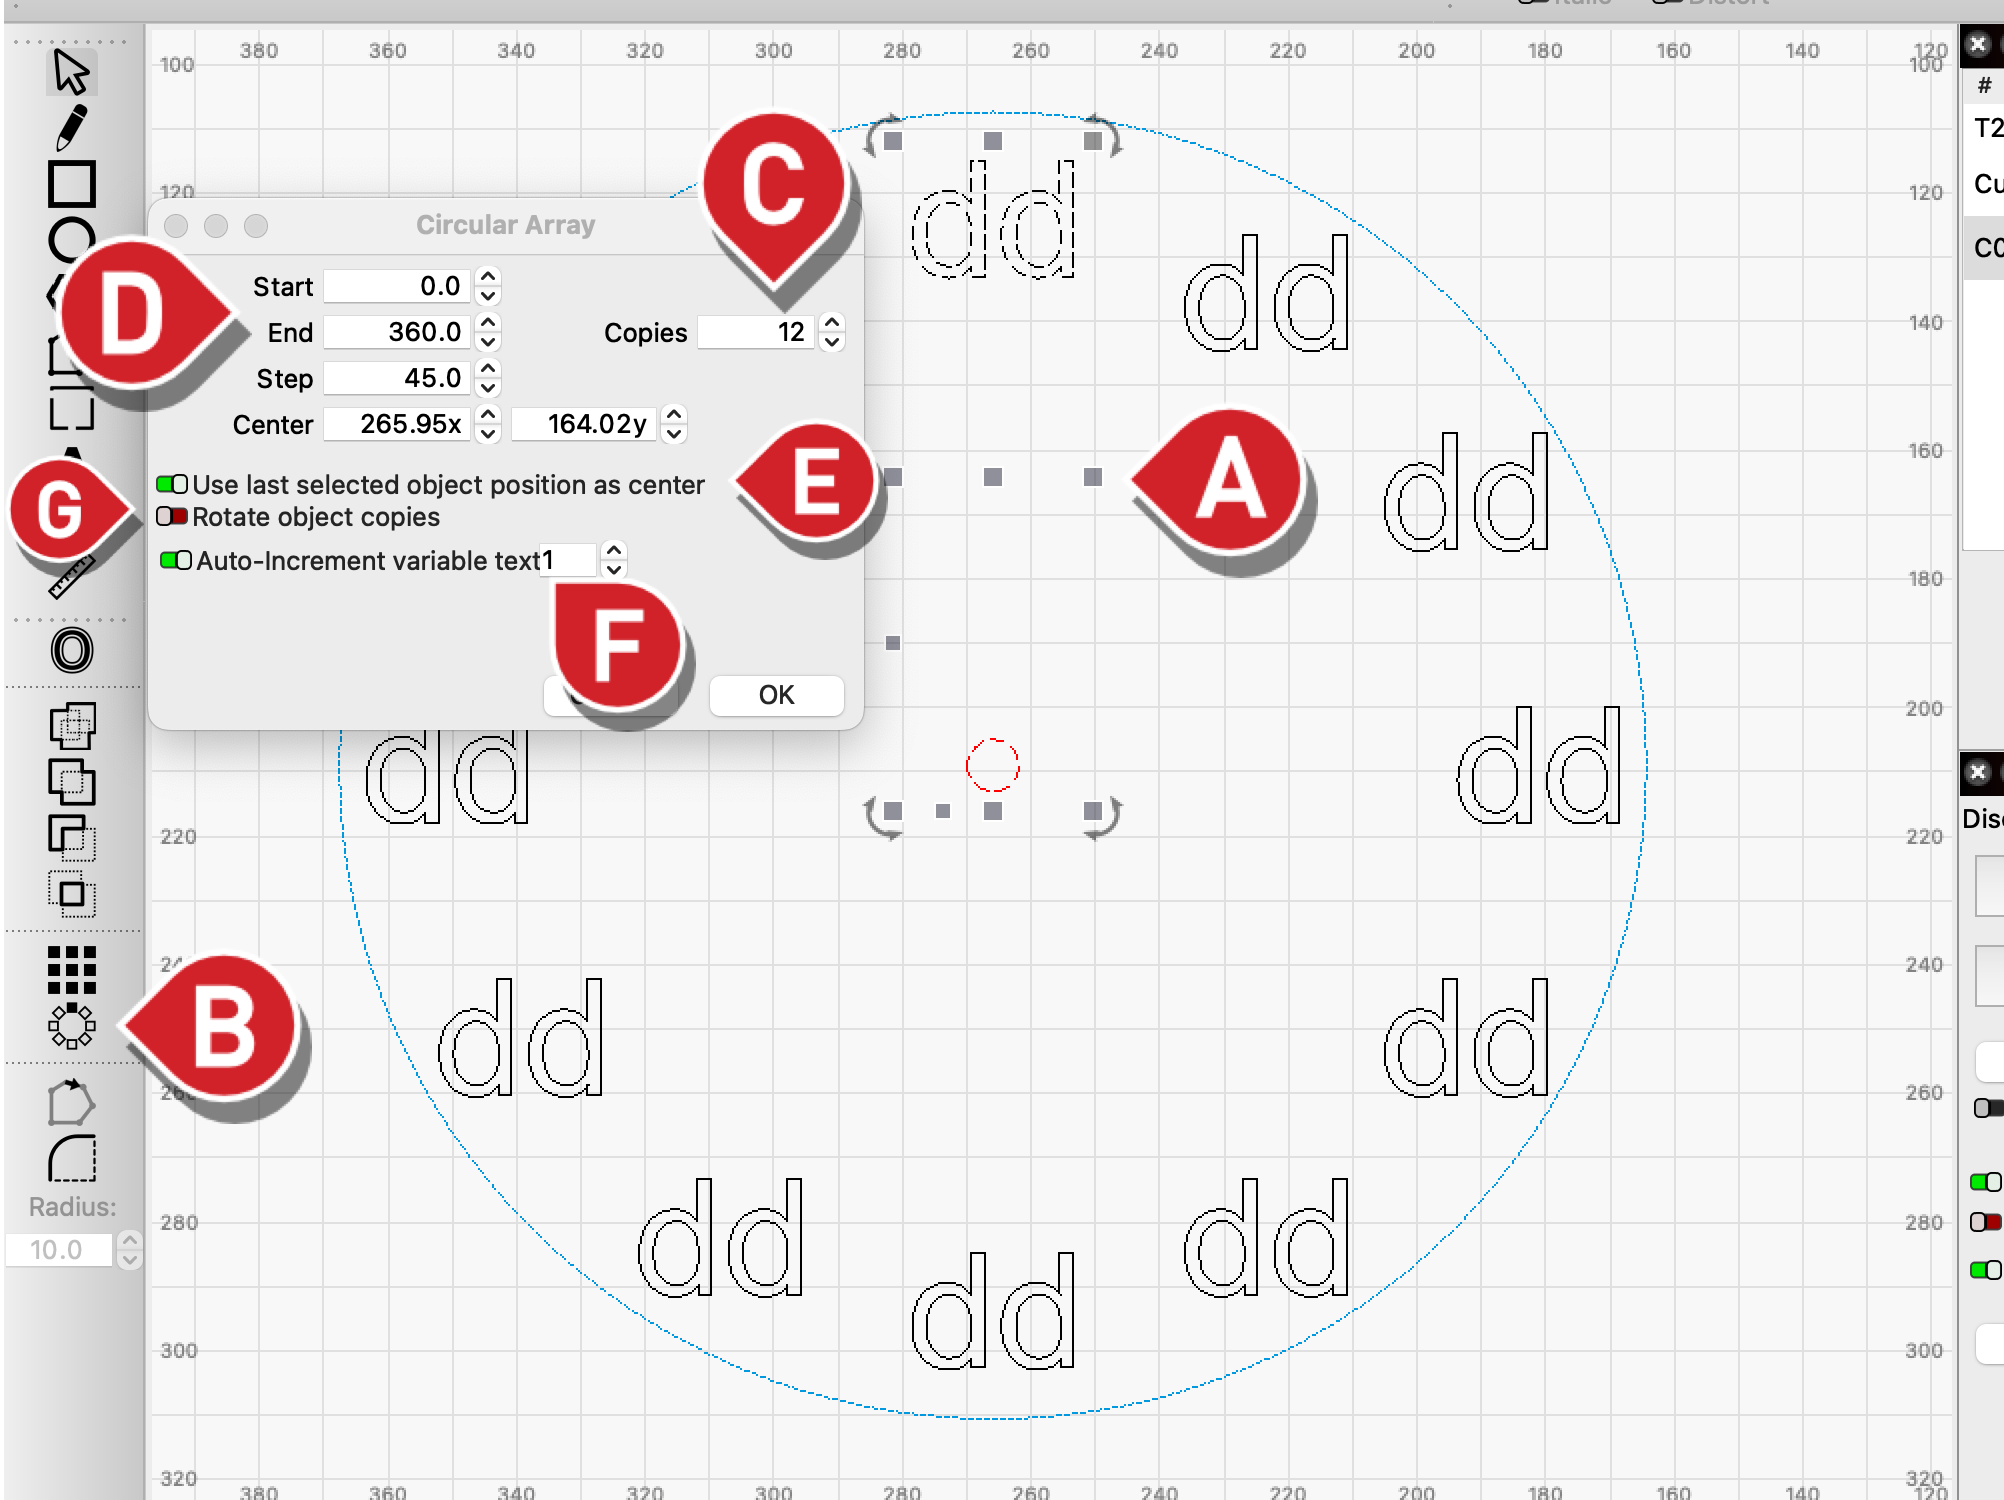
Using the Circular Array tool, we'll create the rest of the numbers for the clock face.
-
Select the text and then either of the circles.
-
Click the Circular Array Tool.
-
In the Circular Array window, set Copies to 12.
-
Set the Start to 0, and End to 360.
-
Enable Use last selected object position as center.
-
Make sure Auto-increment variable text is enabled and set to 1.
-
Disable Rotate Object Copies to keep the numbers rightside up all the way around the clock, or enable it to have them turn upside down.
-
Click OK to make the array.
4. Test and Adjust the Variable Text
To finish off the clock face design, we need to make one small tweak to the Variable Text.
-
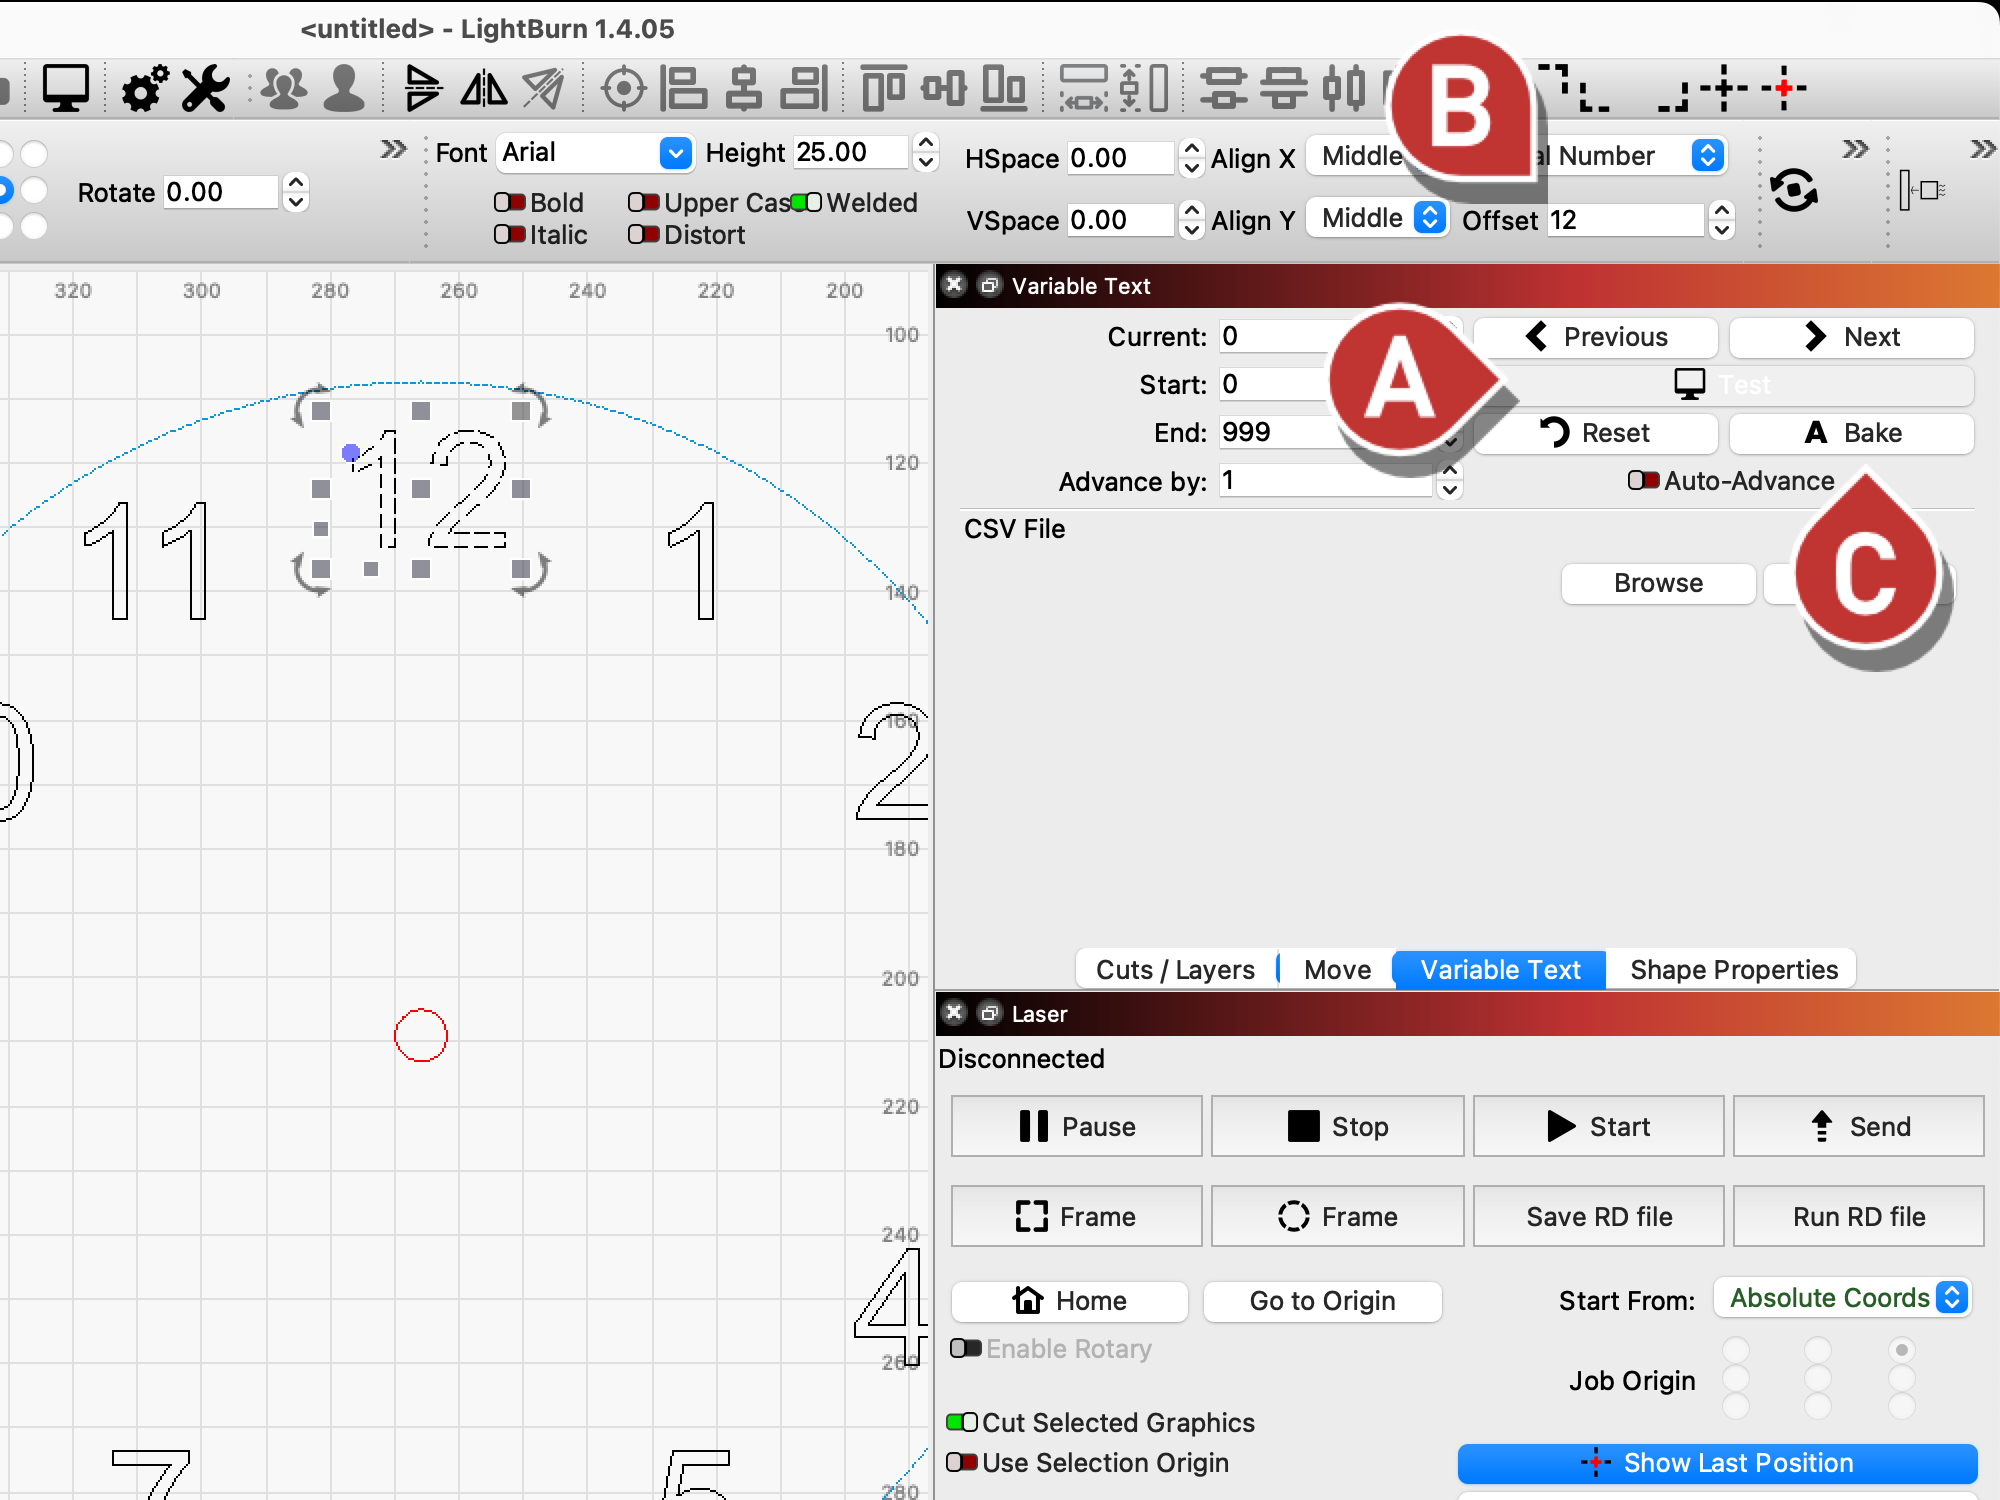
In the Variable Text window, click Test. You should see the numbers 0-11, starting from the top center and advancing clockwise around the circle.
-
Of course, we don't want 0 on our clock, so select the top center text, head up to the Text Options Toolbar, and adjust its Offset to 12.
-
Click Test again to make sure it now reads 12. Once everything is correct, you can click Bake to permanently transform the Variable Text into numbers in your workspace. If you don't click Bake, the Variable Text will still output as numbers when you Preview or Start the job.
5. Assign Layer Settings
Before running the job, we need to apply appropriate settings to our Layers.
-
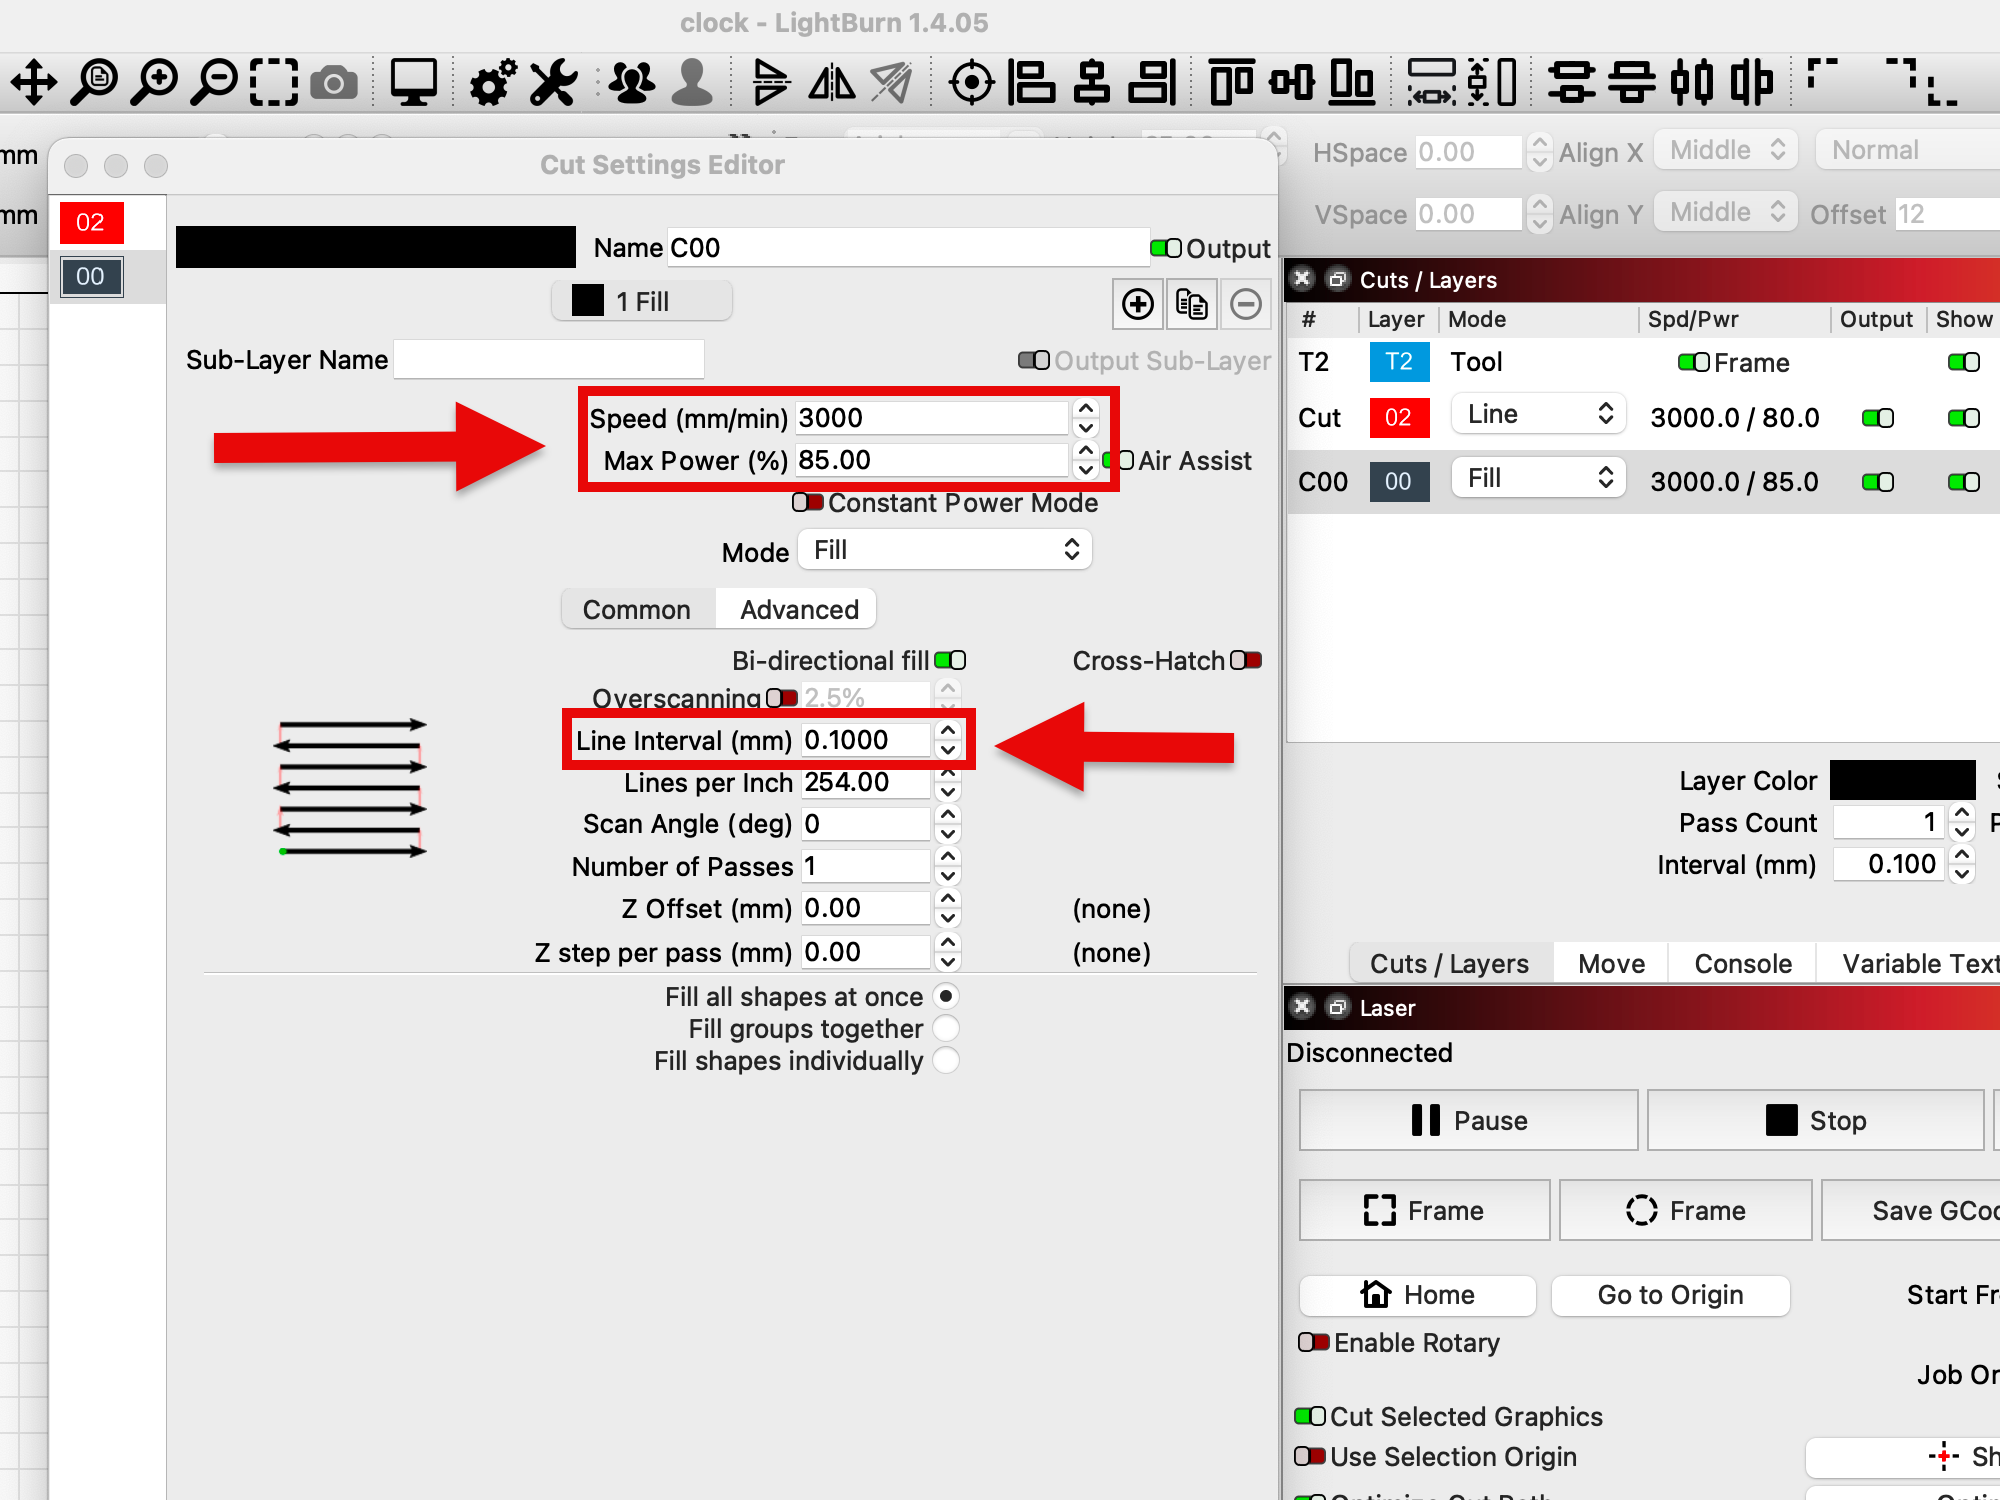
Set the Fill layer to a speed, power, and line interval that produces a good etch on your material. If you're unsure what settings to use, you can run a Material Test on some spare material to find optimal settings.
-
Set the Line layer to an appropriate power to etch the material just enough that you can use the mark as a guideline for drilling a hole.
6. Position the Job
Next, we'll position our material, and select an appropriate Start From mode in LightBurn.
-
Jog the laser head to around the middle of your machine using the arrows in the Move window.
-
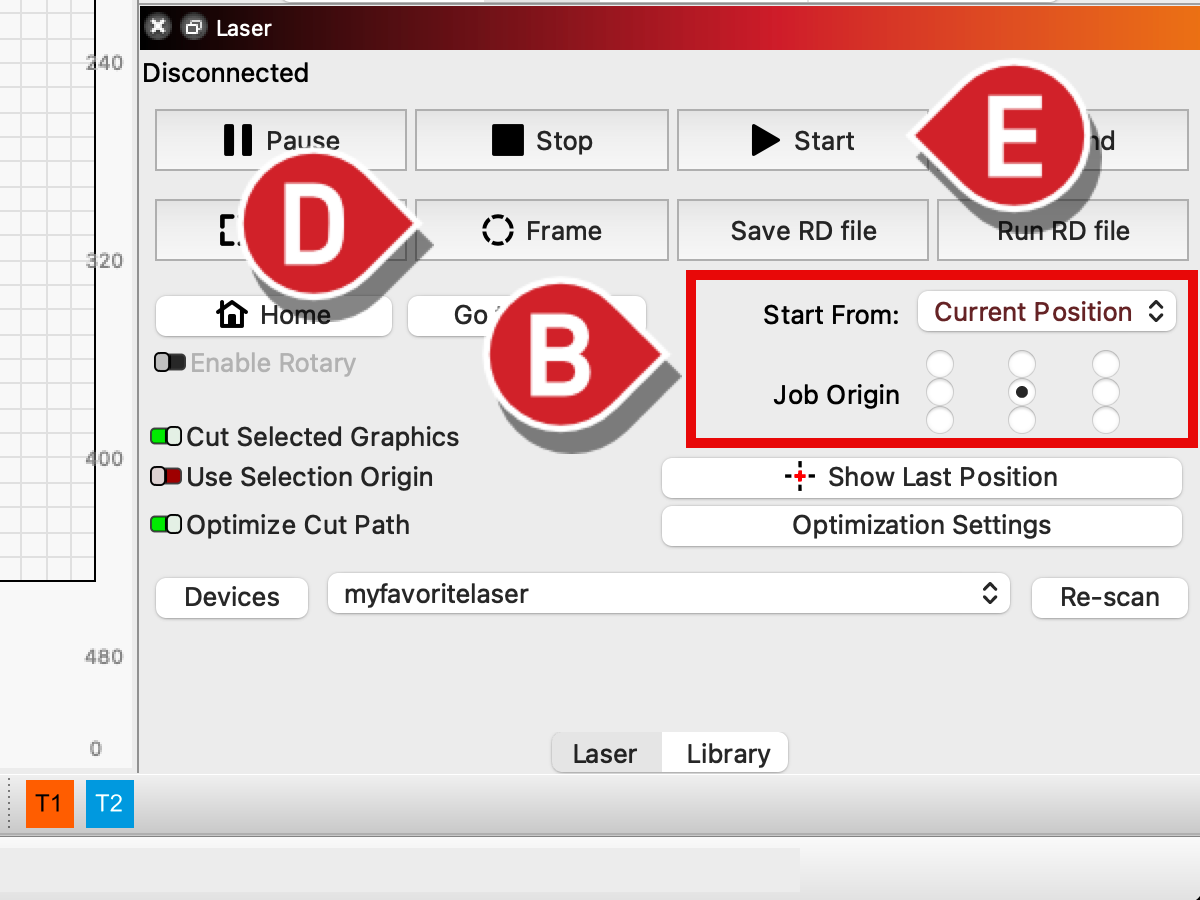
In the Laser window, set the Start From mode to Current Position and the Job Origin to the center position.
-
Place your material centered under your laser's nozzle.
-
Run the Rubber Band Framing routine to make sure your job is properly aligned and centered.
-
Start the job!
7. Drilling
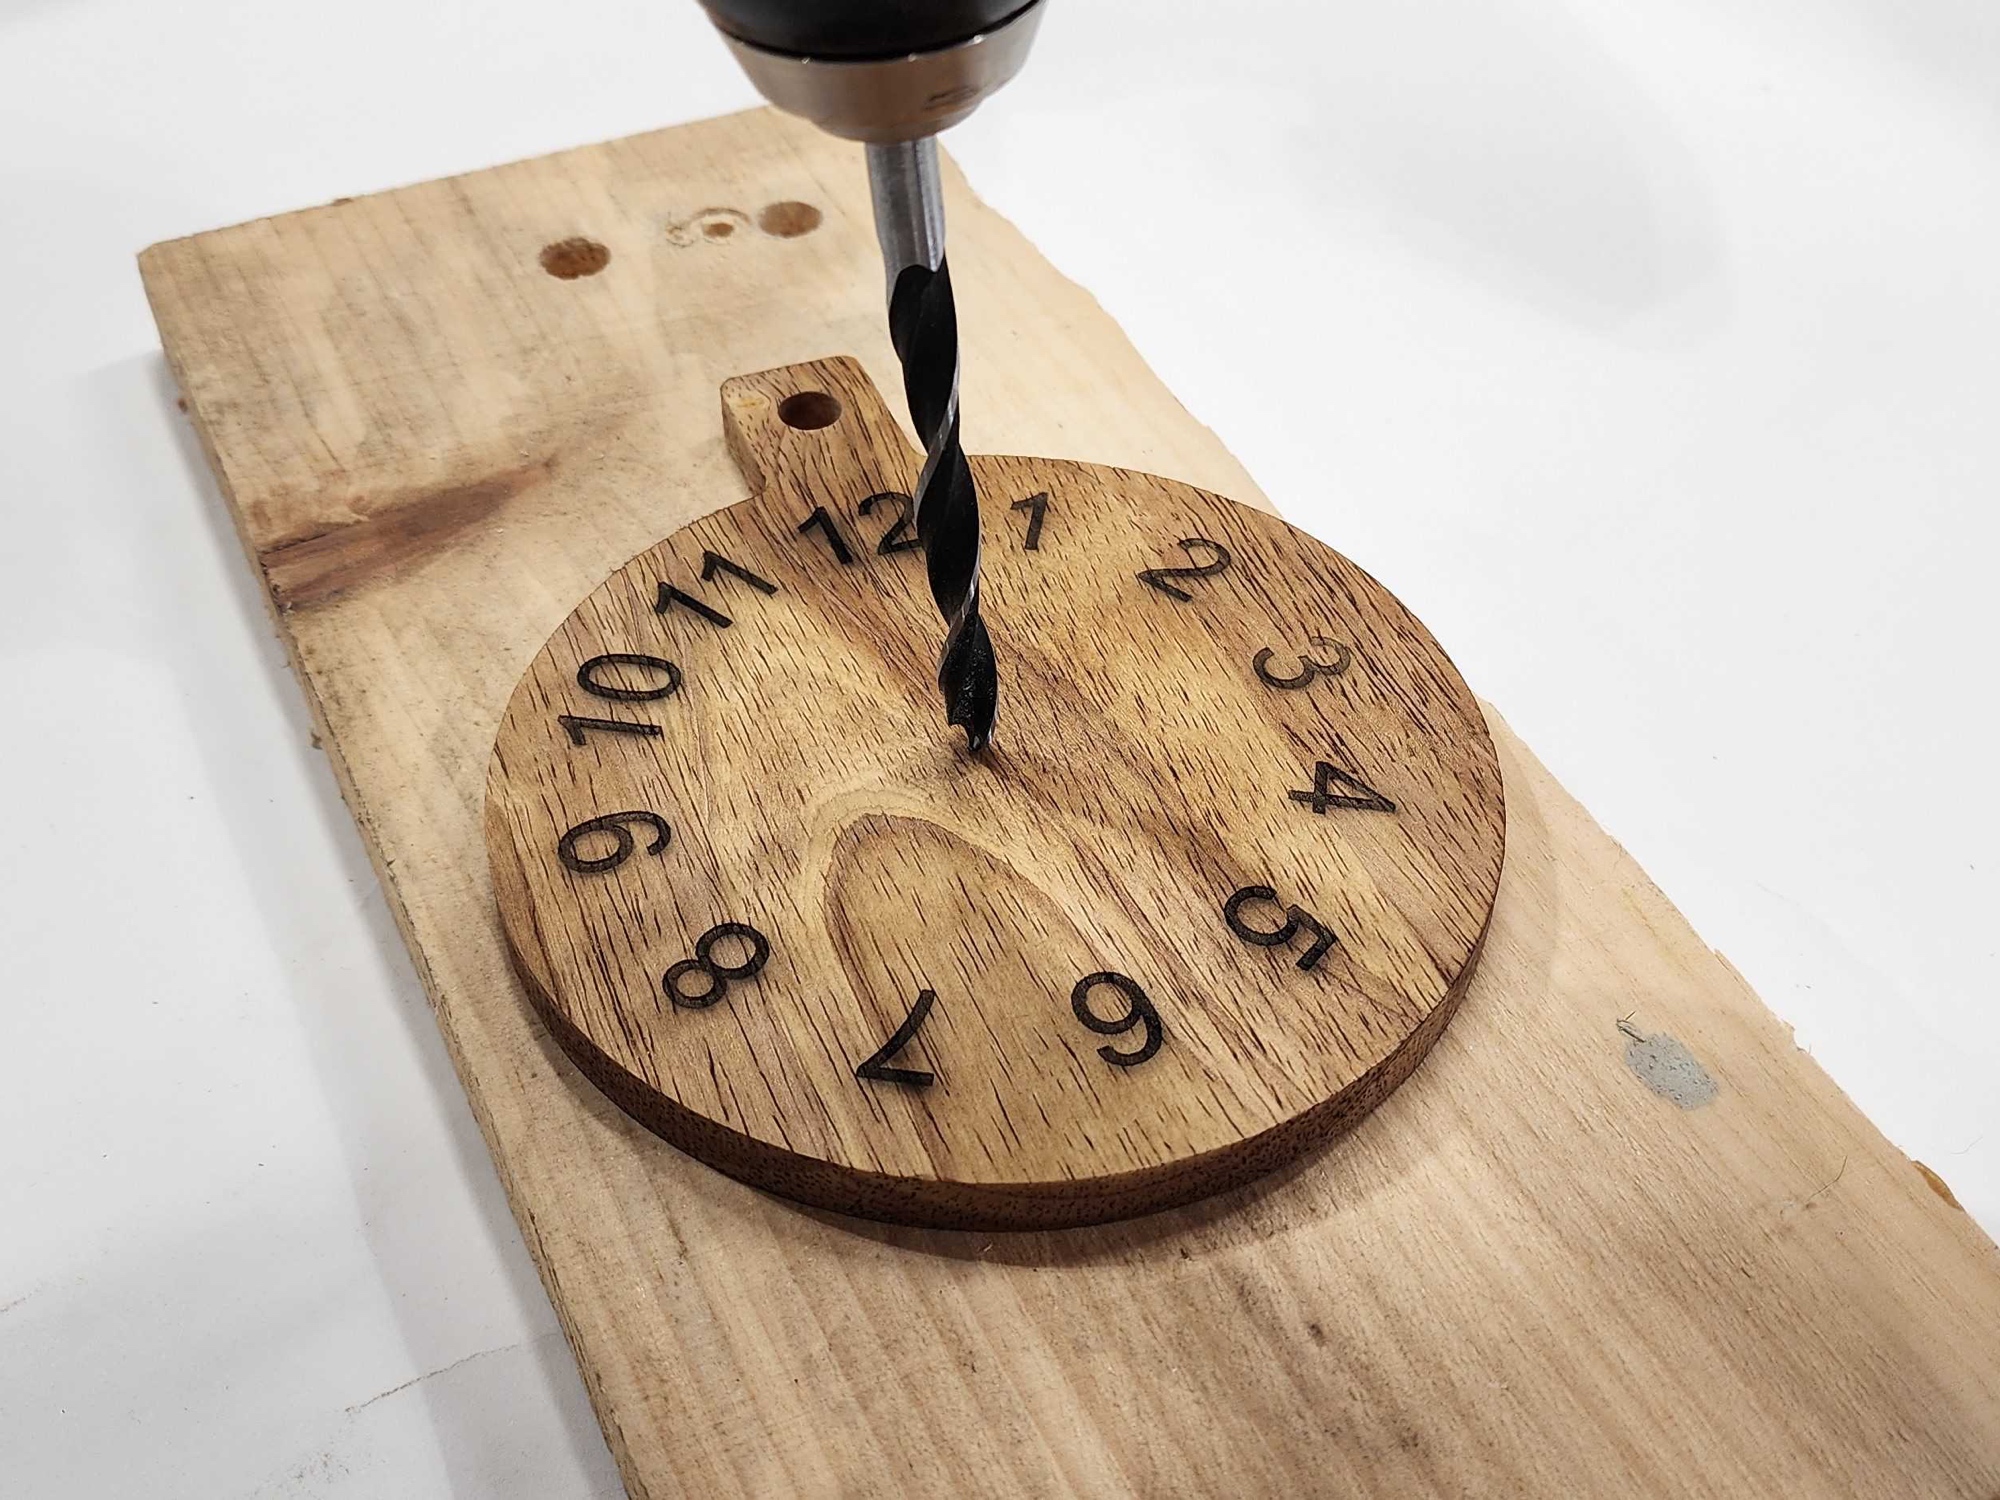
Now that we've engraved our material, we still need a hole for the clock module to come through.
-
Grab a hand drill and a drill bit that is the same size as the post of your clock module. A brad-point drill bit is best for this as it is easy to align and will not walk as you attempt to drill your piece.
-
Put your piece on top of a spare piece of wood so you don't drill into your table when you come through your piece.
-
Now line everything up, making sure to hold your drill perfectly vertical, and drill your hole.
8. Mount the Clock Module
To finish the project, we just need to mount the clock module.
-
Place the clock module's post through the hole and attach any nuts that came with it to keep it mounted on your clock face.
-
Now, following the instructions that came with your clock module, add the hands, and your clock is complete.
-
Add a battery, set the time, and enjoy your new clock for years to come!
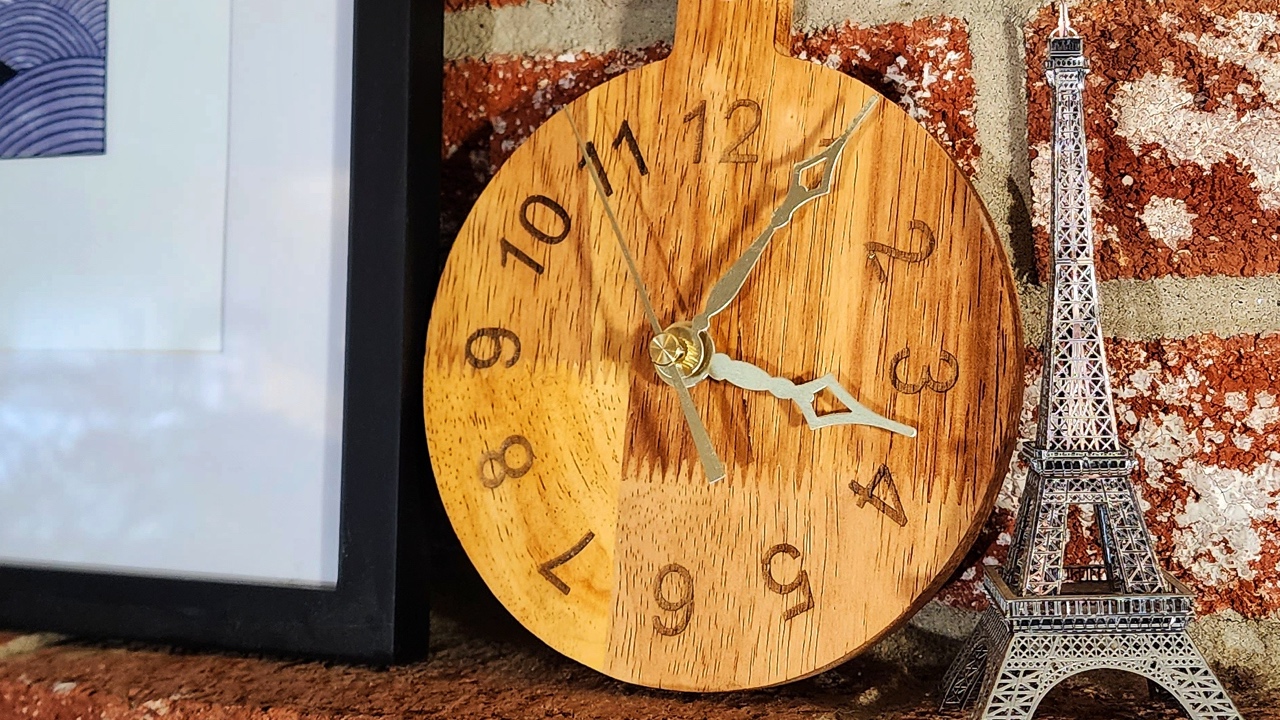
After you've made your first clock, consider the ways you can modify the process and make another. You could embellish the face by etching an Image or pattern onto it, or cut out custom-designed hands for your clock module. The possibilities are endless — so long as you've got the time!