Laser Window
The Laser Window lets you select the laser you're using, see it's connection status, send jobs to the laser, and control a few different things about how jobs are run on the laser, including how the job is positioned, and the order things are cut.
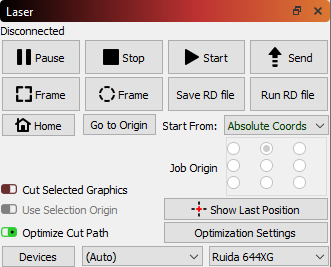
The type of laser you have active will affect how this window looks, and Beginner Mode will change it too, so don't panic if yours looks different than what is shown here.
Start / Stop / Pause
The Start, Stop, and Pause buttons will likely get a lot of use:
- Start: run the current file on the laser
- Pause: pause a running job, allowing it to be resumed when you click the pause button again
- Stop: immediately abort the running job
The Send button, if your laser supports it, will let you send the current job to the laser as a named file, so you can run from the laser itself.
Framing
The two Frame buttons are used to preview the position of the job on the laser.
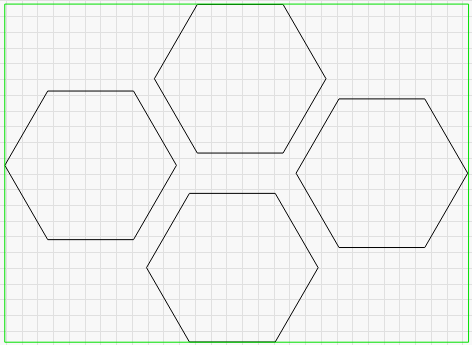
 The first is a standard rectangular frame, also called a 'Bounding Box'. This is the smallest rectangle that will fully contain the shapes you're sending to the laser.
If my current file was these four hexagons, the green rectangle around them is the path the rectangular frame would follow:
 The O-Frame button, called the 'Rubber Band Frame', traces a path around your design that is the shape of a rubber band stretched around it. For the hexagons file, it would look like this:
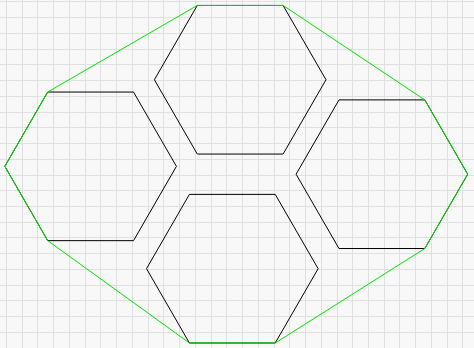
This is useful for lining up jobs with irregular shapes where a simple box outline doesn't fit well. For example, a long, thin diagonal shape, or a triangle.
Save / Run machine files
The next two buttons will change depending on the type of laser you're using, but they always do the same things. The first will save the current design as a 'Machine Ready' file, in the file format used by your laser. The second will load and run a previously saved file. If you have a Ruida, these will save and run RD files. If you have a GCode based laser, these buttons will save and run GCode files.
Home
The Home button will tell your laser to execute a homing cycle, where it moves toward the home position looking for the switches that activate when it hits the boundary. Homing is how your laser figures out where it is.
Go to Origin
The Go to Origin button tells the laser to jog to the position currently set as the user origin. Most DSP controllers have an 'Origin' button on the panel that you press to set the current position as the user origin. If you want to send the laser to that spot, press the 'Go to Origin' button.
Start From / Job Origin
These two controls affect where the job is placed on the bed of your laser. Please read the Coordinates and Job Origin page for details on the different modes, and how they affect the placement of your job.
Cut Selected Graphics
This toggle switch tells LightBurn to only send the portion of your design that is currently selected. If you run a file on your machine and part of the design doesn't cut all the way through, select that piece, enable this switch, and click Start to re-send just the selected part of the job. The placement of the part will not change.
Use Selection Origin
When used in combination with Cut Selected Graphics, the Use Selection Origin button tells LightBurn that you want the origin of the job to be calculated from only the parts that are selected, not the whole design. This is useful if you have many different shapes in a file, like a large selection of frames, but only want to send the one you've chosen, and want the origin calculated from just that selected item.
Show Last Position
When enabled, the Show Last Position button places a cross-hair cursor in the edit window at the location of the laser head. If you jog the laser within LightBurn using any of the positioning tools, the position will be updated. The position does not update live - for example, it will not update while a job is running, because that would encourage you to watch the screen instead of your laser. A laser should never be left unattended while running.
Optimize Cut Path
This toggle will enable / disable the path optimizer that plans the cutting path the laser will take. With it disabled, the order will simply be the order that the shapes in your file were drawn in.
Optimization Settings
This button opens the Optimization Settings window, allowing you to change the various options that control the cut planner.
Devices
Opens the Devices window, allowing you to add, remove, or edit device profiles for the lasers you want to use with LightBurn. Right-clicking the Devices button closes and re-opens the connection to the currently selected device.