Arrangement Toolbar


The Arrangement Toolbar comes in two flavors–long, shown at the top, and shorter, shown just below it. Both offer the same functions, but the shorter version of it is available for those with smaller displays, to save space.
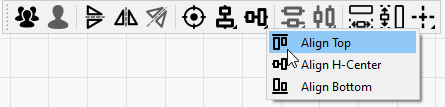
If you are using the shorter version of the Arrangement toolbar, buttons with a small triangular mark in the lower-right corner of the button will open a sub-menu with more choices, like this:
The Arrangement toolbar mostly functions to control the placement and alignment of shapes in your design.
 Group and
  Ungroup
The Group button and the related Ungroup button (below) are used to place shapes into a container (a group) so they can be treated as a single entity when moving, resizing, assigning layer color, and so on. The relative position and size of the grouped objects is maintained. You can also make groups of grouped objects, creating a hierarchy of grouped shapes.
Use the hotkeys Ctrl+G or Cmd+G to group, and Ctrl+U or Cmd+U to Ungroup.
Grouping shapes is often used to tell LightBurn to treat the group as a single entity for an operation, like aligning shapes, using the Boolean tools, and even for cutting, if the proper optimization options are chosen, but the most common reason is simply to make it easier to move and size a collection of related shapes, like different parts of an imported file or image trace.
Note: grouped shapes are not "connected"–if you draw four distinct lines, and make their ends touch so it looks like a square and then group them, they are still four distinct lines, not a continuous connected path. To join the shapes together, you would use the Auto Join tool.
The Ungroup button does the opposite of what the Group button does–it takes a set of grouped objects, removes them from the group, and discards the container. The individual shapes that made up the group are now distinct shapes again.
 Vertical Mirror and
  Horizontal Mirror
The mirror buttons take the current selection and flip it horizontally or vertically. You can use the hotkeys Ctrl+Shift+H or Cmd+Shift+H to mirror horizontally and Ctrl+Shift+V or Cmd+Shift+V to mirror vertically. If the Edit window has the keyboard focus, you can also press H or V to mirror horizontally or vertically.
 Mirror Across a Line
This tool behaves slightly differently to the other two mirror tools in that it creates a copy of the selected object or objects, and mirrors it (or them) across a line. The line must have only two points, and be the last item selected. The default hotkey for Mirror Across Line is Ctrl+Shift+M or Cmd+Shift+M.
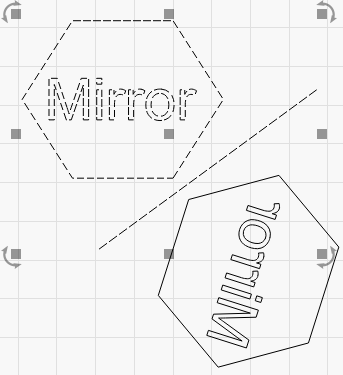
This tool can be used if you want to create a symmetrical shape, like a bottle or heart. You draw half the original shape, then mirror it to create the other half, like this:

 Align Centers
Select two or more shapes, then click the Align Centers tool to move all shapes in the selection to be centered over the last selected item.
 Align Vertically along left, center, or right
These buttons will move all shapes in the current selection to align the left, right, or vertical centers of the selected shapes to the last item in the selection.
 Align Horizontally along top, center, or bottom
These buttons will move all shapes in the current selection to align the top, bottom, or horizontal centers of the selected shapes to the last item in the selection.
 Distribute Vertically
These two buttons will vertically move the items in the current selection to space them evenly, either setting the same distance between the centers of each object, or setting the same distance between edges of the objects.
 Distribute Horizontally
These two buttons will horizontally move the items in the current selection to space them evenly, either setting the same distance between the centers of each object, or setting the same distance between edges of the objects.
 Make Same Width / Make Same Height
These buttons will set all objects in the selection to the same width or height as the last selected item. Objects will resize from their centers. Holding Shift while clicking one of these buttons will preserve the aspect ratio of the selected items while resizing.
 Move Selection to Corner or Page Center
These buttons move the current selection to the indicated corner of the workspace, or the center of it. You can quickly move the selection to the page center by hitting P after selecting. These functions can also be found in the Arrange menu, under 'Move Selected Objects'.
Holding the Ctrl or Cmd key while pressing one of these buttons will move the laser to the indicated corner of the selection, instead of moving the selected objects. These functions can also be found in the Arrange menu, under 'Move Laser to Selection'.
 Move Selection to Laser Position

This button will move the current selection to the current position of the laser head. The selection is placed relative to the laser head based on the setting of the 9-dot corner control on the Numeric Toolbar.
 Move Selection to ...
This button will open a dropdown with a variety of options for moving either the artwork or the laser. The first section moves the artwork relative to the workspace or the laser. The second section of the dropdown moves the laser relative to the selected artwork.
This button only appears in the short version of the toolbar in LightBurn 1.6 or older.
