Creation Tools

The shape creation tools are the basic ways you build stuff from scratch in LightBurn, along with the Selection tool, and the 'Click to Position' tool.
The tools are:
- Creation Tools
- Selection tool
- Draw Lines tool
- Rectangle tool
- Ellipse tool
- Polygon tool
- Trim Shapes tool
- Click to Move tool
Selection tool  
You'll likely use this more than any other tool in LightBurn. The selection arrow is used to choose which things in your workspace you want to change, and there are a number of different ways that selection happens in LightBurn.
Click Selection
Point at the outline of a shape and click with the left mouse button to select it. The shape will change from solid to an animated pattern of dashes. There are several things you can tell from this pattern:
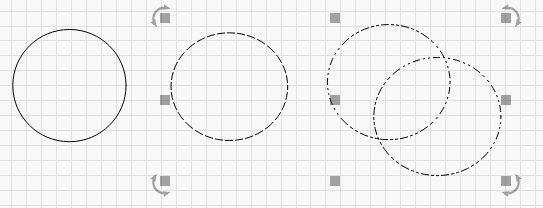
The circle on the left is not selected. The circle in the middle is selected, and it is a simple shape, because the pattern is just simple dashes. The two circles on the right are grouped - visible because the pattern is a combination of dots and dashes.
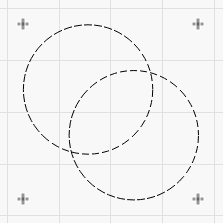
The selection shown above is also comprised of unlocked shapes, as denoted by the fact that the move, resize, and rotate controls are shown. Locked shapes, however, do not show any of these selection controls, as shown below.
The direction that the pattern animates shows the direction that the shape will be cut in (unless you tell LightBurn that it's ok to choose a different direction).
To clear the current selection, left-click an empty space in the view, or press the Esc key.
Drag Selection
If you click an empty space in the edit window and drag the cursor, a selection rectangle appears. Drag the rectangle out over a number of shapes and let go to select them. There are two types of drag selection:
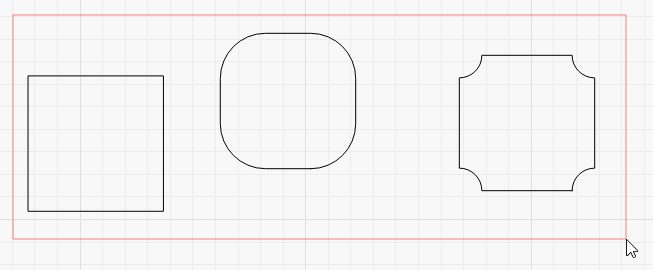
Enclosing Selection
If you drag from left to right, you'll see a red rectangle. Selecting a shape with an enclosing selection means the shape must be completely contained by the rectangle in order to select it.
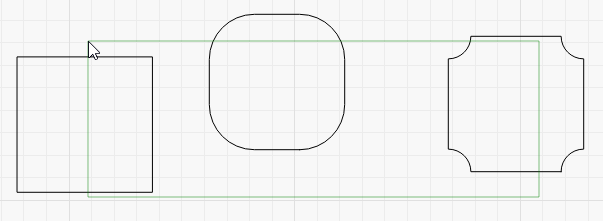
Crossing Selection
If you drag from right to left, you'll see a green rectangle. Selecting a shape with a crossing selection means that if the rectangle crosses the shape at all, the shape will be selected:
Selection Modifiers
To supplement click-select and rectangle selection, LightBurn supports these modifier keys:
- Shift: Holding Shift while selecting will add the new selection to the current one
- Ctrl + Shift or Cmd+Shift: Holding both Ctrl and Shift will remove the new selection from the current one
- Ctrl or Cmd: Holding Ctrl by itself will toggle the selection state of the new selection
Note that on macOS, the Command key is used instead of the Ctrl key.
Moving, Resizing, Shearing, and Rotating
When one or more shapes are selected, several controls appear around them, like this:
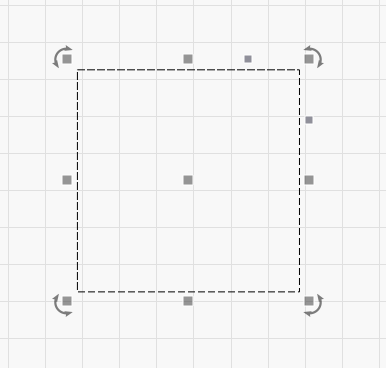
The small squares around the outside of the selection can be clicked and dragged to resize the selection from that side or corner. If you move the mouse over one, the cursor will change to show that the action is available.
When dragging one of the four corners, the shape will maintain its relative width to height (aspect ratio) so it doesn't 'stretch'. You can override that by holding the Shift key while dragging a corner.
When dragging any of the sizing adjustments, the behavior is asymmetric - the other side of the object acts like an anchor and stays in place. Holding the Ctrl or Cmd key makes the action symmetrical, using the center of the object as the anchor instead of the other side.
When dragging the non-symmetrical adjustments, you can "shear" the entire design in the X or Y axis. This allows for "corner-pinching" of your design, and maintains the same center as you had before.
The center square that appears is a movement handle - you can click and drag it to reposition the shape, however you can also click anywhere on the boundary of the shape to do this, and you don't even have to select it first - Simply click the boundary, and while continuing to hold the left button, drag the shape.
The circular arrows shown at the four corners are used to rotate the shape. By default the rotation is "free", however holding the Ctrl key will snap it to 5 degree increments.
When dragging, scaling, or rotating shapes, the bottom status bar in the main window will often show feedback, like this:
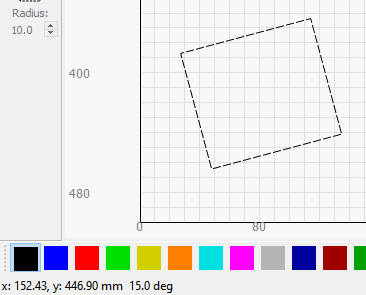
Here I can see the position of my mouse, and the angle I have rotated the shape to while I'm rotating it.
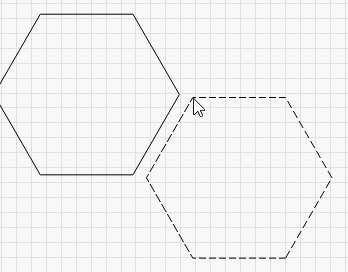
Snapping
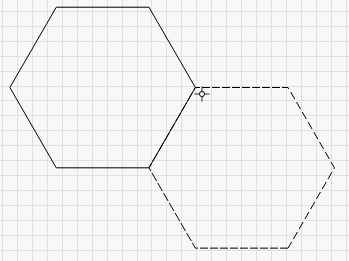
When you move the mouse over a shape to select it, you will occasionally see the cursor change to a small crosshair. This shows that you are over a snap point, like a corner, node, the center of a line, or the center of a shape. If you click at this moment, the point you drag the object from will be that snap point. When dragging an object to move it, as you get near other objects, those objects may also snap the cursor location, allowing you to position shapes perfectly with each other. If you are close to a grid point, the selection will snap to the grid as well.
If you do not want shapes to snap when dragging, hold the Ctrl key to temporarily turn off the snapping behavior.
Draw Lines tool  
Hotkey = Ctrl+L or Cmd+L
Click the pencil to use the Line tool. Click anywhere on the page to start a line, then click in a different location to place the endpoint of the line. The Line tool will continue adding segments until you either click back at the starting point to close it, click the right mouse button to stop, or press the Esc key.
To create curved lines, click and drag when placing a point. You can combine curved and straight segments when using the Line tool.
New In LightBurn 1.7: To toggle between making corner points and smooth points, press the S key while using the Line tool. The cursor will change between showing a corner and a smooth curve next to the crosshairs. See the third shape in the animation above for an example.
Measuring
A little known feature of the Line tool is that it is also intended to be used for measuring distances. The status display at the bottom of the main window shows the length of the line being drawn, even before you've completed it.
If you want to measure the distance between two points in your design, start a line at one point, then move the mouse to the other point, but don't click yet. Look at the status window to see the length of the line in progress. When you have noted your measurement, right-click or press Esc to cancel the line.
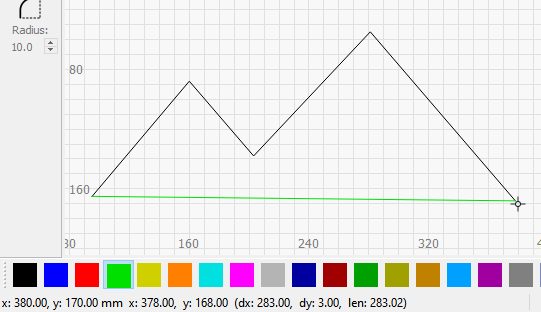
The status window shows:
- dx: the distance along the X axis only
- dy: the distance along the Y axis only
- len: the length of the current line segment
- It will also show the angle between successive line segments as you create them
Rectangle tool  
Hotkey = (Ctrl / Cmd) R
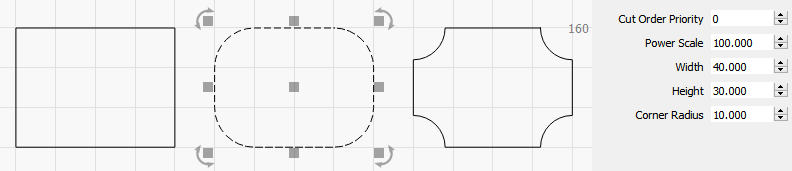
The rectangle tool is used to draw squares and rectangles. Holding Shift while dragging will lock the width and height, producing a perfect square. Holding Ctrl will drag the rectangle or square from the center, instead of the corner.
With a rectangle selected, if you look in the Shape Properties Window you can adjust the 'Corner Radius' property to produce rounded rectangles, or frames with inward corners:
Ellipse tool  
Hotkey = Ctrl+E or Cmd+E
The ellipse tool is used to draw ellipses and circles. Similar to the Rectangle tool, holding ++shif++ while dragging will lock the width and height, producing a perfect circle. Holding Ctrl will drag the ellipse or circle from the center, instead of the corner.
Polygon tool  
The polygon tool is used to draw regular polygons, like hexagons. Holding Shift while dragging will lock the width and height. Holding Ctrl will drag the polygon from the center, instead of the corner.
There are two methods to change the number of sides. Start by selecting the polygon and then do one of the following:
- Open the Shape Properties Window and adjust the Sides property.
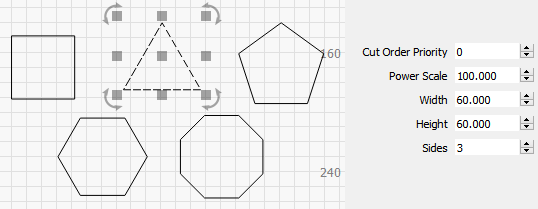
- In LightBurn 1.5 or higher, drag the purple handle to change the number of sides as shown below:
 . Starting in LightBurn 1.6, press and hold the Ctrl key to show the purple handle.
Trim Shapes tool  
Introduced in LightBurn 1.7, Trim Shapes is used to cut line segments back to the next place they intersect with another line. If a shape does not intersect with any other lines, it is deleted entirely.
To enable Trim Shapes, click on the scissor icon or use Ctrl/Cmd+K
See more at Trim Shapes.
Click to Move tool  
Hotkey = Alt+L
The Click-to-Move tool is a quick way to jog your laser to a location somewhere in the workspace. Select this tool, then click anywhere on the page and LightBurn will issue a command to send your laser there. This tool automatically turns itself off after about 10 seconds, in case you accidentally leave it on. Trying to select a shape and having the laser move away from where you want it can be confusing.