Machine Settings
Many of the controllers supported by LightBurn have user configurable device parameters and, in many cases, you can edit those parameters directly from the Machine Settings dialog in LightBurn. Notable exceptions are Smoothieware and Marlin, which do not currently allow use of the Machine Settings dialog.
While connected to your machine you can go to Edit > Machine Settings and will be presented with the following dialog (sometimes after a brief delay while the parameters are read from the controller):
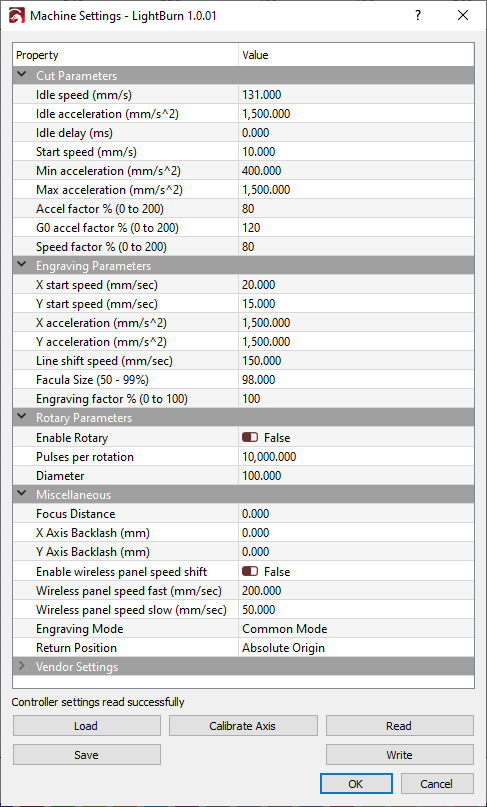
The content of this dialog will be different for every controller type so we won't go through every option and value here. The parameter names are intended to be relatively self-explainatory but if you do not understand what something does, definitely do not just go about changing it. Look in the documentation for your controller or search on the LightBurn Forums for more info.
We would like to specifically call out the Vendor Settings section that will appear for Ruida controllers. These settings are typically set at the factory where your laser was manufacturered or configured and it's best not to touch any of these unless you really know what you are doing.
Beyond the parameters that you can change there are five operations that can be taken with the buttons at the bottom of the dialog:
Write
Write all currently modified parameters back to the controller. This must be clicked before you close the dialog as the parameters are not sent to the controller as you change them, only after clicking the Write button.
Read
This will reload the settings from the controller. Note that any changes you made will be lost if you have not written them to the controller first.
Save
Save the controller parameters to a .lbset file. This allows you to backup your controller parameters so they can be reloaded later in case of accidental change or loaded on another machine which you would like to be configured in the same way.
Load
Load a .lbset file and overwrite the current controller parameters with its contents. Warning: this will overwrite all parameters! Be sure to back up what you had first with the Save option and only load parameters from a known and trusted source!
In some cases your laser manufacturer will actually provide this file for you, as a backup.
Calibrate Axis
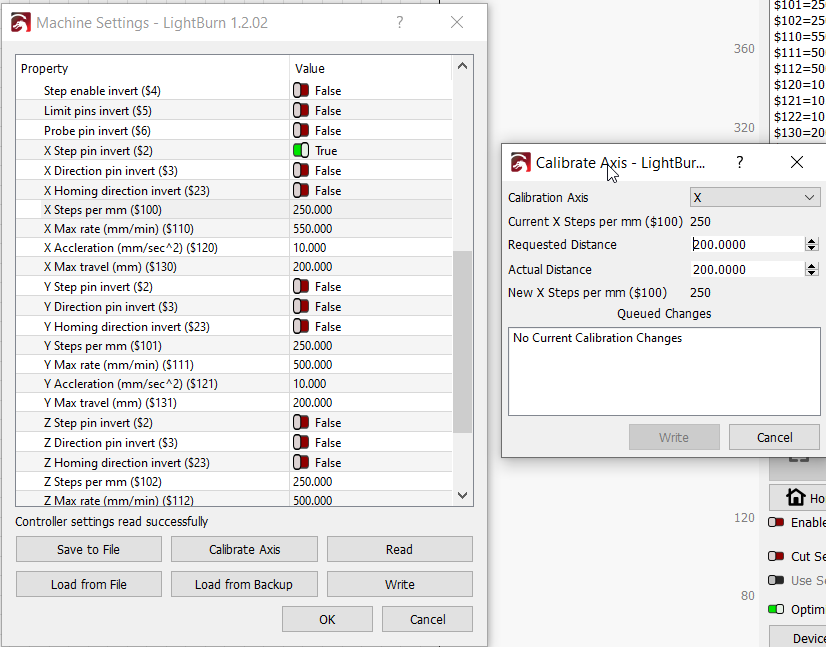
The Calibrate Axis tool is provided as a shortcut to getting your machine axis movement distances dialed in and setting the steps/mm parameter on your controller. Please note that this is no replacement for knowing the true steps/mm value for your specific machine. You can read more on our steps/mm page.
To use this tool, you will need to follow these steps:
- Choose an axis to calibrate with the
Calibration Axisoption. This will display the currentsteps/mmsetting directly below. - Choose a distance you want to move that axis as a test. 200 mm, for example. Then enter that in the
Requested Distancefield. - Instruct your laser to move that distance. If you cannot do that from a built in control screen, you may have to back out of
Calibrate Axisand use the jogging functions on the Move Window to move the selected distance. - Measure the actual distance moved in whatever way is easiest for your particular machine, with the most accurate measurement tool you have. Calipers or a ruller with fine degredations would be best.
- Back in the
Calibrate Axisdialog, enter the measured value into theActual Distancefield. This will show you the newly calculatedsteps/mmvalue below. - Finally, click on the
Writebutton to persist this value to the controller.
Note: It may require multiple iterations of these steps to dial everything in to an acceptable level of accuracy, especially with less accurate measuring tools. Though, the larger the Requested Distance value, the easier it is to measure the difference. Simply repeat the same steps, using the same requested distance each time. The new steps/mm value should continue to become more accurate the more times you repeat this process.