Zooming, Panning, and Selection
While working on a design in the Edit Window, you can focus on different parts of your design with the Zoom and Pan functions. You can also use the Selection tool to select portions of your design to modify. The video below covers useful selection tips to help you work with your designs more effectively.
Zooming
Scrolling the mouse wheel will zoom in or out from the location of the mouse, allowing you to quickly zoom in on whatever your mouse is pointing at. Zooming can also be done on most touchpads with a two-finger swipe up or down.
The + and - keys on the keyboard also zoom in and out.
Panning
To pan the view, sliding the window around, press and hold the middle mouse button and move the mouse. If you don't have a middle mouse button, you can hold the Space bar on your keyboard down instead - you'll see the mouse cursor change to a hand  , and then you can grab and drag the view with the left mouse button.
Toolbar
These tools can also be accessed from the Main Toolbar.

The first button, the four arrows, is the Pan control. Click that to enter Pan mode, to drag the view. You'll see the mouse cursor change to a hand, like this: When the hand cursor is visible, you can drag the view around by pressing the left mouse button and moving the mouse. The Space bar acts as a shortcut for the Pan control.
The second button is Zoom to Page - clicking this will reset the view in the workspace to frame the entire work area, which is the view that LightBurn starts with.
The next two buttons are Zoom In and Zoom Out. Clicking them will zoom in or out of the center of the view.
The fourth button is Frame Selection - Clicking this will zoom the view to focus on whatever is currently selected. If nothing is selected, it will zoom to fit all of the objects in your project.
Selection
Objects in LightBurn must be selected before they can be modified. The primary way to select objects is to click on them while the Selection tool is active. Please see the video at the top of this page for more tips on selecting objects, or read below for a summary.
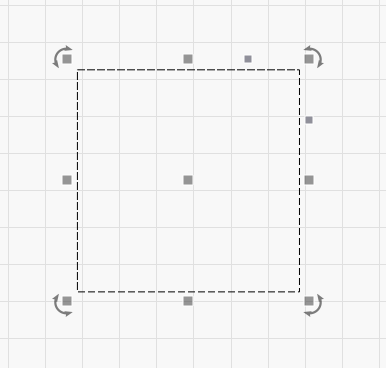
A few things happen when a shape is selected:
- The selected shape is drawn with an animated pattern instead of solid lines.
- The edit handles for resizing, positioning, skewing, or rotating the selection appear.
- The size and position of your selection is shown in the Numeric Edits toolbar.
- Other controls in LightBurn may activate, if relevant to the selection.
To clear the current selection, left click an empty space in the view or press the Esc key.
You can select a collection of shapes by pressing and holding the left mouse button and dragging a rectangle around the things to select as shown below. The rectangle disappears when you release the mouse button, selecting shapes within it.
Dragging from left to right displays a red rectangle, and every object fully contained within it will be selected. Dragging from right to left displays a green rectangle and selects every object the rectangle crosses. In LightBurn 1.7 and higher, the rectangles are filled with either green or red. Older versions of LightBurn show only the outline of the rectangle.


Experiment with these two selection methods — understanding how they work, and when to use them, makes working on larger projects much faster.
Selection Modifiers
To supplement click-select and rectangle selection, LightBurn supports these modifier keys:
- Hold Shift while selecting to add the new selection to the current one.
- Hold both Ctrl and Shift to remove the new selection from the current one.
- Hold Ctrl by itself to toggle the selection state of the new selection, deselecting selected objects, or selecting unselected objects.
- Press Tab to move selection sequentially through objects or grouped objects in your workspace.
- Press both Tab and Shift to move selection sequentially through objects or grouped objects in your workspace, in reverse order.
Additional Selection Tools
Several other selection options are available in the Edit menu:
- Select All: select all graphics in the project.
- Invert Selection: deselect all objects that are currently selected and select all objects that are not currently selected.
- Select open shapes: select all shapes in the workspace that are open, meaning they are not paths that form a closed, continuous loop. See Open vs Closed Shapes for more information on open shapes.
- Select open shapes set to Fill: select all shapes in the workspace that are open, and assigned to a layer set to Fill or Offset Fill mode. LightBurn is unable to fill open shapes — this tool is a useful option for identifying them.
- Select all shapes in current layer: select all shapes in the active layer in the Cuts / Layers window. Alternatively, hold Shift while clicking on a layer in the Cuts / Layers window to do the same.
-
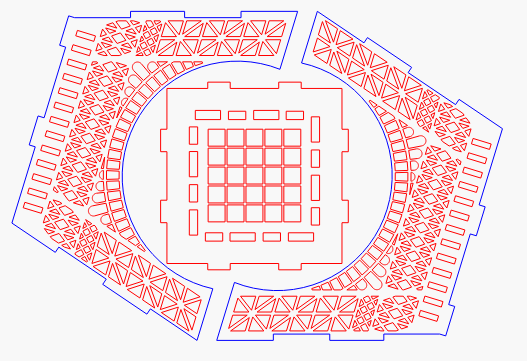
Select contained shapes: select all shapes contained by the currently selected shape. To use this tool, the selected shape must be closed — a path that forms a continuous loop. The containing object remains in the resulting selection.
For example, if you wanted to select everything inside one of the two blue outlines below, using click selection or box selection would be difficult and time consuming, but Select contained shapes does it in two clicks:
- Select shapes smaller than selected: select all shapes that are smaller than the currently selected object. The currently selected object remains in the resulting selection.
Troubleshooting
Normally, selecting an object in LightBurn will give a nice even "crawling ants" animation. If you find that you're getting odd flashing or patterns, the most likely problem is overlapping geometry. This is often the result of importing the same file twice, or other design software exporting paths improperly.
To solve this problem quickly, try deleting duplicate shapes using Edit → Delete Duplicates or Alt + D.
You can also try ungrouping (Ctrl/Cmd + U) and deleting individual shapes if you want more manual control.
Next Step: Basic Usage - The Essentials