LightBurn Cut Settings and EZCAD Hatches
If you're coming from EZCAD2 and having trouble finding hatch settings you're used to, follow this guide to match your usual hatch settings to LightBurn's Fill settings.
If you're not sure how to adjust cut and engraving settings, see the Cut Settings Editor page.
Mark Contour
EZCAD2's "Mark Contour" option can be replicated with LightBurn's Sub-Layers. By creating a Line Sub-Layer and a Fill Sub-Layer, you can achieve the same effect. The Sub-Layers will be cut in the order they appear in the Cut Settings Editor.
Hatch 1, Hatch 2, Hatch 3
EZCAD2 allows for three different hatches on the same geometry. This is equivalent to LightBurn's Sub-Layers.
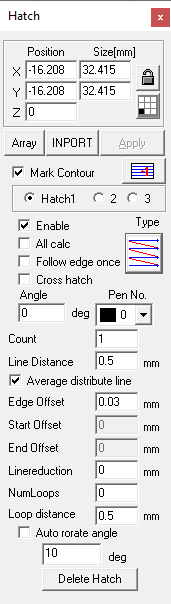
Cross-Hatch
This functionality is the same between the two programs, and is a checkbox in each.
Hatch Patterns and Settings
Unidirectional hatch & Bidirectional hatch


EZCAD2's bidirectional hatch and unidirectional hatch are the same as the default hatch in LightBurn, with the Bi-directional fill toggle either on or off.
Ring-like hatch / Pyramid Hatch

EZCAD2's ring-like hatch is equivalent to LightBurn's Offset Fill.
Snake Hatch
Snake hatch is equivalent to a regular fill in LightBurn with Flood Fill enabled.
Auto Rotate Hatch Angle
LightBurn's Angle Increment setting is equivalent to EZCAD2's "auto rotate hatch angle".
For more help using LightBurn, please visit our forum to talk with LightBurn staff and users, or email support.