Adjust Image Tool

The Adjust Image tool simplifies the process of tweaking image properties such as Contrast, Brightness, and Gamma while also changing Layer Settings, allowing you to adjust all of these properties from a single window, and see an instant preview of resulting output.
To open the Adjust Image tool, select any single image, right-click, and choose the Adjust Image option.

The original source image is displayed in the top left of the Adjust Image window. In the top right, the result of your chosen settings is displayed as a processed image.
Making any adjustment allows you to see an immediate preview of the processed output, side-by-side with the source image.
Click and drag to pan around the image, and use the mouse scroll wheel (or two-finger dragging if you're using a trackpad) to zoom in and out. The source image and processed image are kept in sync while zooming and moving around.

Layer Settings

The Layer Settings group on the left contains settings that correspond to those found in the Cut Settings Editor, as highlighted below:
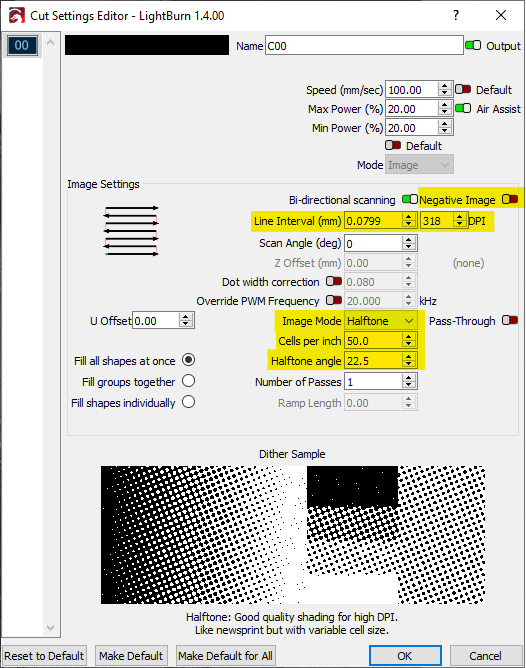
For more information on these settings, see Cut Settings — Image Mode.
After adjusting settings, click OK to confirm and automatically apply changes to the Layer Settings for the image you are adjusting, or Cancel to discard the changes and leave the settings unchanged.
Note
These settings will affect any image on the same layer as the one you have selected.
Image Settings

The Image Settings group on the right contains settings that correspond to those found in the Shape Properties window. These settings can be adjusted by dragging the sliders or directly editing the numeric value of each property.

For more information on these settings see, Shape Properties.
As with Layer Settings, click OK to confirm changes, or Cancel to discard them.
Invert Display
Turn on the Invert Display option to show the processed image with black for the background and white for lasered lines, to see a preview of the resulting output when engraving on slate, black painted tile, black anodized aluminum, or any other material where the burned area will be lighter than the surface of the unmarked material.
This option affects the preview image only — it has no effect on actual output.
Presets
LightBurn offers two image presets within the Adjust Image window, as well as the option to save your own frequently used image settings as custom presets.

The Basic preset is a good starting point for your own engravings or custom presets. The Black Paint on White is similar, but inverted for engraving light marks onto dark surfaces.
Save Image Preset
The first button next to the Presets dropdown allows you to save your current settings as an image preset. You can choose which layer and image settings are included in the preset. Excluded settings well be ignored when loading the preset later.

Delete Image Preset
The second button allows you to delete presets. Make sure the preset you want to delete is selected in the dropdown first.
Export/Import Image Preset
The third and fourth buttons allow you to export and import image presets, which is useful for backing up your presets and for moving them between computers.