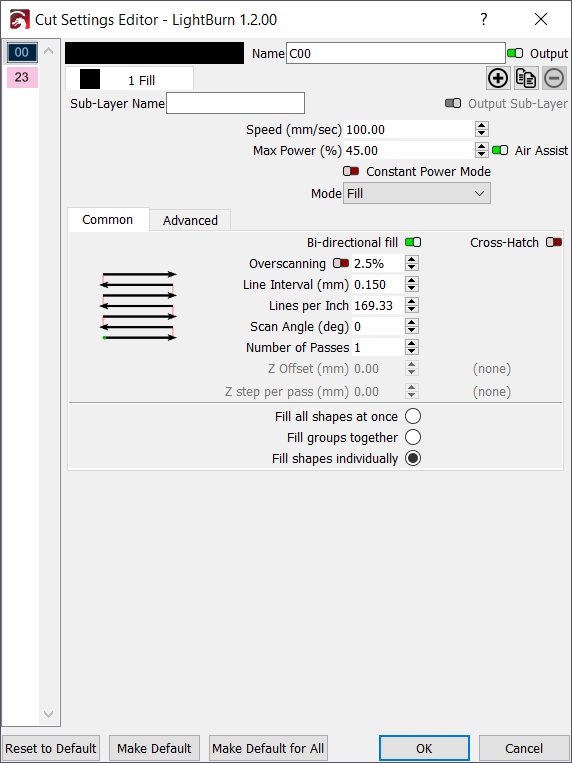
Cut Settings - Fill Mode
Fill mode permits you to instruct the laser to scan line by line and fill in the shape you want, similar to how a paper printer works. Fill mode will fill in closed shapes but not open shapes.
Note for long-term users
In older versions of LightBurn the 'Fill' mode was referred to as 'Scan'. We've updated the terminology to make it easier for new users.
Bi-directional Fill
When enabled, the laser will engrave in a side-to-side sweeping motion with the laser on and engraving in both directions. When disabled, the laser will engrave traveling one way, then return to the start of the next line without engraving the return pass. Depending on the type of laser, enabling this can save significant time on long engraving jobs.
Cross-Hatch
When enabled, runs a second engraving pass 90 degrees rotated from the first to ensure a consistent and thorough fill.
Overscanning
When enabled, adds extra moves to the beginning and end of each line to give the laser time to speed up before firing, and slow down afterward.
When Overscanning is not used or not set correctly, engraved jobs appear more burned at the edges and lighter in the middle.
This is caused by the laser slowing down to change scanning direction.
Thankfully LightBurn can compensate for this by running the tool head outside the boundaries of the engraving, but with the laser off. This maintains an even speed on the engraving itself to provide a consistent engrave. You need a little more space either side of the engraving to accommodate this overscanning.
This setting will not be available for DSP controllers or Galvo lasers. See the DSP or Galvo tabs for more information.
On GCode devices, enable Overscanning in your Fill or Image layer.
If you already have this enabled and you are still seeing issues, you might need a larger value for the Overscan setting, particularly if your acceleration is low.
If Overscanning is enabled on a GCode laser and there isn't enough room at the edge of the job to accommodate the extra travel distance, you may encounter LightBurn's Cut May Be Out Of Bounds error.
DSP controllers handle Overscanning in hardware. If a job on a DSP laser requires Overscanning and there isn't enough room at the edge of the job to accommodate it, your DSP controller may return the Not Enough Extend Space error.
Galvo lasers don't use Overscanning. Correcting for excessive burning at edges is handled by the Delay settings in Device Settings.
Line Interval
Controls the spacing between scanned rows, and indirectly controls Lines per Inch.
Lines per Inch
A different, often more intuitive way of controlling the line interval, or spacing between rows.
Scan Angle
Normally 0, meaning the laser will scan back and forth horizontally across the image, progressing from the bottom of the image to the top. If you set this to 180, the laser will scan the image from top to bottom. Setting this to 90 will scan the laser vertically over the image, progressing from left to right.
Note
If you have a DSP controller, we do not advise using angles that aren't a multiple of 90 degrees. Horizontal and Vertical scanning is supported natively by the hardware, and it will automatically handle over-scanning beyond the sides of the image to get the head to full speed before engraving starts. Scanning at non-90 degree angles is "emulated" using normal cutting moves. It works, but it's mostly useful as a style option, and not recommended for general use.
Number of Passes
Sets how many times the laser will run this filled shape.
Angle Increment
This feature allows subsequent passes of the layer or sub-layer to increment the scan angle automatically.
Z Offset
If you have Z moves enabled, and your controller supports it, the Z Offset setting can be used to move the laser head closer to the material (inward) or farther away from it (outward). Focusing deeper into the material can sometimes help to cut thicker material, and lifting the laser away from the material can produce a thicker line.
Z step per pass
When doing more than a single pass over a shape, the Z step per pass setting allows you to tell LightBurn to raise or lower the laser with each pass by some amount. This is most often used for thick cutting or deep engraving, allowing you to shift the focus point deeper with each pass to help maintain efficient cutting.
Warning for Z moves
If your system uses auto-focus, you may not be able to push the focus point lower, because most systems treat the auto-focus height as the lowest possible height (Z limit) to avoid crashing the laser head. Be careful using Z moves, as they do have the potential to physically damage your laser by crashing the head into the material.
Fill Grouping
These options control which shapes are filled at the same time on the laser. If you run your laser fast, OR your laser accelerates slowly, it is often most efficient to scan things all at once, so the laser spends most of its time moving at the speed you've chosen, and less time changing direction. If you are engraving slowly, your laser accelerates fast, or the design contains a lot of blank space, it can be more efficient to fill clusters of close shapes, or just fill the shapes one by one. If you aren't sure, try different options and use Preview to estimate the time.
- Fill all shapes at once: The default, this setting means that everything on this layer will be filled at the same time, sweeping back and forth across the whole job. If you are running the laser fast (300 mm/sec or more) this is usually the most efficient option, with some exceptions.
- Fill groups together: This setting will fill all shapes in a group at the same time.
- Fill shapes individually: This setting fills all shapes one by one.
Advanced settings
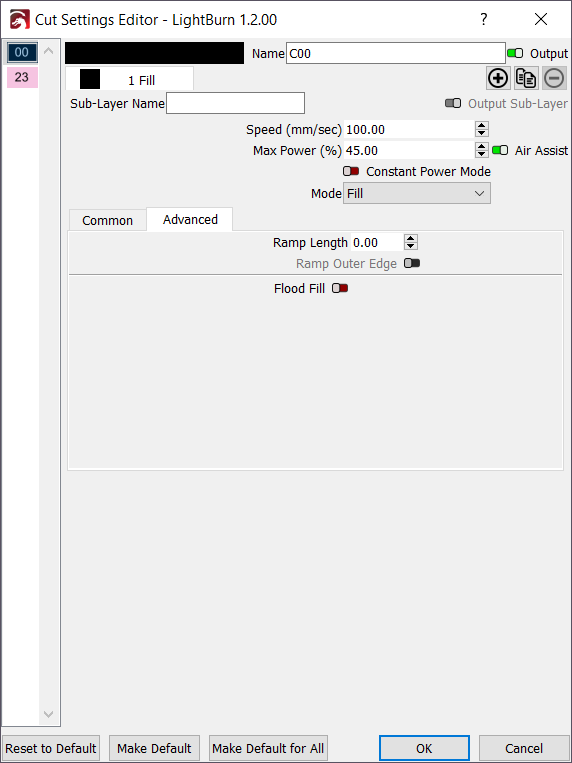
Under the Advanced tab you'll find a few useful, but less frequently used options.
Ramp Length
This setting can be used to slope the sides of an engraving by varying the laser power, and is useful if you create rubber stamps, particularly if the designs have thin regions that need extra support. The ramp length controls how far from the design the slope will extend.
Note: On a DSP controller, the ramp varies the laser power from Min Power to Max Power, so you must set these differently to get a ramped side. Typically you would set Min Power to be just above the firing threshold of your laser.
Flood Fill
Flood fill tries to eliminate travel moves across blank space, so it's perfect for engraving something like a large, empty rectangle, where the blank area in the middle would consume most of the time spent.
Warning
This option is incredibly useful when you need it, but is very sensitive to machine tuning and backlash, and can end up leaving gaps in your engraving if the design is complex and/or your machine is not set up optimally.
If used on complex designs, Flood Fill can produce engraving paths that jump around a lot, and return later to fill in missed spots, which is why it can leave gaps if the machine isn't well tuned. Use it sparingly, and use the Preview tool to see how the option will engrave your design so you aren't surprised by the path it takes.
Fill + Line Behavior
In older versions of LightBurn, Fill+Line mode allowed primitive Sublayer use to draw an outline around an engraved shape. This has since been superseded. The legacy behavior can be approximated with Sub-Layers, one for Fill and a second one for Line with the same base motion settings.
Danger
LightBurn will automatically convert pre-1.2 project files with Fill+Line settings to Sub-Layers in 1.2, including Fill+Line behavior. This produces two layers, one with your legacy "Fill" settings, and a subsequent layer with "Line" settings, to be run afterwards. Going backwards from current project files to pre-1.2 LightBurn is likely to result in breakages involving Sub-Layers due to how complex the changes are.


