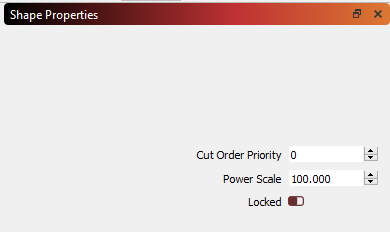
Shape Properties Window
The Shape Properties Window displays editable properties of selected objects.
Accessing the Shape Properties Window
The Shape Properties Window is not enabled by default. Select Window → Shape Properties to enable the window.
The Shape Properties Window will appear docked behind the Cuts / Layers Window on the upper right side of your screen. Click the Shape Properties tab to bring the Shape Properties Window to the front.
Tip
The layout of LightBurn is highly customizable. For more information on enabling and disabling windows and toolbars, or rearranging the default layout, see Customizing the LightBurn Window.
Shape Properties Options
The options available in the Shape Properties Window depend on the type of object you have selected.
Three options are available for all types of objects, or when you have multiple types of objects selected at once.
- Cut Order Priority: sets the order this shape is cut by the laser. Lower values are cut first, starting with 0 as the highest priority. You must also select Order by Priority in the Optimization Settings for this setting to take effect.
-
Power Scale: rescales the power used to cut this shape by this percentage, between Min Power and Max Power. For devices that do not support the Min Power setting, power is scaled as a percentage between 0 and Max Power.
Video: Fine Tune Laser Output With Power Scaling
-
Locked: prevents any edits to the selected shape(s). See Lock Shapes for more information.
When multiple shapes are selected, changing these values acts on all selected shapes at once.
See below for additional properties that are presented only when you've selected specific types of objects.
Image
These settings are presented for image graphics.
Gamma: adjusts mid-tones shades — Lower values lighten the mid-tones, and higher values darken them. 1.0 is normal.
Contrast: increases or decreases image contrast — higher values make light tones lighter and dark tones darker.
Brightness: increases or decreases image brightness, making both light tones and dark tones lighter or darker.
Enhance: increases the contrast of edges within the image - also known as Unsharp Masking and High-Pass Sharpening.
Enhance Radius: controls the spread of edge contrast — a larger radius spreads the Enhance effect further from the edges within an image.
Enhance Amount: controls the intensity of the edge contrast.
Enhance Denoise: reduces noise in smooth areas.
Ellipses
These settings are presented for shapes made using the Create Ellipse tool.
Width: the length of the ellipse in the horizontal (X Axis) dimension.
Height: the length of the ellipse in the vertical (Y Axis) dimension.
Polygons
These settings are presented for shapes made using the Create Polygon tool.
Width: the length of the polygon in the horizontal (X Axis) dimension.
Height: the length of the polygon in the vertical (Y Axis) dimension.
Sides: sets the number of sides of the shape — 3 = triangle, 6 = hexagon, 8 = octagon, etc.
Rectangles
These settings are presented for shapes made using the Create Rectangle tool.
Width: the length of the rectangle in the horizontal (X Axis) dimension.
Height: the length of the rectangle in the vertical (Y Axis) dimension.
Corner Radius: applies a radius to corners. Positive values create curved corners, negative values takes a bite out of the corner.
Text
These settings are presented for text made using the Create Text tool.
Max Width: text begins scaling if the length in the horizontal (X Axis) dimension exceeds this — use 0 for no limit.
Squeeze: when enabled, as the text exceeds the Max Width, the horizontal axis is scaled, but the vertical height remains the same, resulting in a squished appearance. When disabled, text will shrink proportionally, both horizontally and vertically.
Ignore Empty Vars: instructs LightBurn to remove newlines preceding empty Variable Text fields when aligning text.
Related Topics
For more help using LightBurn, please visit our forum to talk with LightBurn staff and users, or email support.


