Tabs / Bridges
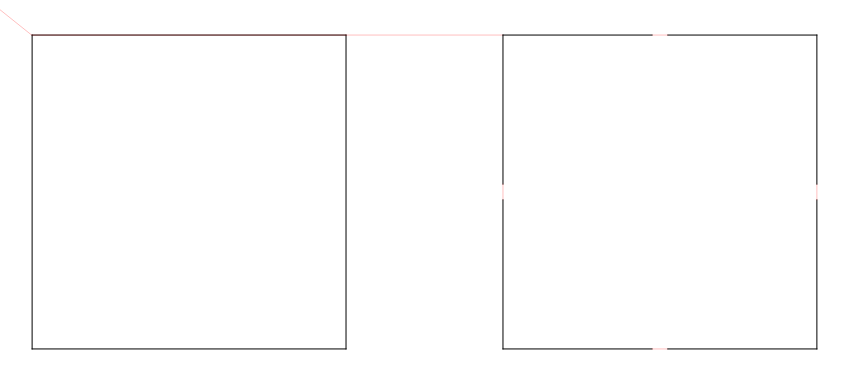
Sometimes it is helpful to include tabs (sometimes called bridges) in objects that you are cutting out so that they do not fall out immediately but can be removed later. The concept comes from the CNC world but is much simpler in the context of a Laser. Simply put, it's where you skip a very small section of a cut, often less than 1 mm in length. In the example below, the left square has no tabs applied, while the right has a single 1 mm wide tab on each side.
Basic Usage
First, note that you will need to disable Beginner Mode in the LightBurn Settings otherwise the tabs functionality will not be available. Once that is done, you will see the "Add Tabs" tool is available:

You can only add tabs to shapes that are in Line mode. Once the Add Tabs tool is selected you will see the Insert Tab cursor ( ) when hovering over a shape which you can add a tab to.
Simply click where you would like a tab, and a red circle will apear where you clicked, denoting that a tab will be placed there.

Tabs default to 0.5 mm in width and you can place many tabs on any shape. The system will, however, limit how close any two tabs can be based on the currently set tab size.
If a tab needs to be moved, simply click on it again and drag it to a new location, even on another shape.
Finally, you can delete a tab by double-clicking or shift+clicking the tab.
Advanced Usage
In a Line mode cut setting's option dialog you will now see a Tabs / Bridges section which allows more control.
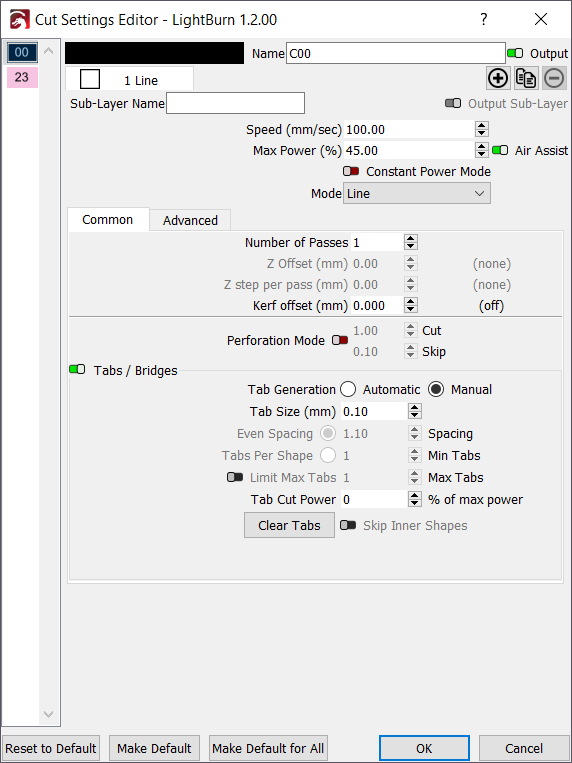
Global Enable / Disable
The Tabs / Bridges group has a checkbox in the top-left. Flipping this to off will supress any tabs on that cut layer without losing any previously configured tabs or tab settings.
Tab Generation
- Manual - Any tabs must be manually placed using the methods described above.
- Automatic - Tabs will be placed on all cut layer shapes, based on the values of Even Spacing, Tabs Per Shape, and Skip Inner Shapes.
Tab Size
Defines the total length of any tabs in whatever the currently configured system unit type is (mm or inch). The system will skip cutting for this distance, if possible.
Even Spacing
When automatically generating tabs, each contiguous path section will have at least one tab applied at the very start of the path and then again at this distance interval (mm or inch depending on unit settings).
Tabs Per Shape
When automatically generating tabs, using this option will place this number of evenly spaced tabs on each contiguous path section for each shape on the cut layer.
Limit Max Tabs
This option allows you to set an upper bound on how many tabs each object can have automatically generated.
Tab Cut Power
If set to anything other than 0%, tabs will have pulsed cuts across the distance of the tab instead of just skipping it completely. In the example below, the top tab is set to 25% whereas the bottom tab is set to 75%.

Not all laser controllers can reliably vary the power mid-cut so this was a way to implement "partially cut" tabs in a consistent way. By increasing the amount it pulses on during the tab you can further weaken the tab overall.
Skip Inner Shapes
When enabled any shapes that are completely contained by another shape in the same cut layer will not have automatic tabs applied. This does not effect manual tab placement.
Clear Tabs
Delete all tabs (manual or automatic) from every shape on this cut layer.