Modifier Tools

The modifier tools, as the name suggests, are primarily used to modify existing shapes.
The tools are:
- Modifier Tools
 Offset
Hotkey = Alt + O
The offset tool is used to create outlines around existing shapes, either inward or outward, offset from the original by a given amount. We use the offset tool in the 'Making a Simple Project' topic, so that's a great introduction.
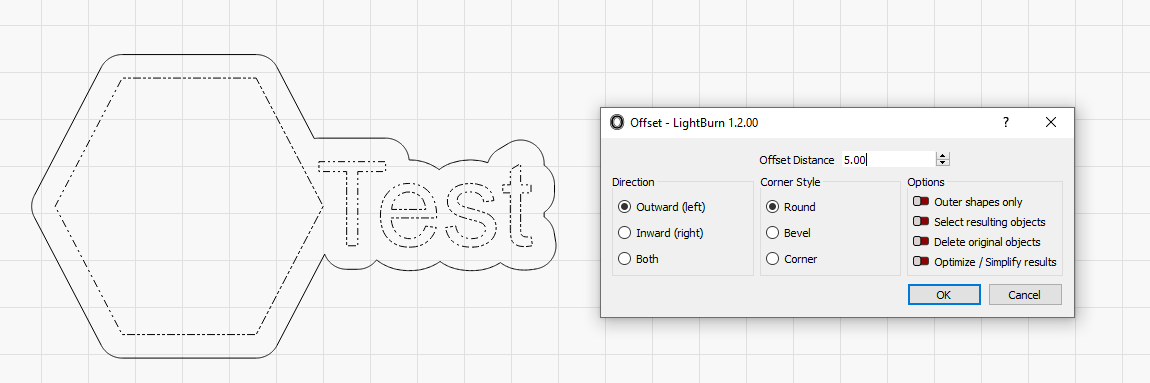
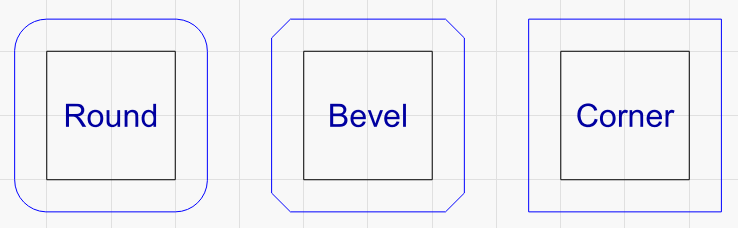
The corner style option chooses how outward corners are offset:
The offset tool remembers the last set of options you used, and if you hold the Ctrl key when you click the offset button, it will perform the offset operation using the previous settings, without bringing up the dialog.
 Weld
Weld
Hotkey = Ctrl/⌘ + W
Clicking on the Weld icon will join all the selected shapes into a single entity that is the outline of all the selected shapes. Note that Weld requires closed shapes, but will accept any number of inputs. If you weld something and the middle content disappears, try Boolean Union instead.
Boolean
The Boolean tools are used to combine shapes into more complex shapes. The three different Boolean operations are shown here:
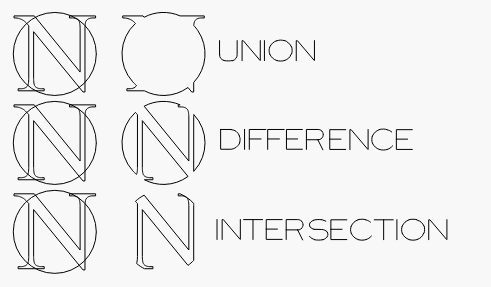
- Union keeps the area covered by either shape - it merges them.
- Difference is the 2nd shape removed from the first.
- Intersection keeps the area covered by both shapes.
Boolean tools require exactly two shapes or two groups of shapes. Weld can be used on any number of shapes, and can often be used as an alternative to repeated Boolean Union operations. Otherwise, you'll need to perform multiple Boolean operations to combine more than two shapes.
All shapes used with the Boolean tools must be closed shapes, meaning continuous loops whose starting and ending points are the same.
Boolean Assistant
Hotkey = Ctrl/⌘ + B
Because it can be hard to remember which operation (or which order) is going to do the thing you want, we've added a new Boolean Helper that will let you preview each of the Boolean operations before deciding on one.
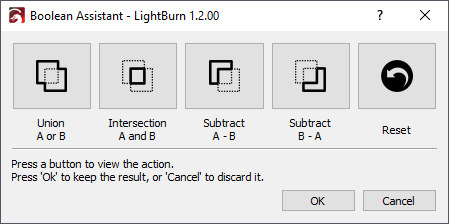
Click any of the first 4 buttons to see what that operation will look like, or click the 'Reset' button to see the original shapes. If your design is not complex, hovering over the buttons will also work. When you see the result you want, click the 'Ok' button to keep it, or click 'Cancel' to revert.
 Boolean Union
Boolean Union is similar to weld, but works with 2 selected objects only. However these selected objects can actually be grouped items, not just a single vector shape.
 Boolean Subtract
Hotkey = Alt + -
Boolean Subtract (also called Boolean Difference) will remove the area that the second selected shape overlaps the first shape by. The order in which you select shapes will determine the outcome. This tool also works with grouped items. If you end up subtracting the items in the wrong order, Undo, then perform the operation again — the undo switches the order of the items, so a simple Undo and click-again of of the Subtract button is a quick fix.
 Boolean Intersection
Hotkey = Alt + *
Boolean Intersection creates a new shape from the overlapping areas of two selected shapes.
Video Walkthrough of the Boolean Operations
Click for a Boolean demonstration video
The above video describes in more detail how the various Boolean operations differ, and why welding text to a circle should be done with a Boolean Union instead.
Arrays
Arrays allow you to make regularly spaced copies of a shape. LightBurn offers both grid and circular arrays.
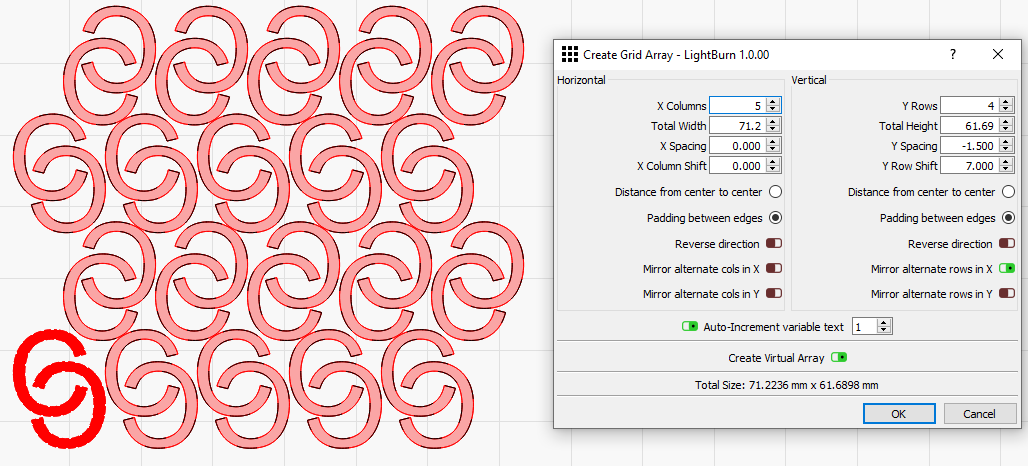
 Grid Array
The Grid Array tool copies an object (or objects) with regular spacing, horizontally, vertically, or both, and includes options to adjust spacing, shift alternate rows, mirror the shapes, and more.

-
X Columns and Y Rows specify the number of copies to make in the horizontal (X) and vertical (Y) dimensions.
-
Total Width and Total Height are alternative options for specifying the number of copies to make in each dimension. Set the values in these fields to match the size you'd like the grid to occupy, and LightBurn will set X Columns and Y Rows to whatever is necessary to fill the specified size without going over, taking into account the other settings below.
If you do not adjust these fields directly, they will automatically change to reflect the width and height of your grid, as determined by your other settings.
-
X Spacing and Y Spacing determine the distance between each copy. For each dimension, you can select to space based on Distance from center to center or Padding between edges.
-
X Column Shift and Y Row Shift offset alternate columns or rows by the specified amount.
-
Reverse direction changes the direction in which copies are produced, and can be enabled individually for each dimension.
-
Shift by half shifts alternate columns or rows by half the total width or height of the original object.
-
Mirror alternate columns in X and Mirror alternate columns in Y flip copies of the original object(s) in the selected dimension, for alternate columns or rows.
Tip
Use the X/Y Spacing, X/Y Shift, and Mirror options individually or in combination with one another to efficiently lay out objects for maximum material utilization.

-
Enable Random orientation to randomly rotate each copy of the original object(s). Use the field next to the Random orientation switch to enter a seed number that is used as the starting point of the randomly generated orientation. Re-using the same seed number will duplicate the same randomly generated orientation later on.
-
Auto-Increment variable text applies an Offset to text in each copy created in the array, automatically advancing output if you are using Merge/CSV or Serial Number formatting. See our documentation on using Variable Text for more information.
The field next to the switch determines the amount by which each duplicate's Offset will advance.
-
Toggle on Create Virtual Array to make an array of synced clones of the original object(s). See below for more information.
-
The Total Size readout displays the resulting array's size in and X and Y.
-
Count displays the total number of copies, including the original.
-
Enable Group Results to automatically Group all objects in the array when it is created.
-
Enable Select Results to automatically add all objects in the array to your selection when it is created.
Radial Array
The Radial Array (or circular array) tool lets you create copies of a shape (or shapes) around a central point. This is useful for creating ornamental patterns, clock faces, and more.
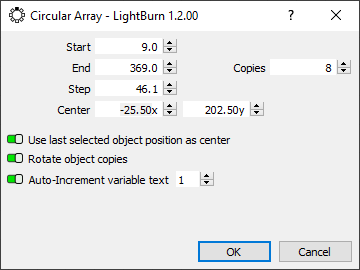
You can manually enter the point of rotation, but it's much simpler to create a shape to use as the center point, and select that shape last. The created copies can be rotated or not - Numbers on a clock, for example, are often left upright for readability, but roman numerals are usually rotated.

In the above example, the small center circle was selected last, and the 'Use last selected object position as center' option is chosen, along with 'Rotate object copies' to produce the pattern.
Virtual Arrays
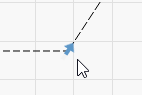
There is also a Virtual Array option that can be selected by checking "Create Virtual Array" at the bottom of the Grid Array dialog. Instead of making copies of the original shapes, this will generate virtual clones of the original that stay synced at all times. When using a virtual array, the virtual clones will render with a dashed outline and muted fill color to denote they are virtual:
Note that these virtual shapes are not selectable and will always be laid out based on the array options you provided. However, any changes made to the original shapes are automatically reflected in the array.

Beyond just altering the original shapes, there are many operations that can be done after the fact to virtual arrays, all of which are available from the shape context menu. This menu is available from any shape that is currently part of a virtual array. You do not have to select all shapes in that array first.

- Edit Array: Display the "Create Grid Array" dialog again, but for this existing array. This allows you to modify any of the parameters and even convert it back into a normal array, by unchecking "Create Virtual Array".
- Duplicate Array: Virtual arrays cannot be selected directly, only the shapes included in them. So this allows you to duplicate an entire virtual array and all of the shapes in it.
- Flatten Array: Convert the virtual array into a standard array where all shapes are separate copies and no longer synced to the original shapes.
- Remove from Array: Remove the currently selected shape(s) from the virtual array.
- Add to Array: Add any currently selected shapes not in the virtual array to the array. Note, you must select at least one shape that is in a virtual array and one shape that is not in a virtual array currently.
 Start Point Editor
The Start Point edit tool lets you tell LightBurn where to start cutting a shape, and in which direction. By default, the starting point is the first point of the shape, and the direction will be the direction that the selection marquee animates in. In the Optimization Settings, if you tell LightBurn to choose the best starting point or best direction, it can choose a different point than the default if it will reduce cutting time. The Start Point editor lets you force the starting point and direction.
With a shape selected, click the 'Start Point' tool and you'll see the starting point and direction indicated by an arrow. If the arrow is gray, it means this shape is displaying the default point and direction, but it is not forced. If you click any node on the shape, the arrow will move there, and turn blue, indicating that the user has chosen this as the starting point and direction.
Holding Shift and clicking a point will choose the opposite direction, and holding Ctrl and clicking the shape will clear the starting point back to the default.
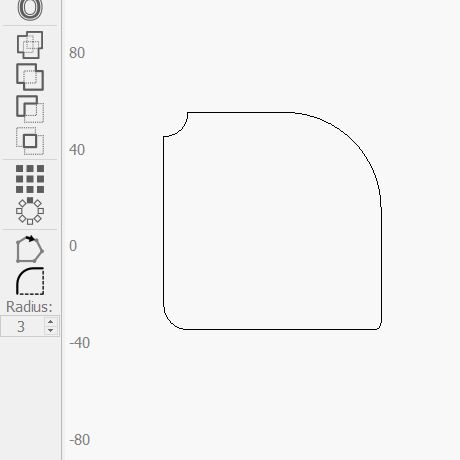
Radius Tool
The Radius Tool can be used to fillet (round over) sharp corners, take a round bite out of a corner (using a negative radius value), or remove a radius from a corner.
It also allows you to remove radiuses from corners, turning them into sharp points.

Fillets have all kinds of applications, and they can be combined to form more complex shapes.
Add a Radius
- Click the radius tool
- Set the radius value
- Select the object you want to modify
- Click on a corner to apply the radius
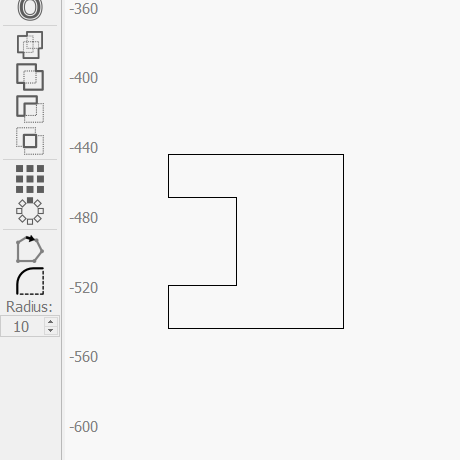
If you change the radius to a negative number it takes a fancy little bite out of the corner.
LightBurn 1.5+ Starting in LightBurn 1.5, rectangles have an additional handle available that acts as a shortcut for the Radius Tool. Drag the blue handle away from the corner to increase the radius of all four corners, and drag toward the corner to decrease the radius. Dragging vertically creates a reversed radius, with a bite taken out of the corner.
LightBurn 1.6+ Starting in LightBurn 1.6, the draggable handle for Radius is only shown when the ctrl key is held down.
Remove or Change a Radius
As of release 1.3, you can use the radius tool to delete rounded corners (returning them to a sharp one) by clicking on them. This even works on imported designs that were made in different software, as long as the software exported actual arcs.
After removing a radius you can then apply a differently-sized one to the corner, as normal.
Troubleshooting Radii
Radii can only be applied where there is room for the radius to be applied.
LightBurn 1.5 and later support applying a radius where curved (Bézier) lines meet, but earlier versions can only apply a radius to a corner where straight lines come together.
When the radius tool is active, the icon changes as you hover over a corner to indicate whether the radius tool can be used.
| Icon | Meaning |
|---|---|
 | Click to fillet corner |
 | Click to remove fillet |
 | Can't fillet - corner is next to a curve |
 | Can't fillet - not enough space |
If the cursor isn't appearing as you hover over a corner, make sure you've selected the radius tool in the Creation Tools. The Radius icon should be highlighted. Also check that you have selected the object you wish to edit by clicking on it.
If that still isn't working, check that the connected lines are straight. It's possible for lines that appear straight to be curves, especially in imported files. Select the Edit Nodes Tool, hover over the line either side of your corner and hit L on your keyboard.
If a radius still can't be applied it might be because the two lines that make up the corner aren't actually joined at that point. To check, move the corner using the Edit Nodes Tool, if it splits off into two lines, bring the one you moved back toward the other so that they snap together and join, and then try the radius again.
If you are having trouble converting a rounded corner back into a sharp one, it could be because there is not a true arc at the corner. This is most common with imported shapes, because some programs export arcs as a series of tiny lines. You can try repairing these with Optimize Selected Shapes.
To exit the radius tool, hit Esc on your keyboard.
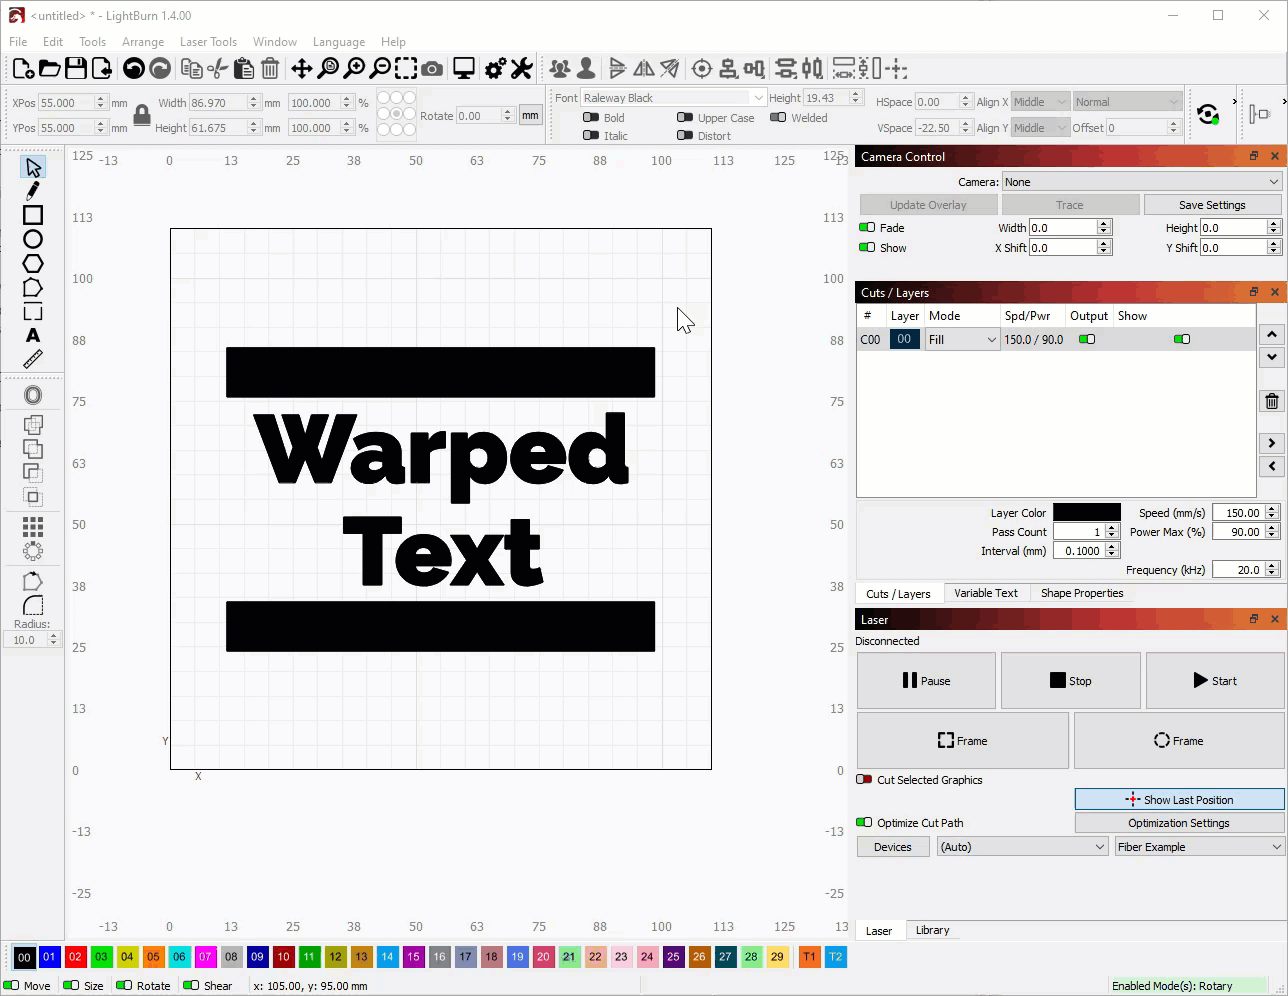
Warp and Deform (version 1.4+)
You can find both Warp Selection and Deform Selection under the Tools menu. Both tools can be used on single or multiple objects by selecting the objects and then selecting the tool. You can modify text, shapes, or images by dragging the handles.
While using warp and deform:
- Double-click on a handle to reset it.
- Hold Shift while dragging a handle for horizontal symmetry.
- Hold Alt or Option while dragging a handle for vertical symmetry.
Warp Selection
Warp Selection uses four handles, one at each corner.
Deform Selection
Deform Selection uses 16 handles, arranged in a 4x4 grid.
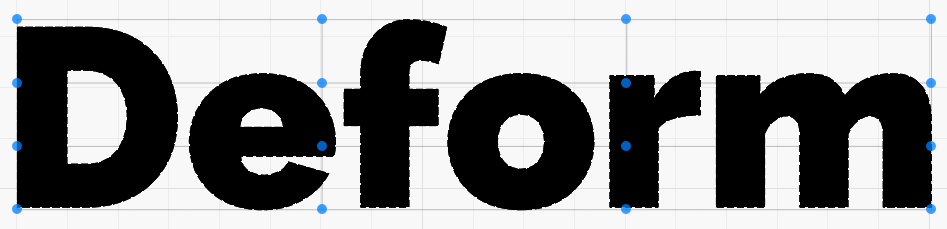
You can grab and drag the blue dots at the corners and intersections of the grid to deform the shape. See the animation below for examples.
