Rotary Setup (GRBL)
Info
This will walk you through setting up and using your rotary attachment with LightBurn for gantry (non galvo) lasers. To set up a rotary with a galvo laser, please see Rotaries for Galvo Lasers.
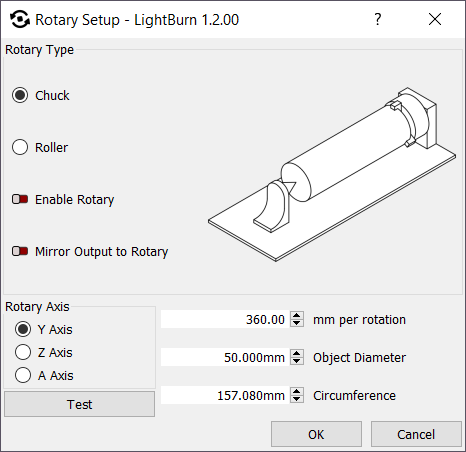
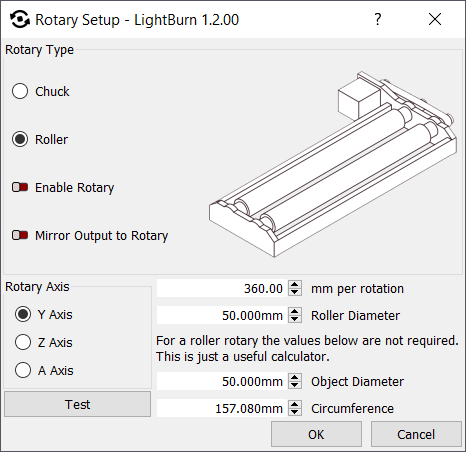
In the top menu bar, click the Laser Tools menu (or just Tools in older versions of LightBurn), then Rotary Setup, and it will open the rotary setup window, shown here:
Rotary Setup
The window may look different depending on the type of controller you have, and in fact, you may not be able to access this menu item at all - most Trocen controllers, for example, require setting rotary parameters through a menu on the controller panel itself.
General Rotary
- Choose whether you have a chuck style or roller attachment.
- Click the enable rotary check box (it will turn green when enabled).
- In the steps per revolution box, enter the number of steps it takes your attachment to make one full revolution. For a chuck rotary, this will be one rotation of the chuck, and for a roller, it will be one full rotation of the roller, NOT the item. For GCode devices with a dedicated rotary axis, this number should just be "360 degrees". If not using a dedicated rotary axis, you'll have to use trial and error to dial in the correct travel distance using the Test button.
- Click the Test button to verify that the roller or chuck makes one full rotation, pauses, then returns.
-
Enter either the diameter of the object to be engraved or it's circumference, the other value will be automatically calculated.
-
Align your object under the laser head in a position where the X axis will start and rotate the object in the rotary attachment to the point where you want the Y axis to start engraving.
- When using the rotary, it's generally a good idea to use "current position" as the "Start From" setting.
- Click Start to run your job, or if you have a DSP controller, you can use Send to send it to the controller to run it from there.
- Remember to uncheck the use rotary attachment check box once you are finished so that you do not impact your next regular project.
Notes
-
If the object slips on the rollers of a roller type attachment, wrap the rollers with some sort of non-slip material or even rubber bands.
-
You can also try placing some weights inside the object such as ball bearings or other small round objects, this will help press the object against the rollers.
-
If you end up with a flat part at the 'bottom' of the engraving, it means your rotary gear mechanism has backlash. In general, tightening any belts in the rotary device will fix this, but if not, you can place a small line a few mm below the bottom of your design, set to very low power, like 0.1%, and set it as the first layer to run. The rotary will spin to this position, then back up over that few millimeters of gap, and will take up the backlash with that movement.
Notes for C3D, Smoothieware or GRBL users:
Before configuring the above, you will likely need to set up the rotary axis on your controller. LightBurn sends rotary moves as angle values, and the GCode controller translates those angles into actual movements. To do this, it needs to know the correct number of motor steps to take for one degree of movement on the rotary motor.
If you have a Cohesion3D, Smoothieboard, or other common GCode based controller, the number is usually 200 times your microstepping multiplier (usually 8 or 16) times any gear reduction, divided by 360.
For a Cohesion3D or HolgaMods rotary, this is usually
3200 steps (200 x 8 micro steps x 2x reduction) / 360 = 8.88888888 steps per degree 6400 steps (400 x 8 micro steps x 2x reduction) / 360 = 17.7777778 steps per degree
The steps per degree number, along with acceleration and maximum speed will need to be set in the appropriate location for the controller. With Smoothieware, it would be the 'delta' settings in the config.txt file on the controller. For GRBL, it can be accessed in Edit > Machine Settings in LightBurn, under vendor settings for the A Axis.