Multi LB Win
Using Multiple Instances of LightBurn
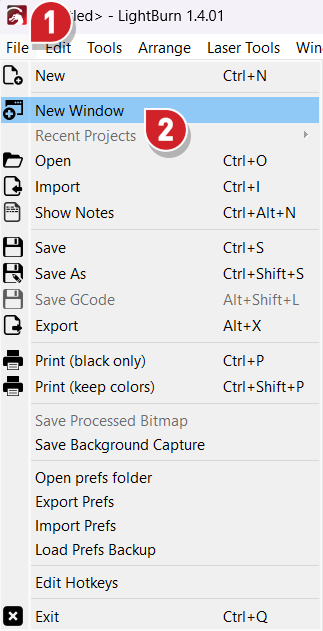
Users running LightBurn versions 1.4 and higher who need to run jobs on multiple lasers at the same time from the same workstation or need to quickly jump between projects can open a new instance of LightBurn by selecting File → New Window. All windows will share the same settings and preferences. For an alternate method that creates fully independent instances of LightBurn, users should refer to the Running Multiple Independent Instances of LightBurn guide in the next section.
Info
The last window closed after changing LightBurn settings will save those changes to the preferences file and will overwrite any changes made previously in other open instances.
Running Multiple Independent Instances of LightBurn
Info
This specific guide is intended for Windows users only. The steps required to adjust this behavior and replicate it on macOS and Linux will not be the same. This may be addressed in the future. Community contributions to this guide will be appreciated and reviewed.
Danger
This guide is for advanced users, and is non-trivial to follow. Caution is advised.
Users running multiple fully independent instances of LightBurn may need to use separate preference files to use different device configurations while operating two instances of LightBurn. This is not a suggested workflow, but is documented in the event a user needs this workflow.
Steps
-
Open LightBurn and select
File→Export Prefs.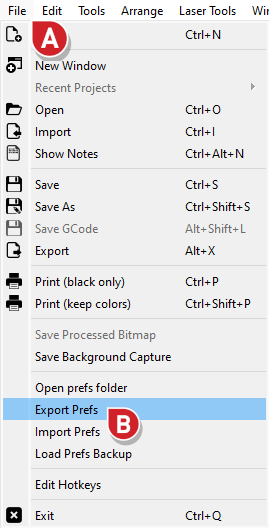
-
Save the .lbprefs file and note its location.

-
Fully close LightBurn by selecting
File→Exit, or by pressingCTRL+Q.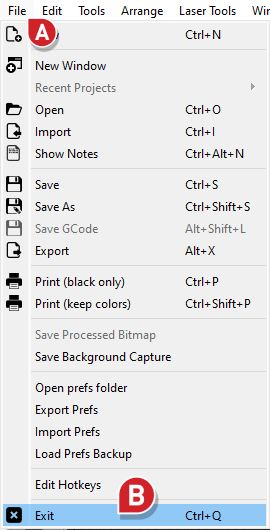
-
Open File Explorer and navigate to the Windows Start menu links storage location or enter this file path into the File Explorer address bar.
C:\ProgramData\Microsoft\Windows\Start Menu\Programs\LightBurn\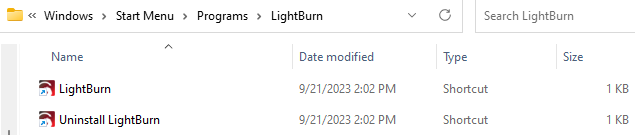
-
Copy and Paste the LightBurn shortcut twice and rename each file. Grant administrator privileges in the User Account Control window by selecting
Okand thenContinueto save each change.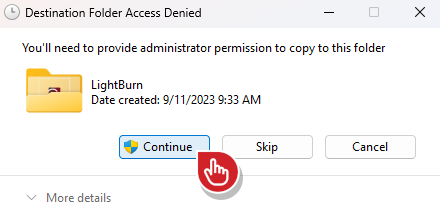
Info
This guide uses the file names
LightBurn_AandLightBurn_B. Rename the files to suit your needs. -
Right clickon the first shortcut file and selectProperties.
-
Select the
Shortcuttab and replace the text in the Target field to match.C:\Windows\System32\cmd.exe /c "SET LB_SETTINGSFOLDER=%USERPROFILE%\LightBurn_A&& START /D ^"C:\Program Files\LightBurn\^" LightBurn.exe"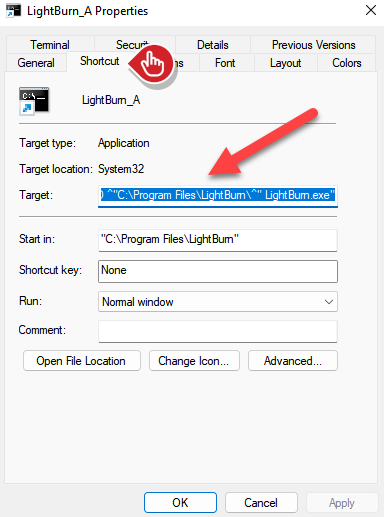
Info
Note: If you are using custom preferences names instead of the guide examples, replace
LightBurn_Awith your first custom preferences file name. Do not include a space between the file name and the&&characters as formatting and syntax matters. -
Click
Applyfollowed byOKand grant admin permissions again to save the changes.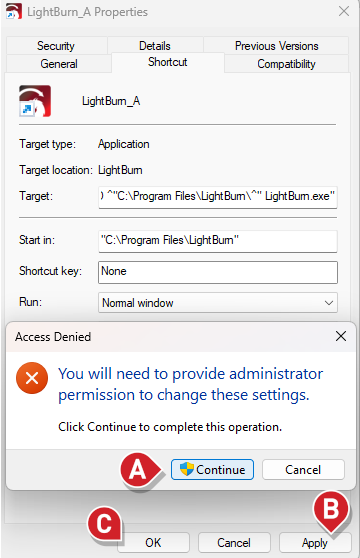
-
Repeat step 6 through step 8 for the second shortcut, this time using this target link:
C:\Windows\System32\cmd.exe /c "SET LB_SETTINGSFOLDER=%USERPROFILE%\LightBurn_B&& START /D ^"C:\Program Files\LightBurn\^" LightBurn.exe"Info
Note: If you are using custom preference file names instead of the guide examples, replace
LightBurn_Awith your first custom preference file name. Do not include a space between the file name and the&&characters as formatting and syntax matters.Two new LightBurn shortcuts are now located in the Start menu. Launching LightBurn via the "A" or first custom preference link will display the first run
Help & Notes. Reentering your license key will not be required. -
Click on the
Startbutton to open the Start menu and click on the first newly createdLightBurn_Ashortcut to launch the first independent instance of LightBurn.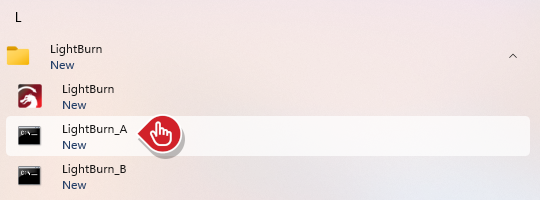
-
Click
OKto close the first runHelp & Notesdialog window.
-
Click on
Import Preferencesin the bottom left corner of theDevicesdialog window.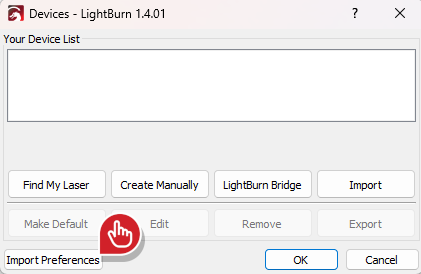
-
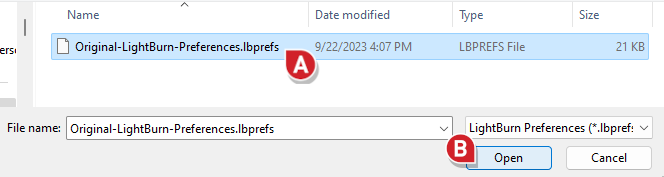
Navigate to and load the preference file saved in step 7 to load all devices in the preferences file.
-
Select and remove any devices you do not want associated with this LightBurn instance and click
OK.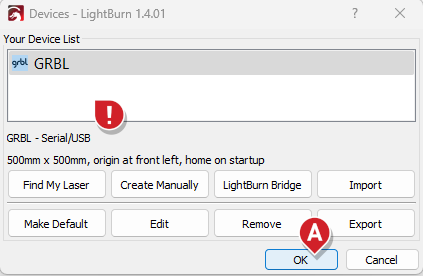
-
Open the new
LightBurn_Bapplication link and repeat step 9 through step 13 to load the original preference file into the second independent instance of LightBurn.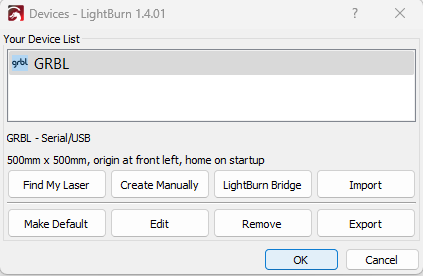
Done!
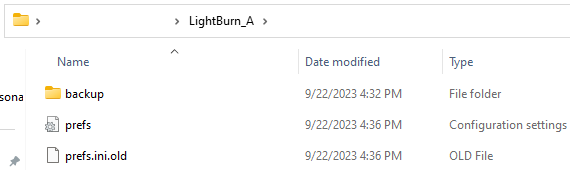
Two new preferences directories can now be found in your Windows user profiles folder at %USERPROFILE%\LightBurn_A and %USERPROFILE%\LightBurn_B. The %USERPROFILE% shortcut will resolve to the full file system path on for your user directory.
Starting LightBurn with the new shortcuts will launch independent LightBurn instances that are completely independent of one another. They will not overwrite the other's preferences file and any changes you make to the device on each will persist, and will include completely independent recent file lists, rotate/shear options, and more. Each LightBurn instance will be completely independent.
Danger
While LightBurn allows for simultaneous use of multiple devices without conflicts, cameras and lasers cannot be used by multiple instances of LightBurn concurrently. For example, a DSP controller set up as "Ruida A" will not be able to be accessed in the A and B configurations simultaneously.
Origin
This guide originated as a post on our forum by one of our developers. For reference, that guide can be found here.