WiFi Connection (GRBL)
This tutorial explains how to set up a GRBL laser over a local network (e.g. your home router).
The Sculpfun iCube is used as an example, but the process should be similar for any GRBL device capable of network connections.
We’ve attempted to point out anything that is device-specific throughout, but GRBL network configuration is not fully standardized. If your device's network settings don't match this guide, please email support or visit our forum, where we can help you with your device and gather the information we need to update this page to help other users.
Part 1: Connect Over USB
Why do I need USB? Isn't this about WiFi?
You'll need to connect with USB to update a few settings on your laser. If your laser is already connected with USB, you can skip to Part 2.
If your laser is already connected to WiFi and you just want to connect a second computer to it, you can skip to Part 4.
- Turn on the device and connect to the computer with a USB cable.
- Use the USB connection to add the device as described in Find My Laser.
- Select the device in the Laser window:
- If you see Ready right below the title bar of the window, your laser is connected and ready to use.
- If you see Busy and a green progress bar, your device is busy doing something. Many GRBL devices will home themselves when first connected, so you'll see the Busy message until homing is complete.
- If you see Disconnected, your device is not connected. Make sure you have the correct serial port selected (the dropdown that says COM4 in the above screenshot). If your laser still isn't connecting, select (Choose) in the same dropdown and then reselect the serial port to reset the connection. If you're still unable to connect, please see Troubleshooting: Connection Problems.
- Open up the Console window:
- By default, the Console window is in the same section of the screen as the Cuts / Layers and Move windows.
- If you don't see the Console window, go to the Window menu and make sure Console is checked.
- In the next two sections of this guide, you'll use the Console window to configure your network connection.
Part 2: Find Network Info in Console
Immediately after you connect to your laser, you should see a series of messages in the console describing your laser's status.
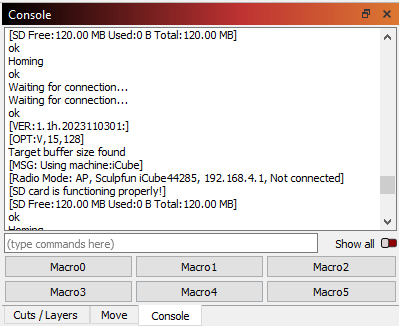
You need information about your laser's network status, shown in the line starting with Radio Mode:
[Radio Mode: AP, Sculpfun iCube44285, 192.168.4.1, Not connected]
Your laser won't send the exact same message, but you should see something similar. Here's what each part of the message means, based on the example above:
| Message | Meaning | Explanation |
|---|---|---|
Radio Mode: AP | Network type, typically either AP or STA | If you see AP here, your laser is in Access Point mode, allowing you to connect directly to the laser over WiFi. If you haven't changed your laser's network settings, it will likely be in this mode. If you see STA here, your laser is in Station mode and will attempt to connect to an existing WiFi network. This is not universal, and some devices are configured differently. |
Sculpfun iCube44285 | WiFi network name, or SSID | The name of the WiFi network the laser is either broadcasting (in Access Point mode) or attempting to connect to (in Station mode). |
192.168.4.1 | Laser's IP address | This is the IP Address of the machine — it's how a computer knows where to find it on a network. |
Not Connected | Connection Status | This tells you whether your laser is connected with any devices over the network connection. |
Your specific device may not match this exactly. Please email support or visit our forum if you need help with your specific device.
Part 3: Configure Network Connection
This process varies between devices. If you're not sure how to change WiFi settings and the directions below don't work for you, try checking your laser's user manual or seeking support from your laser's manufacturer. These settings are stored on the laser, so once your laser connects to the network, you shouldn't need to repeat this process until your WiFi network changes.
Your laser may come with a mobile app or web interface that allows you to configure network settings. If you aren't able (or don't want) to use these, skip ahead to Configuration in LightBurn.
Configuration With App or Web Interface
Tip
Many devices will automatically disconnect from a WiFi network without an internet connection. You may need to modify your device's network settings to connect directly to your laser. See the support resources for your phone or computer for help with your network settings.
If your laser is in Access Point mode, you may be able to configure the network connection using a mobile app provided by the manufacturer or a web interface. This isn't always possible and the process varies between lasers, but in general you will need to start by connecting a phone or computer to the laser's WiFi network. If you need a password to connect, check your laser's user manual for the default password. For the Sculpfun used as an example here, the default password is "12345678".
If your laser uses a web interface, enter the IP Address from Part 2 where you would usually type in a website's URL to access it.
Here are the settings you will need to configure, although they may be displayed differently for your laser:
| Name | Value | Notes |
|---|---|---|
| Network type | Typically STA or Station | You want to connect to an existing network. You don't want AP or Access Point |
| SSID | Your WiFi network's name, or SSID | Newer routers may have 2.4GHz and 5GHz connections available. If you see both, choose 2.4GHz |
| Password | Your WiFi network's password | Enter this carefully to avoid entering it incorrectly |
Configuration in LightBurn
To configure your laser's network settings, you will need to use the Console window.
Network configuration varies between devices, so check your laser's user manual for more information. The Sculpfun used as an example here came with a sheet of paper listing the appropriate parameters. Regardless of what laser you're using, you will need to change the settings listed below, but the number after $ may be different for your specific laser:
| Name | Parameter | Value |
|---|---|---|
| Network type | $50 | Typically STA |
| SSID | $53 | The name of the WiFi network to connect to |
| Password | $54 | The password to connect to the WiFi network |
Each command given is entered into the text box at the bottom of the Console Window and followed by pressing Enter.
To check the value for any of these parameters before changing it, you can use the parameter without assigning a value. To change the value, add =YOURVALUE after the parameter. As an example, $53 will show the name of the WiFi network to connect to. $53=MyWifiNetwork will configure the laser to connect to a network called "MyWifiNetwork".
Each of the following steps will use the parameters shown above. If your laser's manufacturer provides different parameters, use those parameters.
Known Exceptions
The Spider X1 requires that $50 be set to 2 to enable WiFi. As we identify additional devices that differ from the settings shown above, we will add them here.
Set Network Type
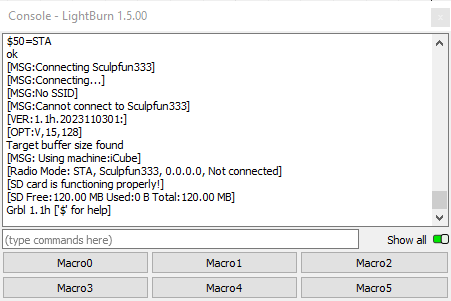
Use $50=STA to set your laser to Station mode. This tells it to connect to an existing network.
Don't worry for now if you see [MSG: No SSID] or a similar message in the Console window. This is your laser's way of telling you that it doesn't know what network to connect to yet.
Set Network Name
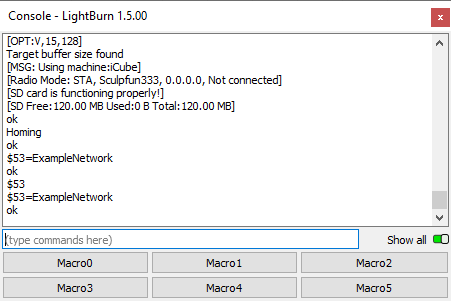
Use $53=ExampleNetwork, to set the SSID, replacing "ExampleNetwork" with the actual name of your WiFi network.
Make sure you type accurately, including capitalization.
Set Password
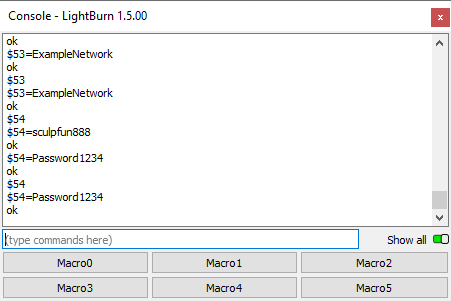
Use $54=Password1234 to set the WiFi password, replacing "Password1234" with your actual password. The screenshot above also shows how to use $54 to check the saved password.
Make sure you type in your password accurately, including capitalization. This should be the password to connect to WiFi, not the login info for your computer or any accounts you may have.
Check Connection
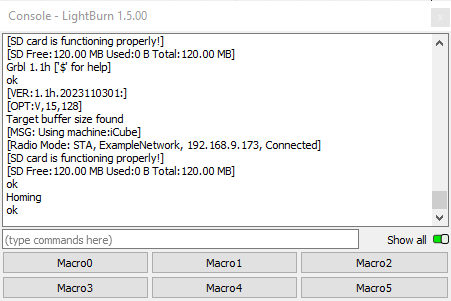
After configuring network settings, you may need to restart your laser to get it to connect. The Radio Mode status message now shows updated network settings and ends with Connected:
[Radio Mode: STA, ExampleNetwork, 192.168.9.173, Connected]
Make sure you write down the IP Address (192.168.9.173 in the example above) for easy access in Part 4.
Part 4: Network Connection in LightBurn
Once you have an IP address, you can set up a network connection in LightBurn.
- In the Laser Window, click the Devices button and choose Create Manually. Click Next to continue.
- Select GRBL to create a new GRBL device and click Next.
- Select Ethernet/TCP as your connection type and click Next.
- Enter your device's IP address from Part 3 and click Next.
- Give the device a name that makes sense to you and set the size of the work area. Click Next.
- Check that the origin and homing settings are correct and click Next.
- Make sure the summary looks correct and click Finish.
At this point, you should be able to connect to your laser through the network connection by selecting the device you've just added in LightBurn.
Troubleshooting
- If your laser isn't able to connect to the WiFi network in Part 4:
- Check that the SSID and password are correct.
- If you are using a 5GHz WiFi network, try using a 2.4GHz network instead. Most routers that have 5GHz WiFi will also have a second SSID for 2.4GHz.
- Ensure your computer is connected to the same network as your laser.
- If you have trouble connecting, you may need to change the network port LightBurn is using to communicate with your laser.
- If you can connect but the laser is stuttering, stopping, or restarting mid-job, you may need to switch to Synchronous Transfer Mode.