Connecting to the Laser
Once you have added your laser to LightBurn, it should appear in the list of devices to the right of the 'Devices' button in the Laser Window. If you only have a single laser, it will be automatically chosen for you.
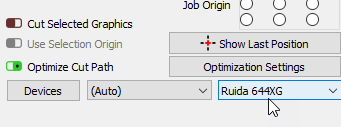
If you have more than one laser set up, you might need to select the one to connect to by clicking here:
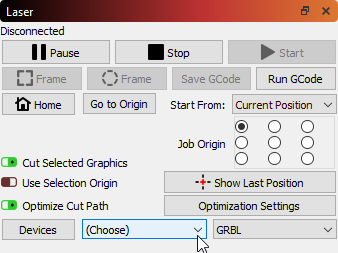
Depending on the type of controller you have, you might have to manually choose the port that the laser is connected to, by clicking where you see '(Choose)' in the Laser Window:
As long as your laser is connected to the same communication port, LightBurn will reconnect when you re-start. If you reboot your computer, or plug the controller into a different USB port, you might need to re-select it.
If you see the '(Choose)' as shown above, you need to select the port. If no ports are listed in the drop-down, it means that no devices were found, which could mean that it is not plugged in correctly, isn't powered, or you're missing a driver.
If your laser disconnects for some reason, or enters an alarm state and needs to be reset, you can quickly re-connect by right-clicking the 'Devices' button in the Laser Window.
Troubleshooting
Some Linux users have reported issues connecting to lasers that had previously worked after upgrading to Ubuntu 22.04 due to a conflict with the Braille display driver BRLTTY.
To check if BRLTTY is running, open a terminal window and run ps -fe | grep brltty. You can remove the process from the system using sudo apt-get purge --auto-remove brltty