First LightBurn Project
One of the best ways to learn to use Lightburn is to use it. We recommend following along with our laser-engraved QR Code WiFi coaster to start exploring LightBurn. By the end, you'll be familiar with LightBurn's user interface and general workflow, and you'll have a coaster your friends and family can scan to log into your WiFi network without needing to type anything in.
The video above shows the same project in an older version of LightBurn. The overall process is the same, but some tools will look a little different, and the QR Code tool is replaced by the Bar Code tool.
Before you begin, familiarize yourself with your laser and how to operate it safely according to manufacturer instructions. Never run your laser unsupervised.
What You'll Need
- LightBurn installed on your computer.
- A laser added to LightBurn.
-
Suitable material for the coaster. Our video uses laser-safe plywood, but you can use any laser-safe material you have on hand if you don't have that available.
Note
You can use a pre-made coaster blank instead of cutting out your own. Some lasers — including most Galvo lasers — aren't capable of cutting through any materials.
-
Your WiFi information to enter into the QR Code.
Designing Your Coaster
Create Text
You're going to start by creating text to engrave onto your coaster.

- Click on the Text tool
 in the Creation Toolbar.
 - Click in the Workspace to place a cursor and type something out. Our demo coaster will say "WiFi", since that's what the QR Code will be for.
- Find the Text Options Toolbar near the top of the screen above the Workspace. When you have text selected, this toolbar becomes active, and provides several options for modifying the selected text. For this project, try the following steps:
- Select a font you like from the Font dropdown. LightBurn can use any font installed on your computer.
- Adjust the size with the Height box.
- When you're done typing, return to the Select tool by pressing Esc or clicking the cursor icon
 in the Creation Toolbar. You can come back and edit the text later by double-clicking it with the Select tool active.

Create a QR Code
LightBurn has a built-in Bar Code tool, which can generate QR Codes as well as a variety of other scannable codes. You'll use this to generate a QR Code that automatically logs someone into your WiFi network.

- Go to Tools → Create Bar Code to open the Bar Code tool. You'll see the cursor change to a QR Code. Click and drag in the Workspace to set the initial size of your QR Code and start creating it. Put it somewhere near where you want it — you'll improve the placement in the next step.
- Make sure the Bar Code Type is set to QR Code and click on the WIFI Tab.
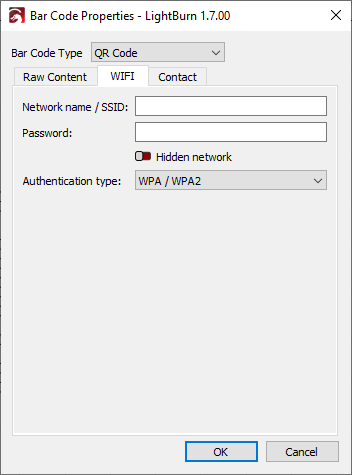
- Enter your WiFi login info into the window – be very careful with your spelling and capitalization – and click OK to create the QR Code.
- Adjust the size with the Width and Height boxes in the Numeric Edits Toolbar. Make sure the lock icon is closed so the code's aspect ratio is maintained as you make adjustments, and it doesn't get distorted. Enter a size into either Width or Height — somewhere between 40 and 60 mm is generally a good size.

Aligning and Grouping
Now that you have text and a QR Code, you'll want them to line up nicely. This is a great opportunity to try out the Align and Group tools.

No Alignment Tools Option?
New LightBurn installations start in Beginner Mode, which simplifies the user interface by hiding less-used options. Beginner Mode combines all of LightBurn's alignment tools into the Align Tools Helper.
If you aren't in Beginner Mode, go to Arrange → Align → Align V-Center for this step, or enable Beginner Mode in your Settings.
- Make sure you have the Selection tool active by clicking on the icon or pressing Esc.
- Select the QR Code by clicking on it. Drag to place it where you want it relative to the text. You can quickly spot selected objects by looking for the animated "marching ants" pattern on the outline of the shape.
- With the QR Code still selected, hold down the Shift key and click on the text to select that as well.
- Go to Arrange → Alignment Tools to open the Align Tools Helper, which will preview different alignment options as you hover over them. Use the bottom Align Centers button
 to vertically center both shapes.
 - With both objects still selected, press Ctrl/Cmd+G to Group them. This way both shapes will move together without having to remember to select them both. To move them individually, you'll need to Ungroup them by selecting them and pressing Ctrl/Cmd+U.

Layer Modes
Now we'll preview your design and edit your cut settings. We'll be introducing the Preview function and the Cuts / Layers Window.

View Styles
LightBurn offers Wireframe and Filled options for the View Style. After setting Layer 0 to Fill, if you don't see the shape filled in, you can use Alt / Option+W to toggle between Wireframe and Filled view styles. Read more at View Style Types.
-
Open the Preview window with Alt/Option+P. This window shows your design as it will be sent to the laser, and can even simulate the engraving to estimate time and visualize what the laser will be doing. Try pressing play to see how it works.
-
By default, your design will be on Layer 00 and set to Line Mode, which means the laser will trace the outside of the shapes rather than filling them in. Click on the dropdown under Modes and select Fill. Next to Speed and Max Power, set appropriate speed and power settings for the material you're using. Check your laser's user guide for recommended settings.
Learn More: Line Mode versus Fill Mode
Line Mode tells your laser to trace a path around the contours of vector graphics.
If you command the laser to move quickly, or with low Power, it will likely just etch the surface (sometimes called scoring). If you move slowly and with high power, especially with a CO2 laser, the laser will cut deeper, or even completely through the material. The only difference between surface marking and cutting with Line Mode is the Power and Speed you set.

Closed Shapes Only
This feature only works with shapes that are closed. A shape is closed when it is a complete, continuous loop whose start and end points are the same. When a shape's start and end points are different, it is open.
See Open vs. Closed Shapes for more information.
Fill Mode tells your laser to etch parallel lines within the boundaries of vector graphics.
The distance between each line is determined by the Line Interval setting, and the Speed and Power settings control the darkness or depth of the etch. Use low Intervals, low Speeds, and high Powers for deep engravings or dark marks, or tell your laser to move quickly at low Power to lightly etch or mark the surface.

-
Turn off the Air toggle to disable air assist for this layer. It's helpful for cutting, but less useful for engraving.
Learn More: Air Assist
Air assists are a feature of some types of lasers that blow air onto the surface of your material at the spot where the laser's beam strikes, which can help prevent soot accumulation and charring, and aid in cutting processes.
Some lasers have automatic assists, which LightBurn can turn on or off when a job begins. Other models have external air assists which you must enable manually when you start a job.
If your laser has a manual air assist or no air assist at all, toggling the Air switch will have no effect.
-
Preview the design again, and you should see the design filled in instead of outlined.

Create a Decorative Border
With the QR Code and text ready to engrave, we'll move onto a different style of engraving.
When you set Layer 00 to Fill, the preview shows that the laser will move back and forth over the area to engrave, very much like printing on paper. A raster engraving like this is the most common way to engrave, but you can also engrave (or score) in Line Mode by using a lower power and higher speed than you would use to cut through the material. This tends to be faster and produce cleaner results on thin lines than a raster engraving. It's particularly effective with single line fonts.
Draw and Position the Circle

- Select the Ellipse tool
 from the Creation Toolbar.
 - Click near the top left of your QR Code and text to start drawing the circle. Drag toward the bottom right, holding down the Shift key as you go to keep the width and height the same, and then release to draw the circle. Don't worry too much about the exact size and position yet.
- Press Esc to exit the Ellipse tool. This should leave the circle you just drew selected. Hold down the Shift key and click to select the Grouped text and QR Code as well.
- Center the circle around the rest of your design by going back to Arrange → Alignment Tools and choosing Align Center.
- If you need to adjust the size of the circle, use the Width and Height boxes in the Numeric Edits Toolbar to adjust. You may need to repeat Step 4 after doing this.
Layers and Cut Settings
Always pay attention to units of distance and time when entering Speed settings
When entering Speed values recommended by your laser's manufacturer or other LightBurn users, make sure to use the same units of distance and time as those from the recommendation, or to convert the values to your preferred units.
A given number of millimeters per second is much faster than that same number in millimeters per minute. Mixing up units can lead to reduction in power output due to unexpectedly high speeds, or excessive power output — and even fire — due to unexpectedly slow speeds.
Change your units of speed in the Dimensions / Units tab of the Device Settings window. LightBurn automatically converts any existing values when you switch between units.
Right now, your circle is on the same layer as the QR Code and text. This means it'll be filled in like them as well. We'll need to move it to a different layer and give it its own cut settings.

My design is reversed!
A filled shape inside of another filled shape will act as a cutout, similar to a donut hole. We'll fix this in a moment. You can also see a more detailed explanation in How to Invert a Vector Engraving.
- Make sure the circle – but nothing else – is selected.
- At the bottom of the main window, look for the Color Palette. Select a layer other than Layer 00 or the Tool Layers, T1 and T2.
- In the Cuts / Layers Window, adjust the Speed and Max Power settings to a higher speed and lower power than your manufacturer recommends for cutting through the material you're using. This will let you engrave (or score) a line without cutting through.
- Preview your design. Your QR Code and text should still be filled in, but the circle should be just a line that the laser travels along.
Creating the Cut Line
Note
If you're using a pre-made coaster blank, you can skip this step.
The last piece of the design is the circle to cut out. You could do the same thing we did for the previous step – draw a circle and center it with the Alignment tools – but this is a wonderful opportunity to get familiar with the Offset Shapes tool.

- Make sure the circle is selected.
- Go to Tools → Offset Shapes or press Alt/Option+O to open the Offset window.
- Make sure the Direction is set to Outward and Optimize / Simplify results is enabled. Adjust the Distance so that it looks good to you – LightBurn will give you a live preview as you adjust it. Somewhere around 6 mm or ¼" should work well, but this is your coaster and it's up to you. Press OK to create the new circle.
- As you did before with the first circle, move this circle to a different layer and adjust the cut settings.
- See your laser's user guide for recommended speed and power settings to cut through the material you're working with.
-
If your laser has an air assist, keep the Air switch on to enable air assist for this layer. Air assists are helpful during cutting operations.
Learn More: Air Assist
Air assists are a feature of some types of lasers that blow air onto the surface of your material at the spot where the laser's beam strikes, which can help prevent soot accumulation and charring, and aid in cutting processes.
Some lasers have automatic assists, which LightBurn can turn on or off when a job begins. Other models have external air assists which you must enable manually when you start a job.
If your laser has a manual air assist or no air assist at all, toggling the Air switch will have no effect.
Previewing Your Design
Tip
It can be tempting to start a design without previewing it, especially when you're in a rush, but it's one of the best ways to catch errors before you start burning your material.
Now that your design is complete, preview it one more time. Remember that you can open the Preview window with Alt/Option+P. Press Play to preview what your laser will do. You can use the slider at the bottom to speed up or slow down the simulation.

In the simulation, you should see the following happen in order:
- Raster engraving to fill in the text and QR Code.
- Vector engraving the decorative border — the laser should follow the outline of the circle.
- Vector cutting the outer circle.
It's generally best to do engravings before cutting out your design. If you followed along with the steps above, your layers should already be in the right order. If they aren't, you can drag them around in the Cuts / Layers Window to change the order – by default, LightBurn will run each layer in order from top to bottom.
If you make changes, preview them again before moving on to cutting your design.
Learn More: Preview

When you first open the Preview window, you'll see a still image of the final result of your project — the contours to be scored or cut by Line Mode will be indicated by black lines, and the areas to be etched or engraved by Fill Mode will be shown as solid black areas, or, if your Line Interval is relatively large (or you zoom in close enough) as parallel lines running across the filled shapes.
You'll also see red lines — these lines indicate the path your laser will travel while not firing. You can toggle Show traversal moves at the bottom of the Preview window to switch between showing these moves or not.
Press Play to see a simulation of the movements and lasering operations your laser will perform when you start the job. In addition to making sure the laser will outline or engrave the correct graphics and areas, you'll be able to make sure it performs those actions in the order you want.
By default, the simulation will play in a close approximation of the job's real runtime, and Total time estimated is shown in the bottom right. You can adjust the Playback Speed slider to speed up or slow down the simulation.
See Preview Troubleshooting for help identifying and resolving any potential issues you spot in the Preview window.
Engraving and Cutting Your Design
Now that you've created and previewed your design, it's time to load material into your laser and begin cutting.
Avoid damaging your work area
Since you'll be cutting through the material, make sure that whatever is underneath your material is either scrap that you don't mind burning into or won't be damaged by lasering. This might be a thin sheet of aluminum, a honeycomb bed, or a piece of scrap wood.
Focusing the Laser
Lasers need to be focused correctly to achieve good results.
-
Place the material in the laser and move the head over the material. LightBurn has jog controls in the Move Window to make this easier.
Quick Reference: Jogging
-

-
You can use the arrow keys in the Move Window to move your laser up, down, right, or left. You can set the amount the laser travels with each click in the Distance field, and the rate at which it travels in the Speed field.
If you have a DSP laser you can also jog your laser using buttons on its onboard controller.
-
Location
- Move Window
- Onboard controller (DSP-only)
-
Keyboard Shortcuts
Each keyboard shortcut will move your laser by the amount entered in the Distance field, at the rate set in the Speed field.
- Jog Laser Left: Alt/Option + Ctrl/Cmd + [
- Jog Laser Right: Alt/Option + Ctrl/Cmd + ]
- Jog Laser Up: Shift Ctrl/Cmd + ]
- Jog Laser Down: Shift Ctrl/Cmd + [
-
-
Focus the laser according to your laser's user guide:
- GCode-based Diode lasers usually have a focusing spacer to set the distance between the laser and the material.
- DSP-type CO2 lasers may require manual focusing with a focusing spacer or may support auto-focus, either through the controller, or with the Focus Z button.
- Galvo lasers usually require manual focusing. Many galvo lenses are marked with their optimal focal distance, and you can use a ruler to set the correct distane between the lens (or mirrors) and your material. Some are equipped with a two red dot focusing system — adjust the height of the scan head until the dots meet, then the laser is focused. Finally, see our guide on Galvo Laser Focusing for a manual method of determining optimal focus.
Start From
LightBurn has three different Start From modes: Current Position, User Origin, and Absolute Coordinates. For this project, you'll be using Current Position.

- Set Start From to Current Position using the dropdown in the Laser Window.
- Set the Job Origin in the Laser Window to the center of the artwork.
-
With these two settings, your engraving will be centered wherever the laser is positioned when you start the job.
Learn More: Current Position
With Current Position selected, your job outputs relative to wherever the laser head is located when you press the Start button. The Job Origin control in the Laser Window tells LightBurn how to orient output relative to the laser head.
In this image, we're starting from the Current Position, with the Job Origin set to the lower left:

Notice the location of green Job Origin indicator. This represents the position of the laser when you start the job, so the laser is going to move slightly up and to the right from wherever it is, cut the four hexagons, and go back to where it started.
Why is the Job Origin offset from the graphics?
When using Current Position or User Origin, the green Job Origin indicator is always located on a corner, side, or at the center of an imaginary box — the smallest possible rectangle that can fully contain all graphics you're sending to the laser.
Below, we've added a Tool Layer to represent that imaginary box. Notice how the Job Origin moves around the box as we change the location in the 9-Dot selector.

Now imagine that you want to etch this four hexagon pattern onto a coaster or a phone case. Lining it up from the lower left is not easy. If you change the Job Origin setting to center, you get this instead:

The job will be centered around the current position of the laser head. If you position the laser head directly over the center of the item you want to etch, the output will be centered on the item.
-
Jog your laser to the center of your coaster. If your laser has a controller display and keypad, you can use the buttons there to jog. If not, use the buttons in the Move Window.
Framing
The final check before you can run the job is to make sure that it will output in the location you're expecting.
-
Click the Bounding Box Frame button to tell your laser to trace a box around the area the coaster will be cut and engraved.

Note for Galvo laser users
If you have a Galvo laser, the design will be outlined by your laser's red dot instead. See Galvo Framing for more information.
-
If the area your laser frames is correct, you're ready to start the job. If not, what you do next depends on how far off it is.
Learn More: Tips for improving Framing visibility
How to fire your laser at low power during Framing (diode lasers only)
If your laser has a red dot pointer, it makes framing easier to see. Otherwise, your laser will travel around with the laser turned off. LightBurn does offer the ability to run diode lasers at a very low power to aid in Framing. To do so:
- Go to Edit → Device Settings to open the Device Settings window.
- In the Basic Settings tab, toggle on the Enable laser fire button and Laser on when framing settings. Click OK to apply.
- The Move Window should now have a Fire button and a box to enter a power level. Keep this value very low to avoid burning the material — start at 0.25%, and only increase that value only if the beam is not visible.
- The Fire button will toggle the laser on and off. Now you can use the Frame command with the laser visible.
-
Adjust the position of the material and/or the laser head until you're happy with the layout of the design.
Danger
The Fire button should only be used for diode lasers, which generally don't have a red dot pointer for Framing.
Always wear proper eye protection when Firing your laser. Consult your laser's manufacturer for information on the proper eye protection required for your laser.
This should never be used for a CO2 laser, which has an invisble beam that could blind you or start a fire.
Frame Continuously
Frame Continuously is an option in the Device Settings window that tells your laser to repeatedly Frame the same path until you tell it to stop.
Sometimes you won't get the positioning just right on your first try, but a little nudge of your material will do the trick. Other times, you'll just want to want to double or triple check the position. In either case, Frame Continuously will be a big help.
To enable it:
- Go to Edit → Device Settings to open the Device Settings window.
- In the Basic Settings tab, toggle on the Frame Continuously setting. Click OK to apply.
- Now when you click either of the Frame buttons, a dialog window will open, letting you know that continuous Framing is active, and to press OK when you're ready to stop.
-
If it's close, but a little bit off the material, try nudging the material (if you have room) to align it to the framed area. If you don't have room, you'll need to exit the Material Test Generator window and jog your laser to a better position.
-
If it's very far off, it's likely you didn't select the correct Start From mode or Job Origin position. Revisit the Start From step, or see Coordinates and Origin.
-
After making corrections, be sure to Frame again. Repeat if necessary, until you've got everything lined up properly.
Running the Job
- Press the Start button in the Laser Window to tell your laser to begin running your project.
- If all goes well, you'll have a new coaster in a few minutes.
- Go and make more stuff!
Note
If the result isn't what you were expecting, revisit previous steps to make sure you followed them all, visit our Troubleshooting section, join our forum to look for advice, or email us at [email protected].

For more help using LightBurn, please visit our forum to talk with LightBurn staff and users, or email support.